DSCI 100 Course Project: Set Up
Project assignment details are on Canvas
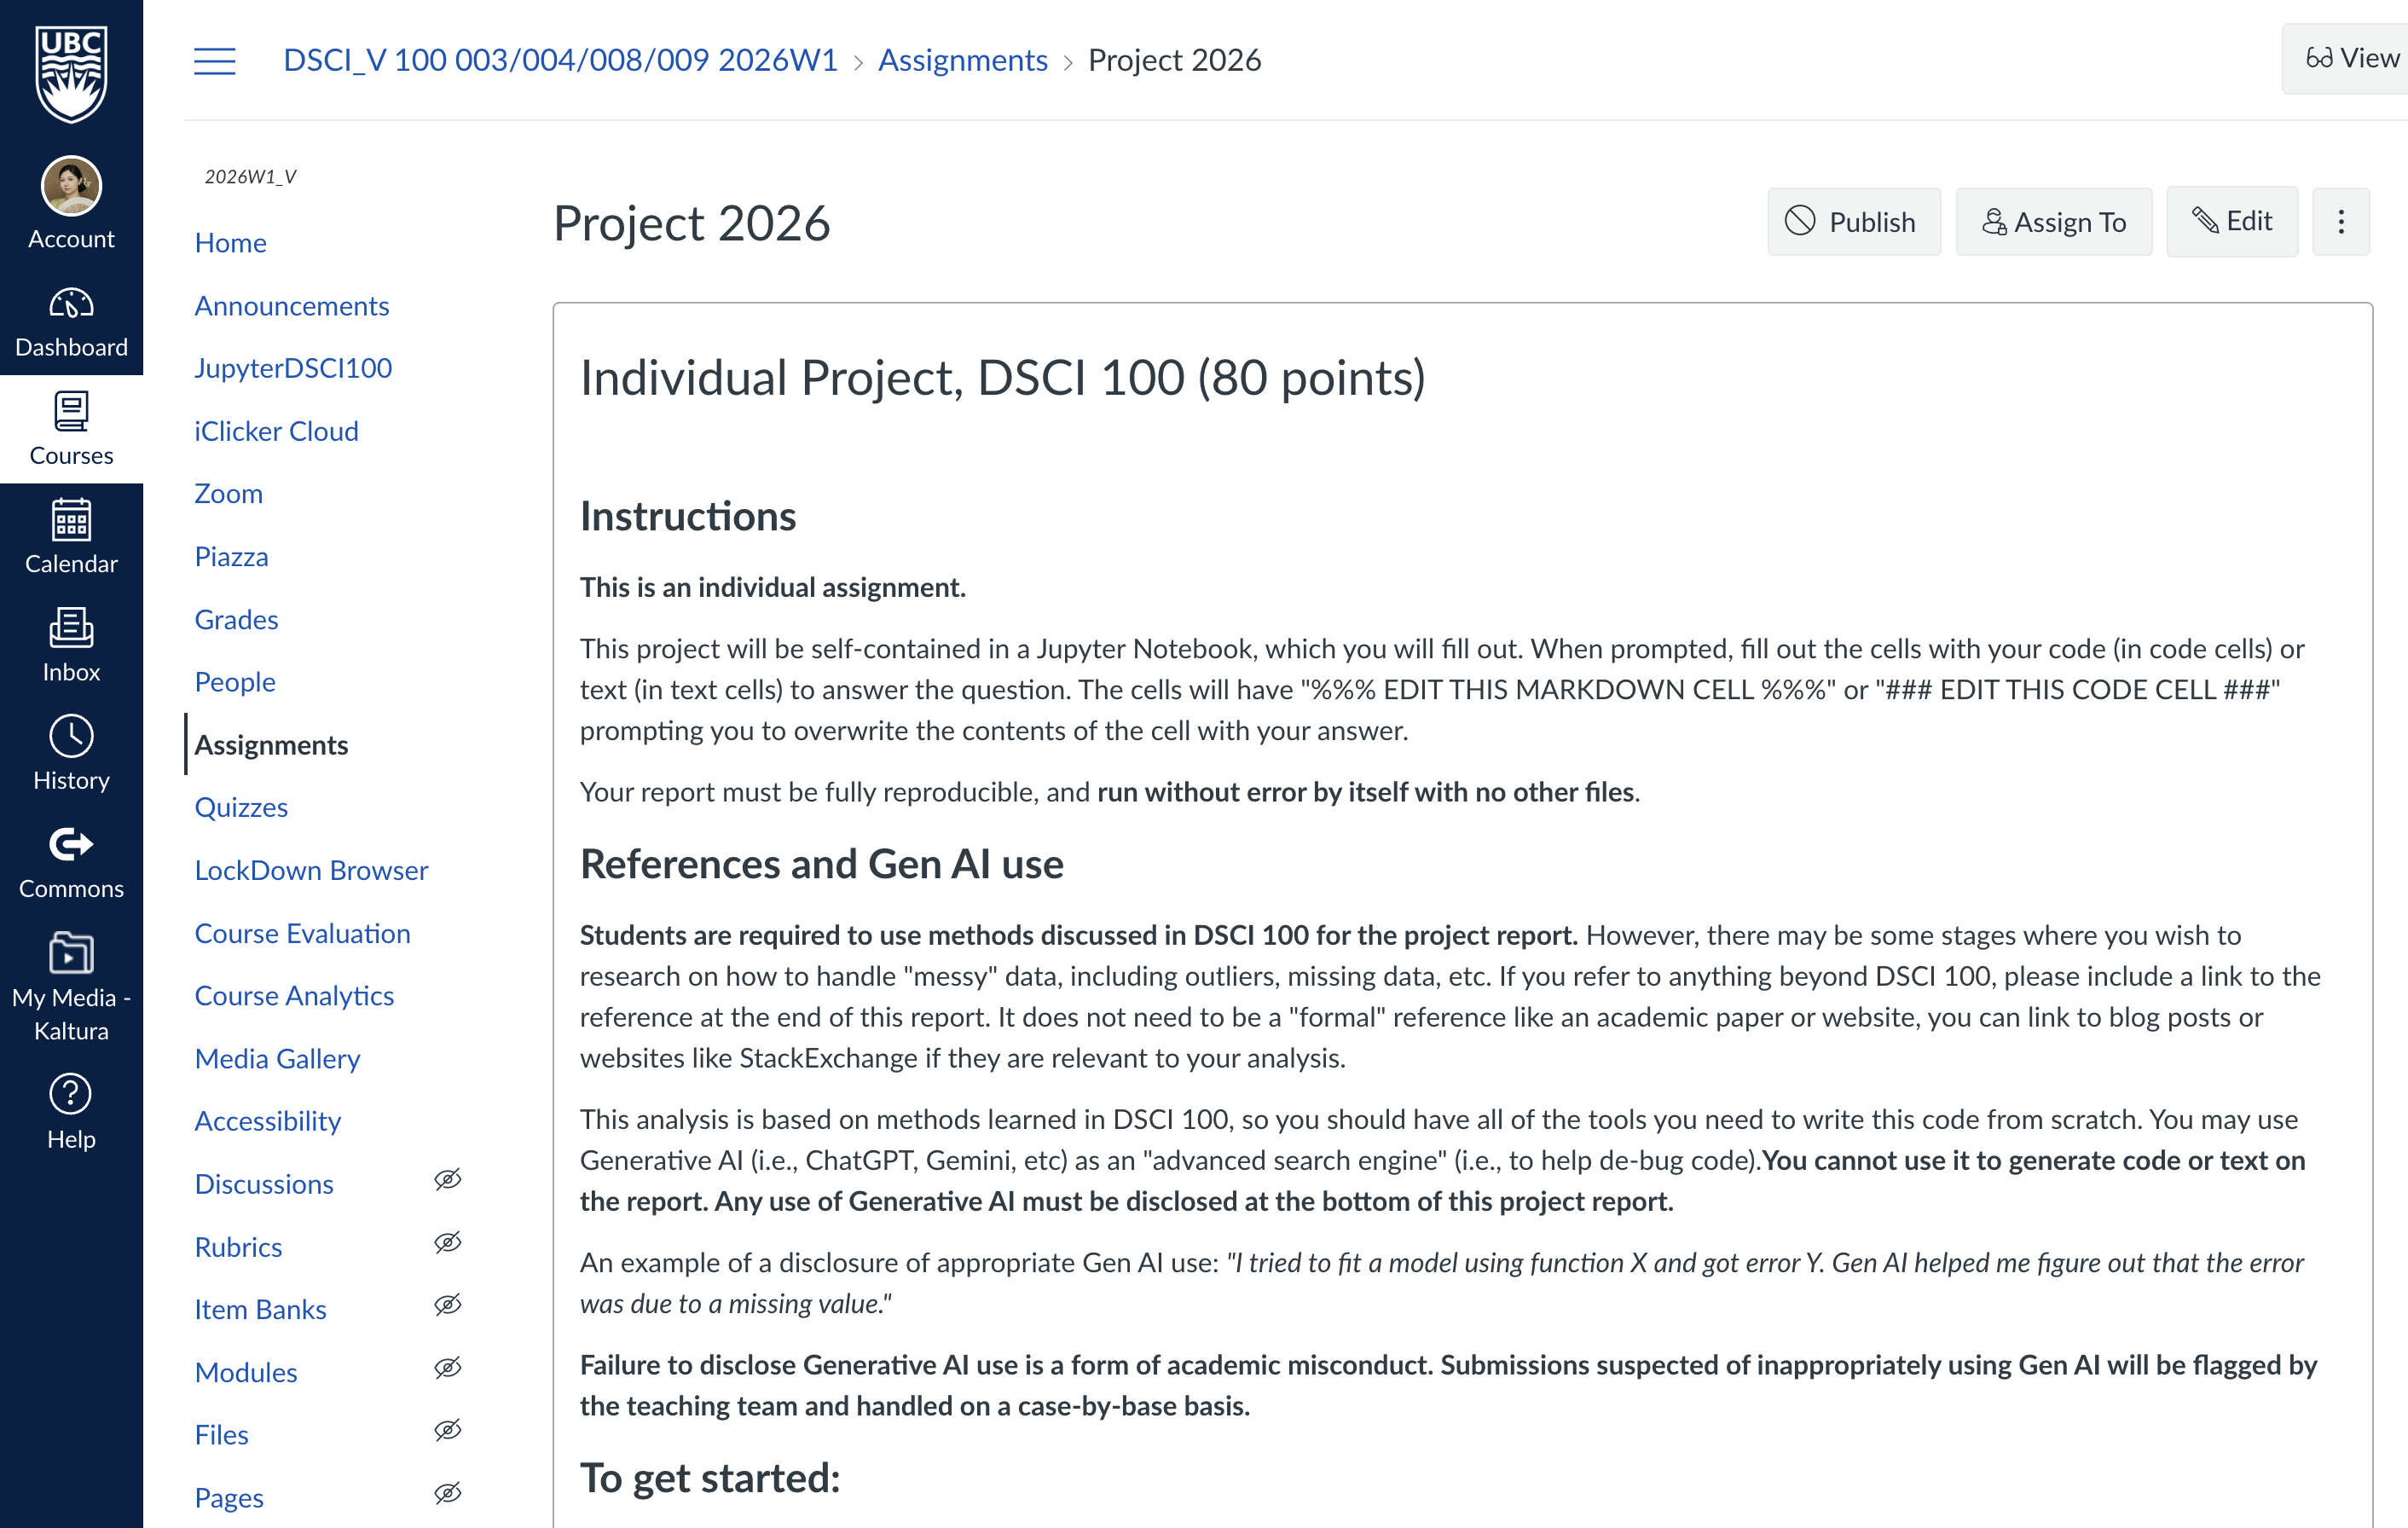
📋 Step 1: Use the template
Open the project template. Click Use this template, then Create a new repository.
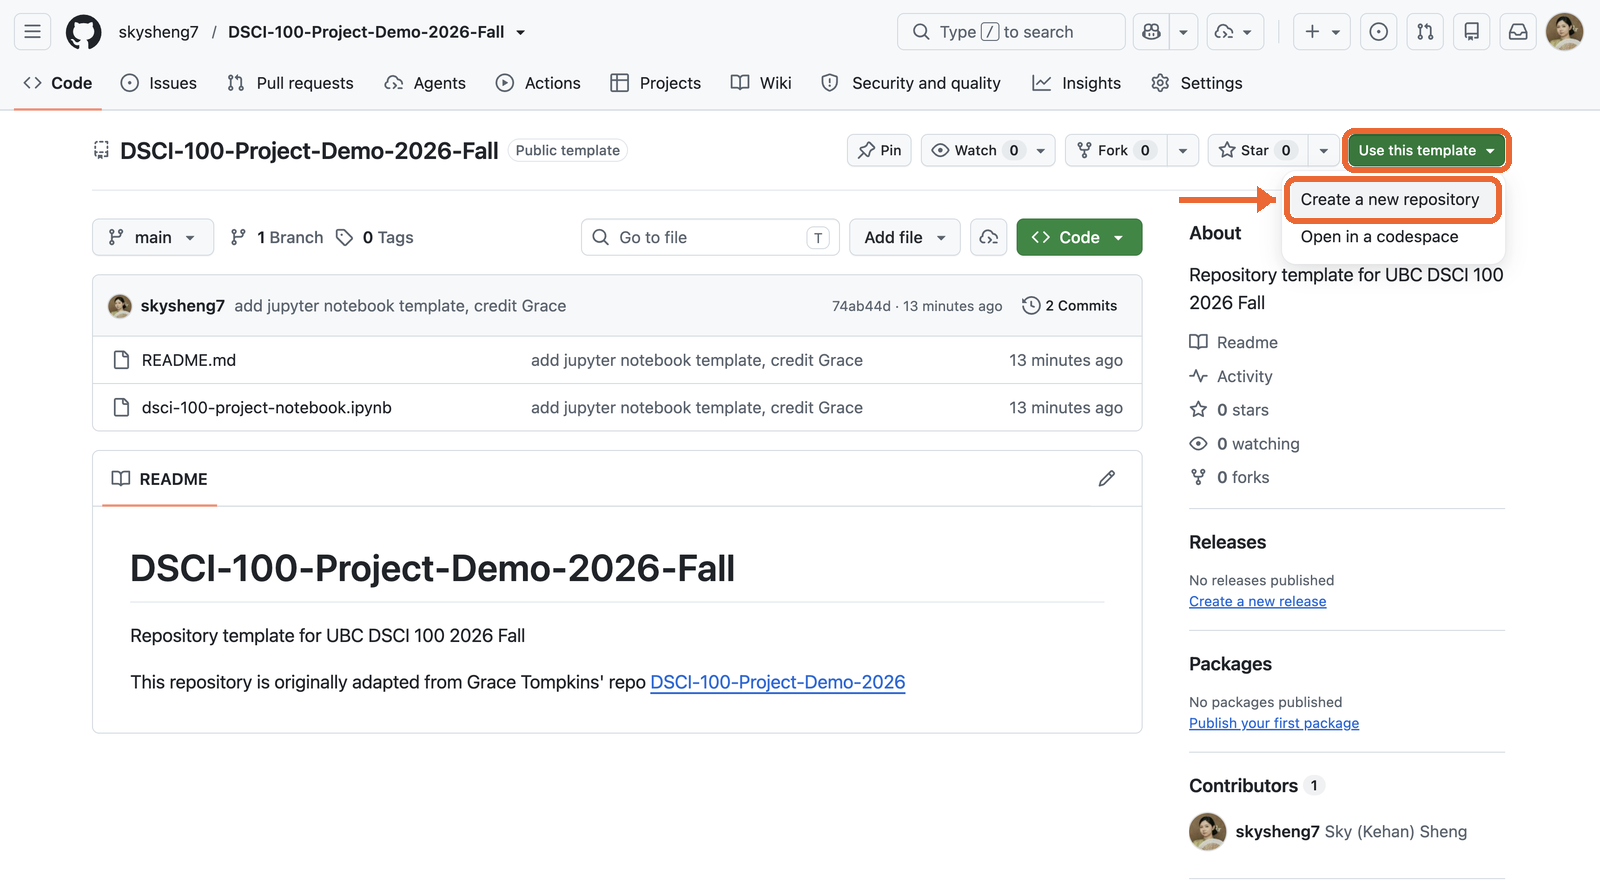
📋 Step 2: Name it and keep it public
Name it dsci-100-project- plus your first and last name, e.g. dsci-100-project-sky-sheng. Leave it Public. Click Create repository.
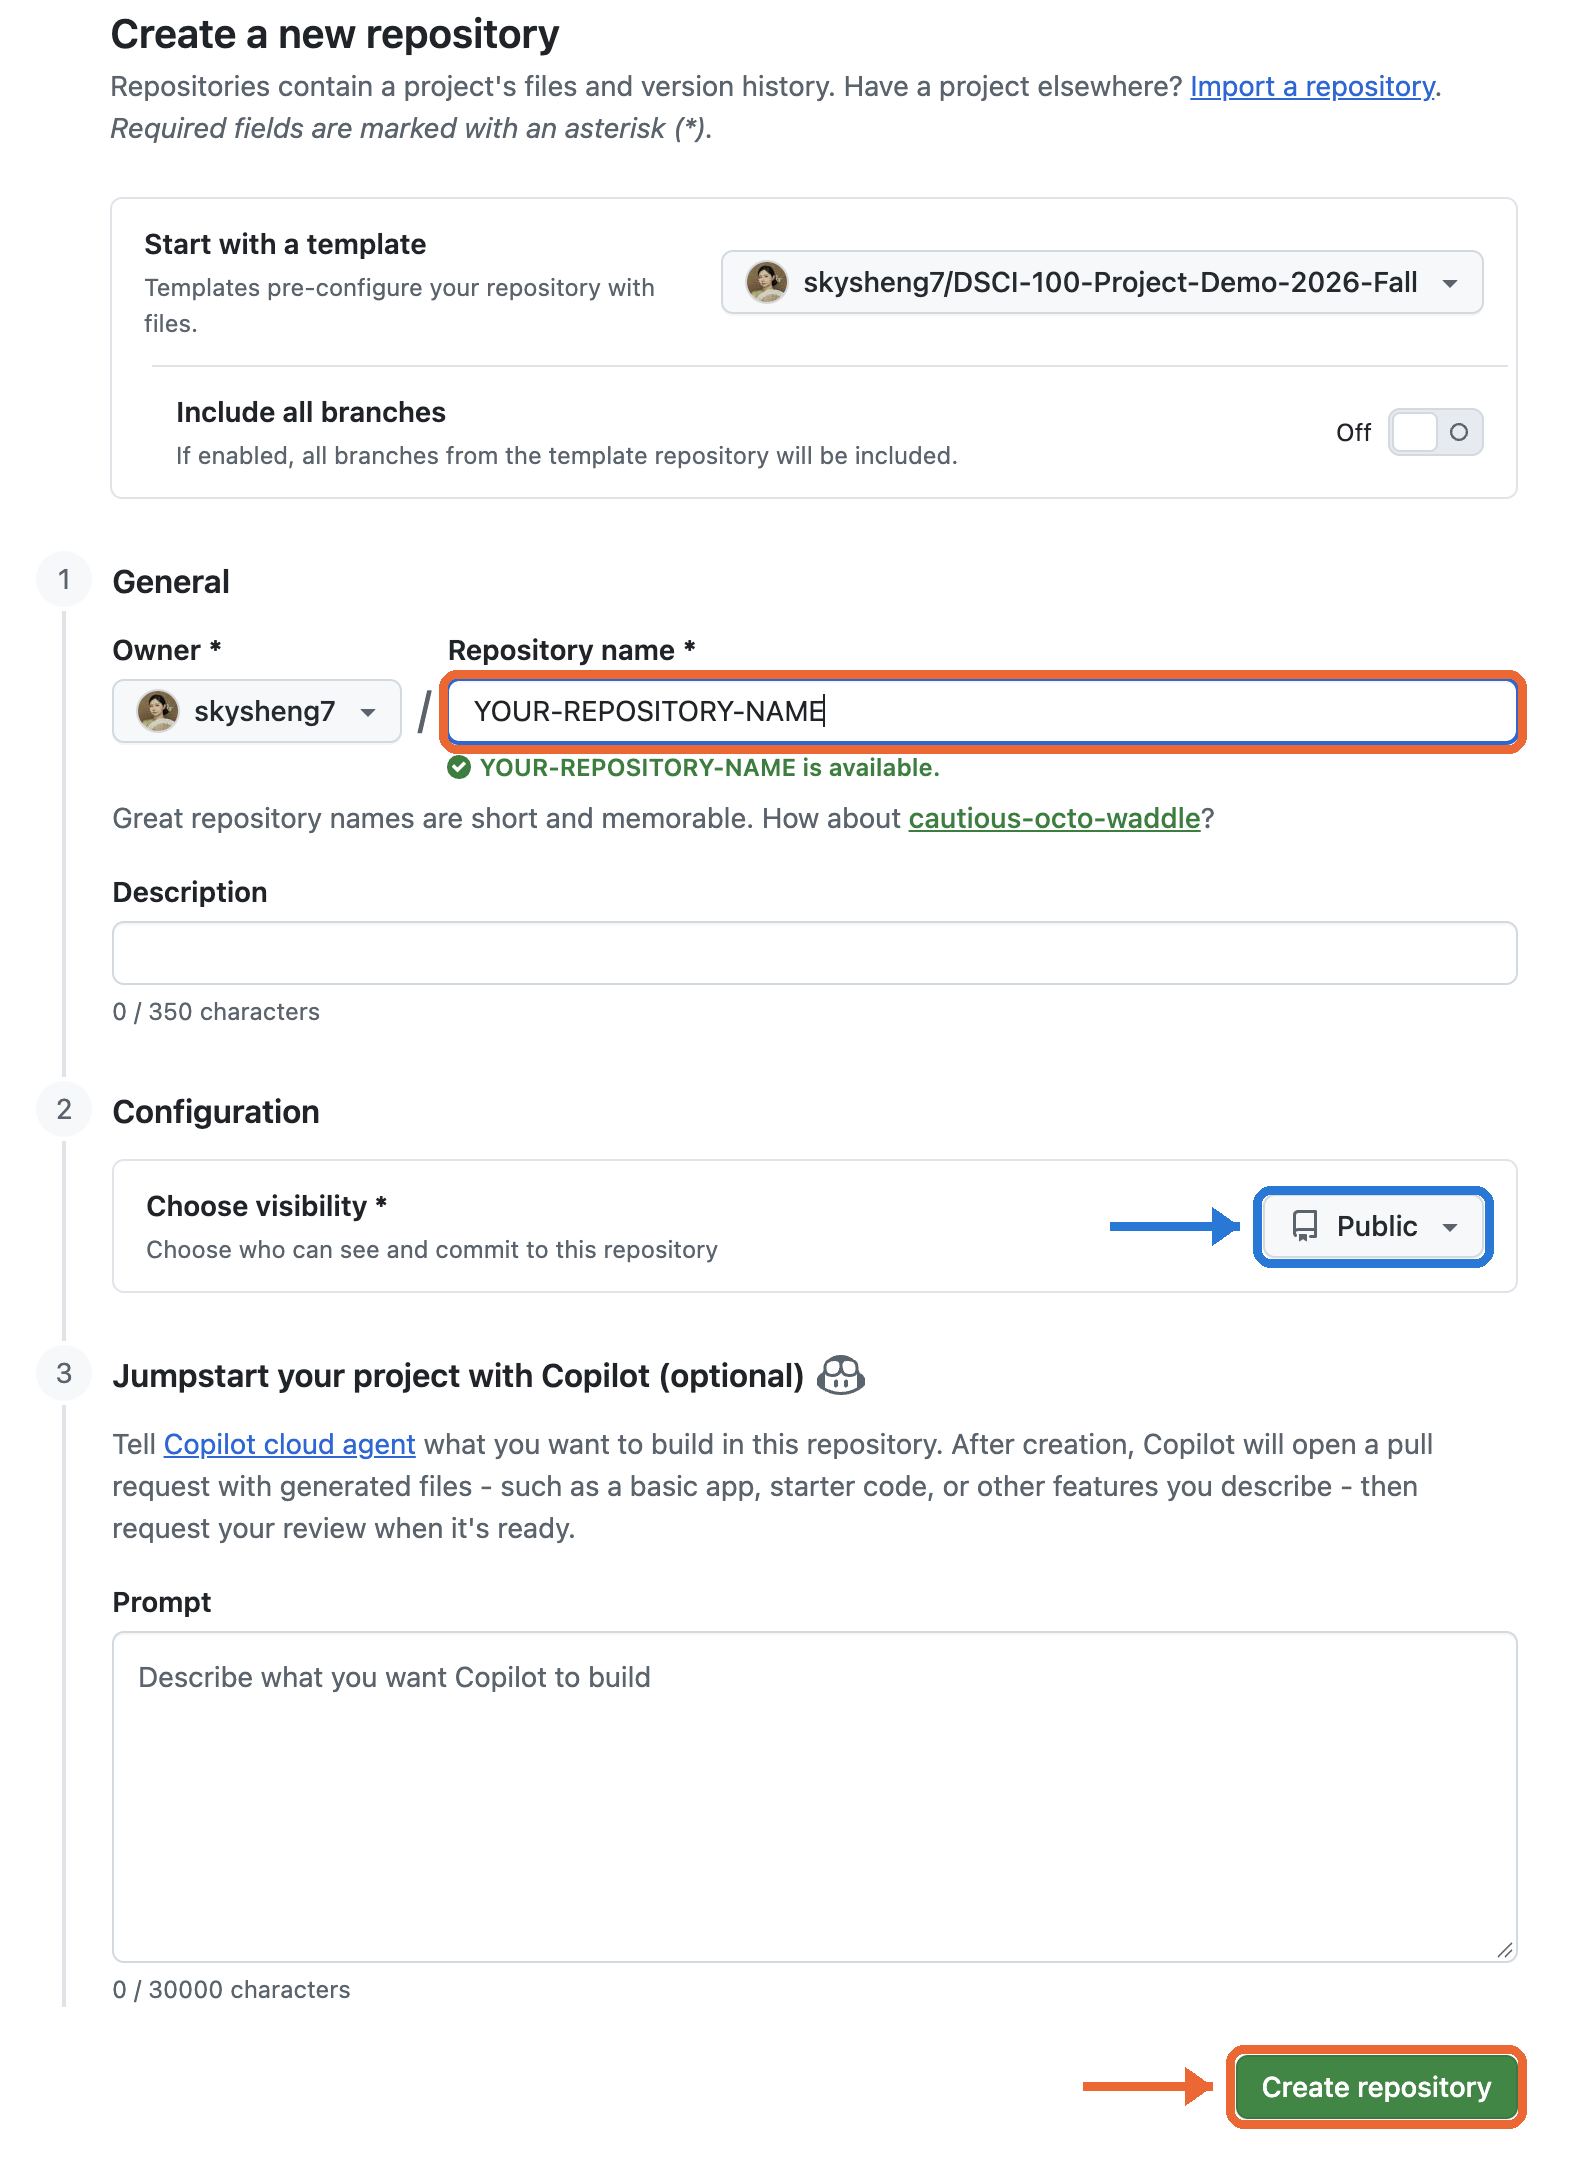
📋 Step 3: Copy your repository’s address
Click the green Code button. Under HTTPS, click the copy icon. You need this address three times: to clone, in your notebook, and on Canvas.
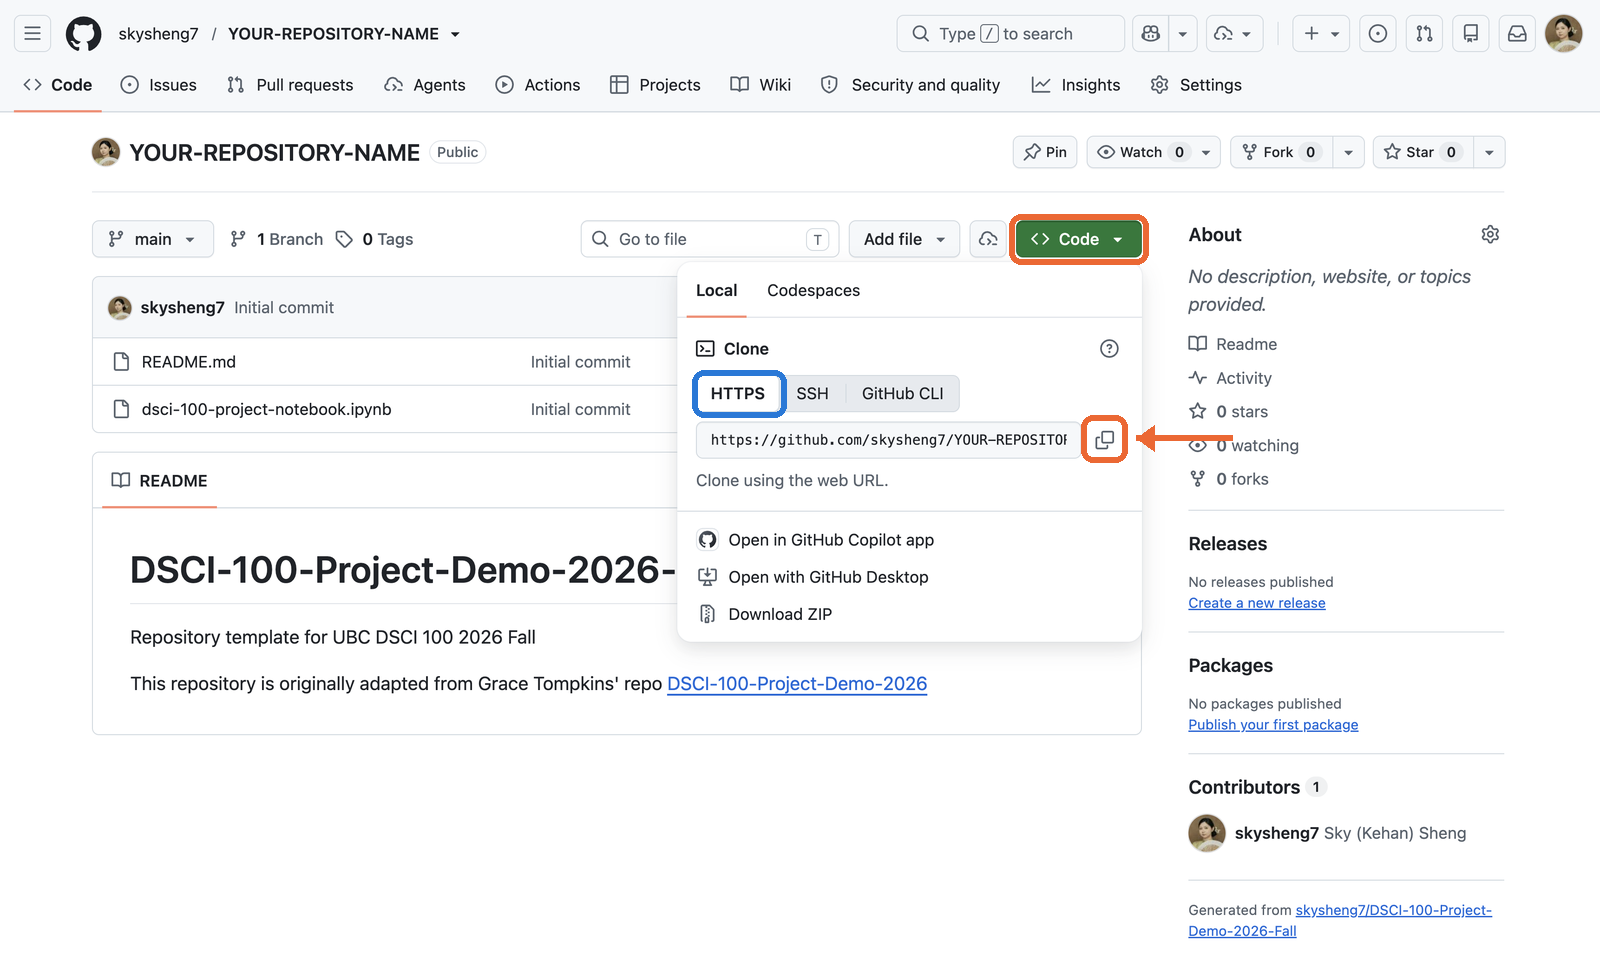
📋 Step 4: Open JupyterHub from Canvas
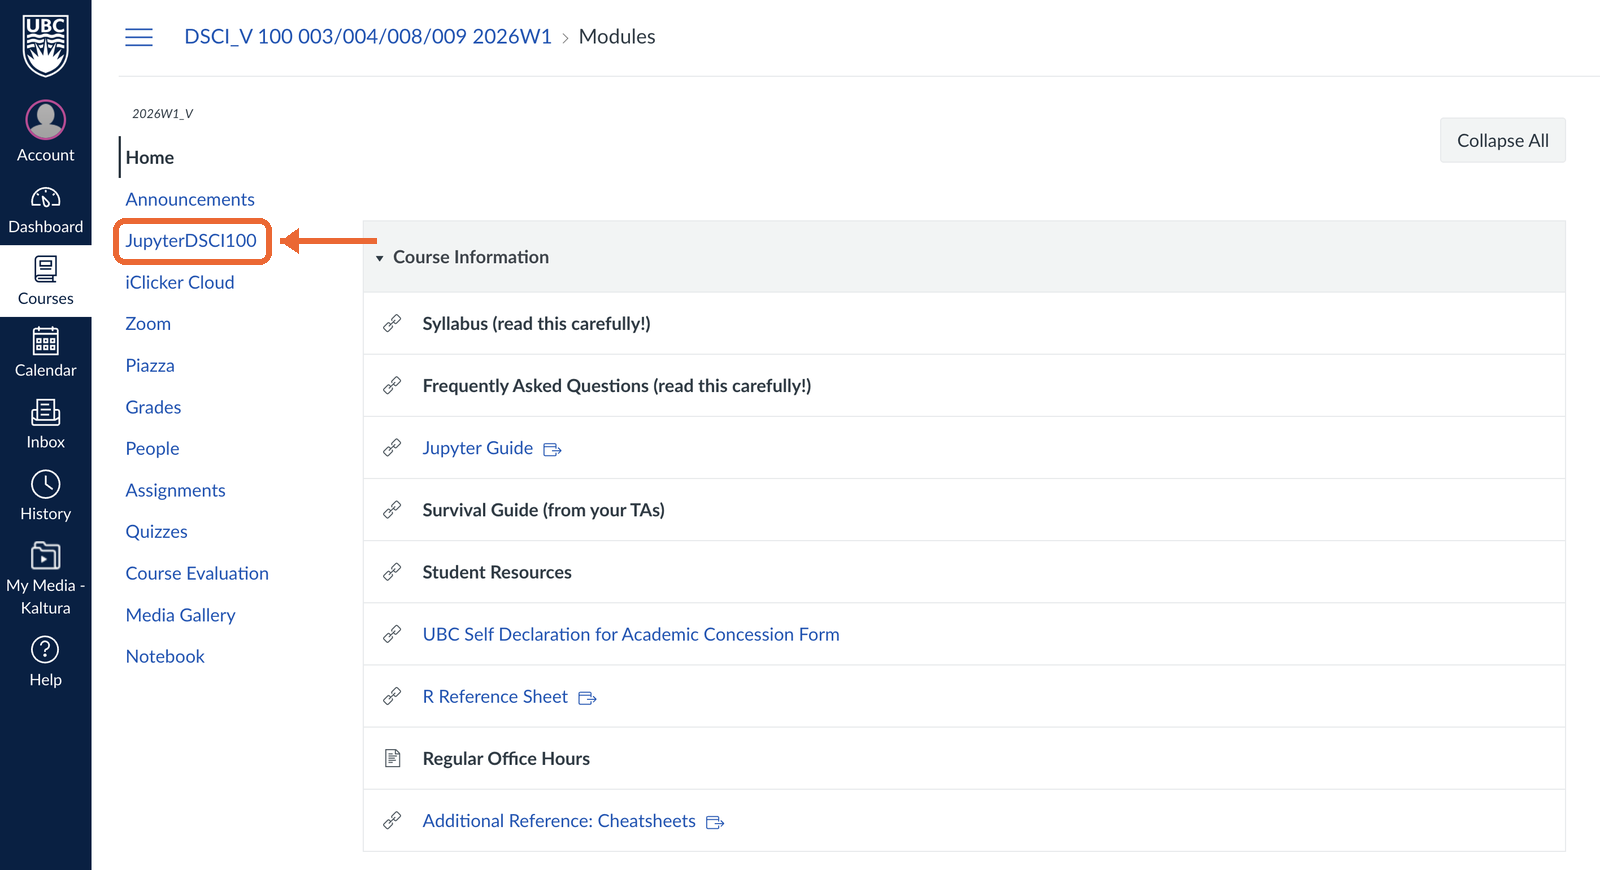
On Canvas, click JupyterDSCI100 in the menu on the left.
📋 Step 5: Start your server
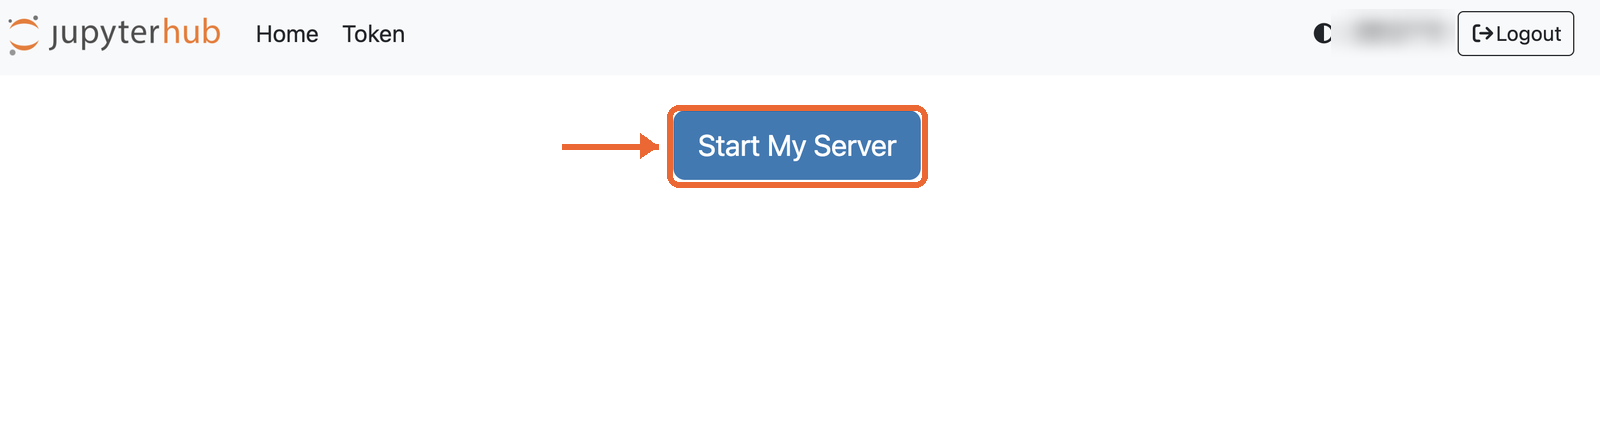
Click Start My Server. It can take a minute.
📋 Step 6: Stay in the top folder
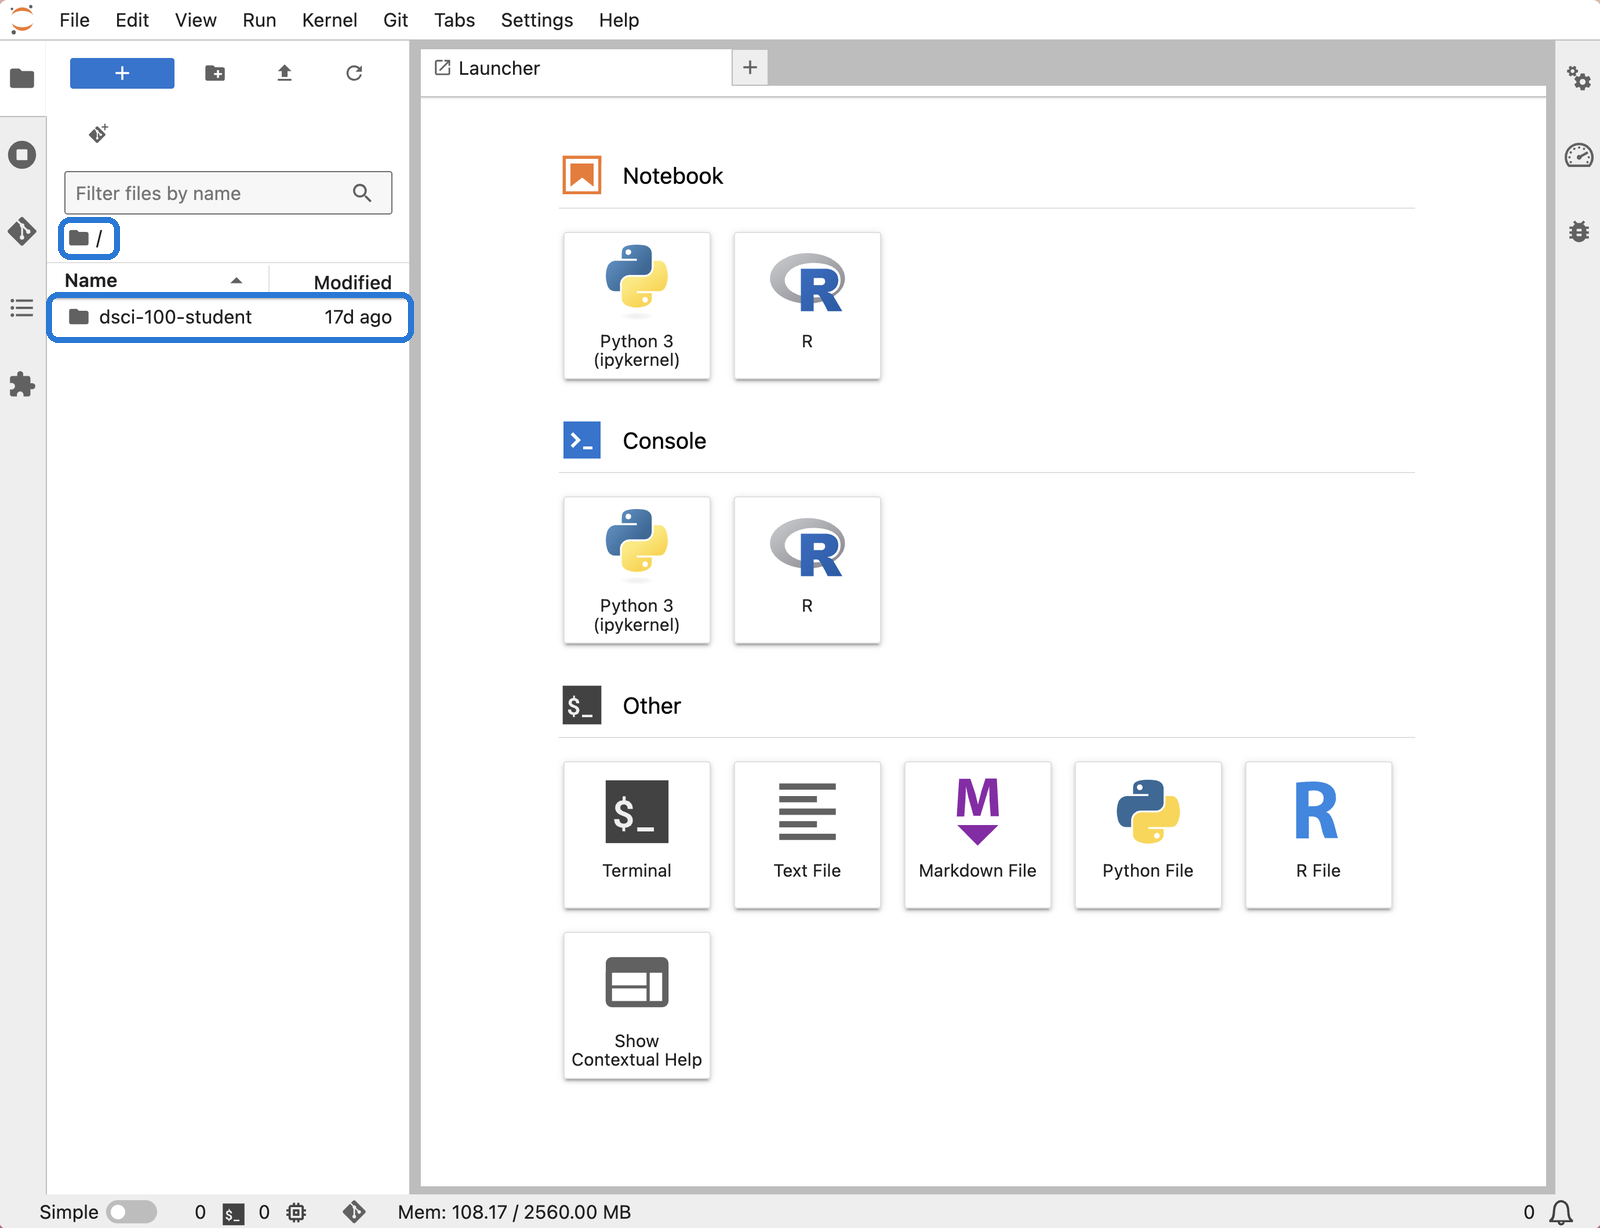
You should see / at the top and the dsci-100-student folder below it. Stay here. Don’t open dsci-100-student.
📋 Step 7: Open the Git tab
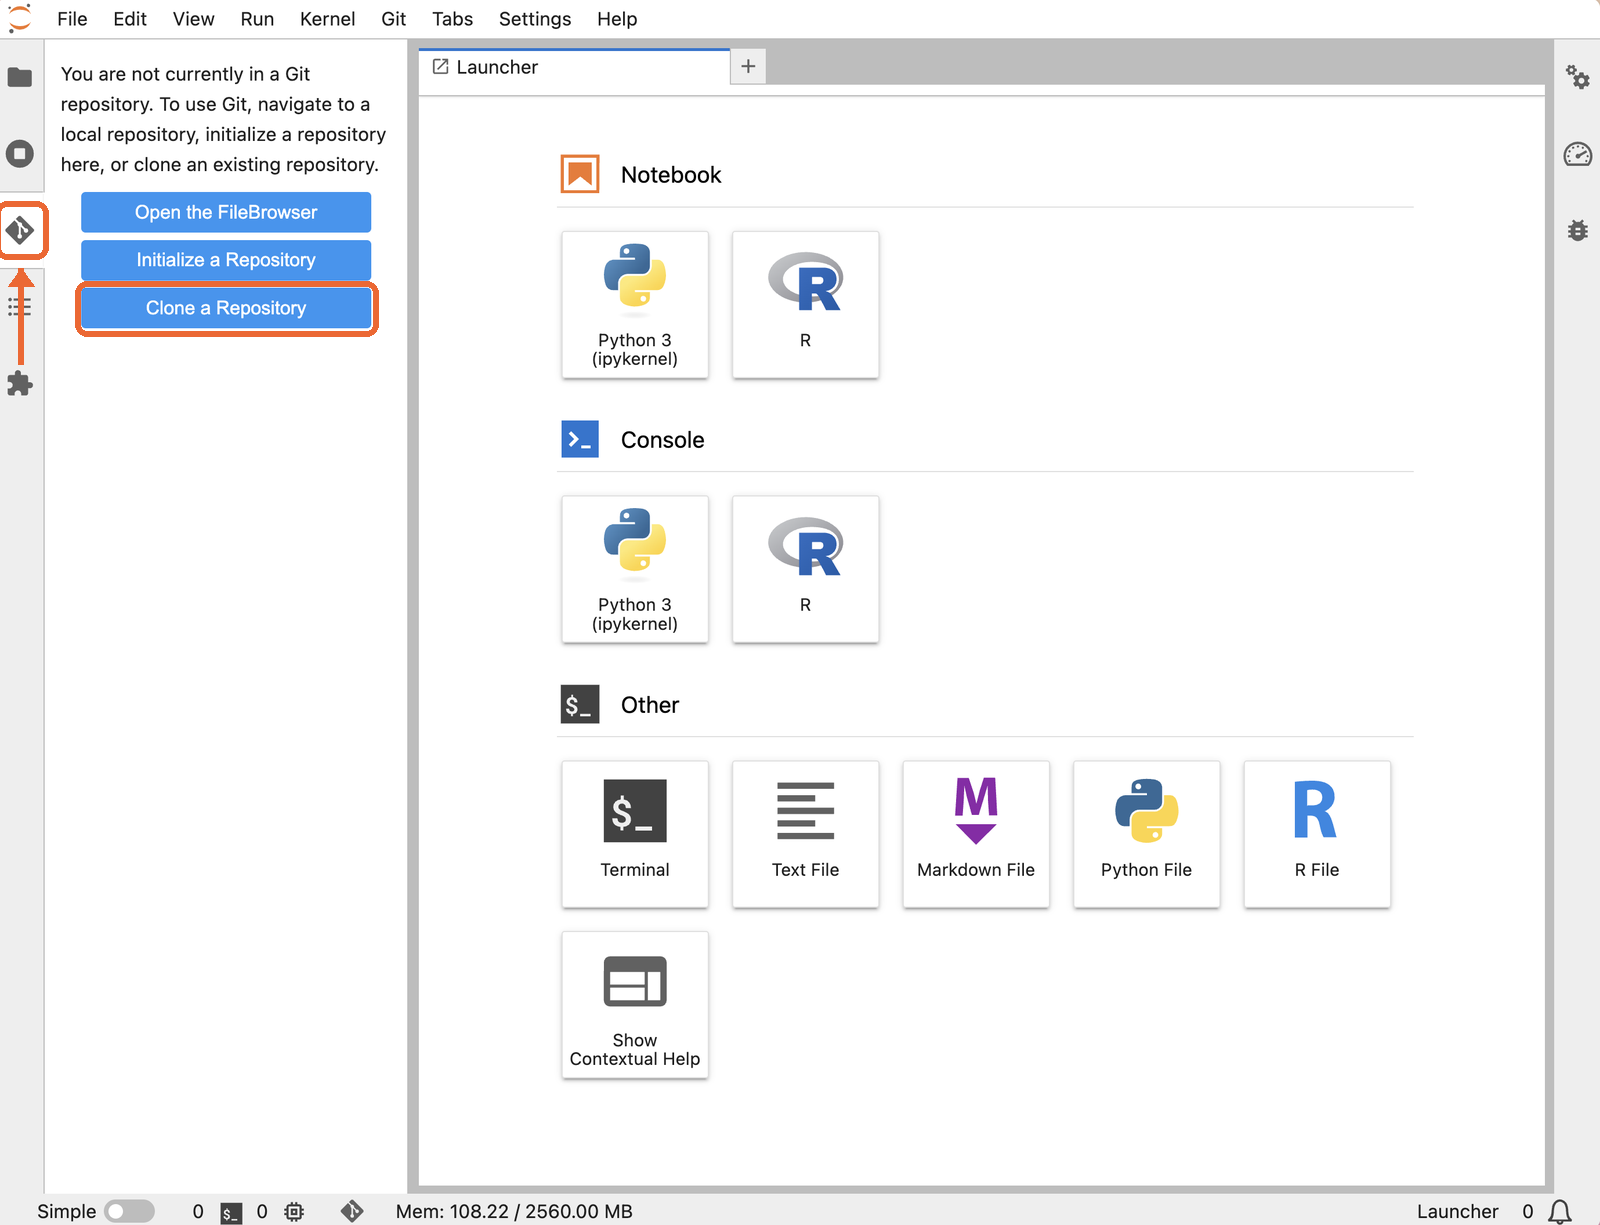
Click the Git icon (the diamond) on the far left, then Clone a Repository.
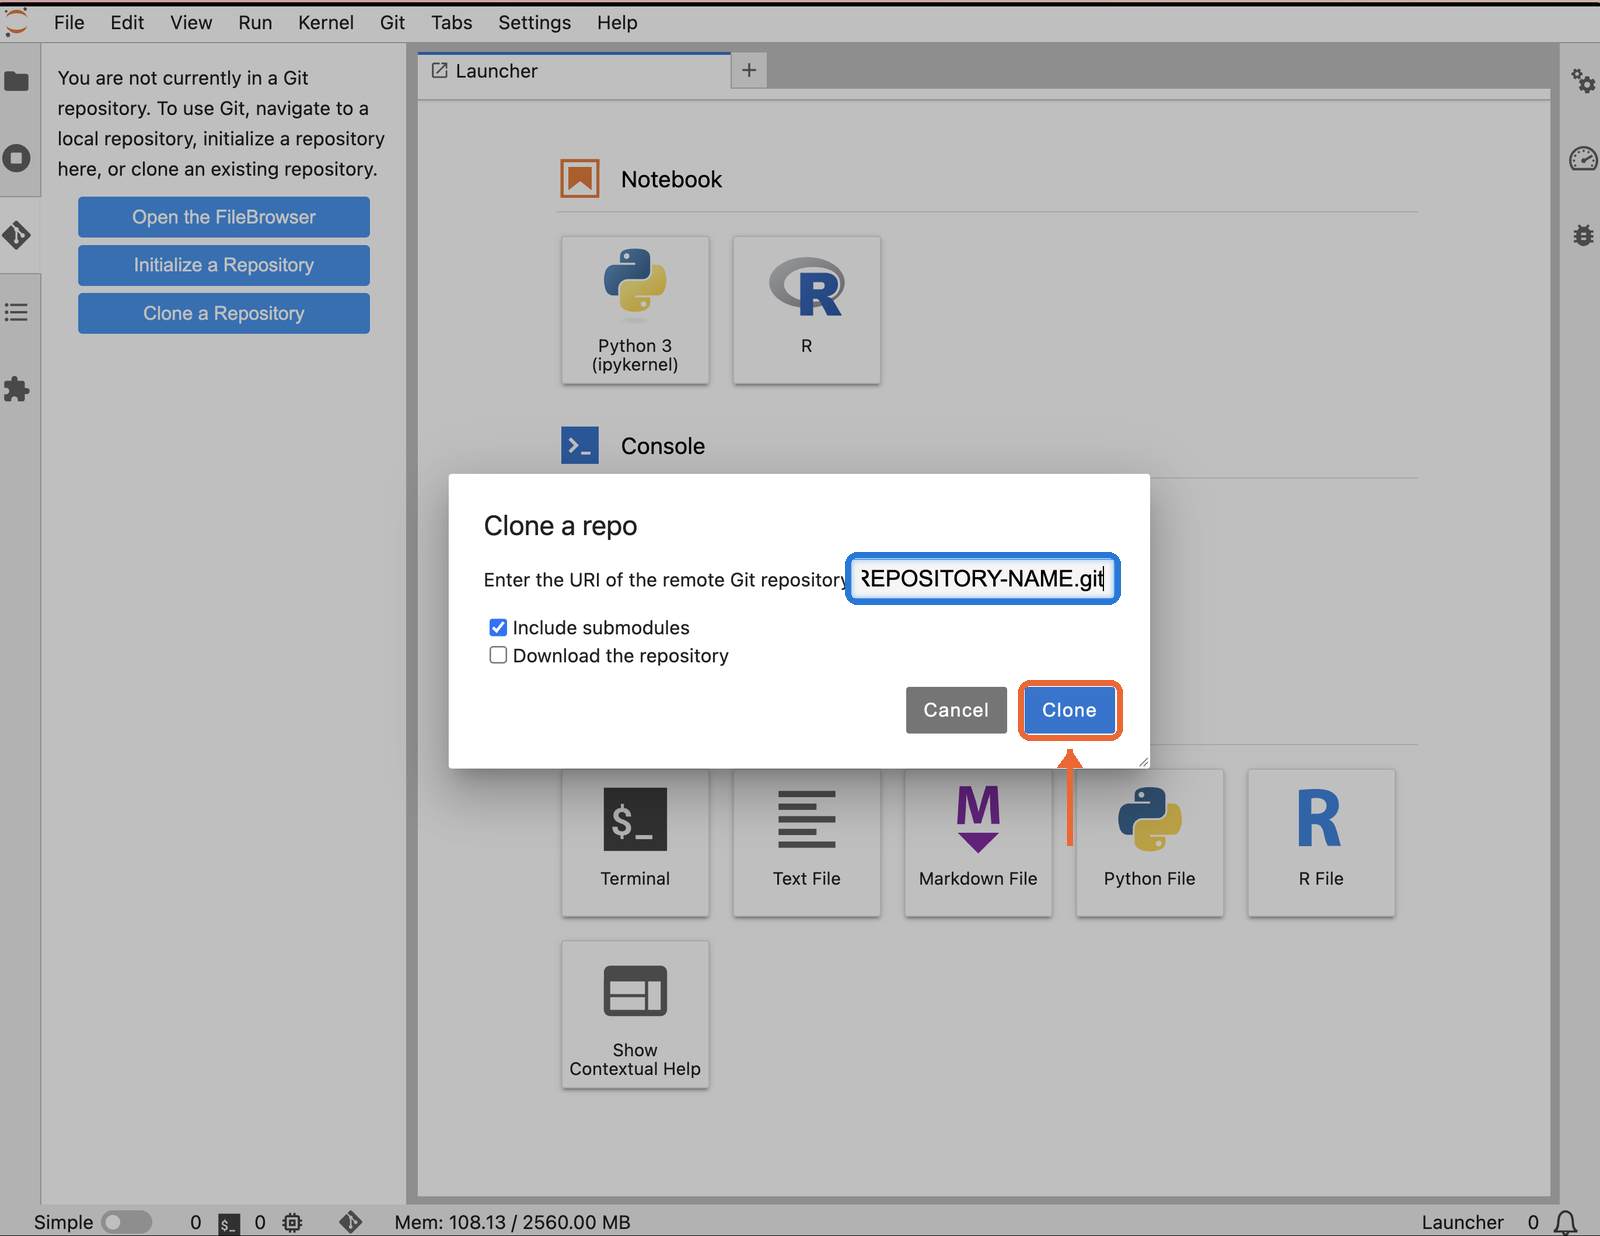
📋 Step 8: Paste your address and clone
Paste the HTTPS address from step 3. Leave both boxes as they are. Click Clone.
📋 Step 9: Your repository is here
You see Successfully cloned, and a folder with your repository’s name appears on the left.
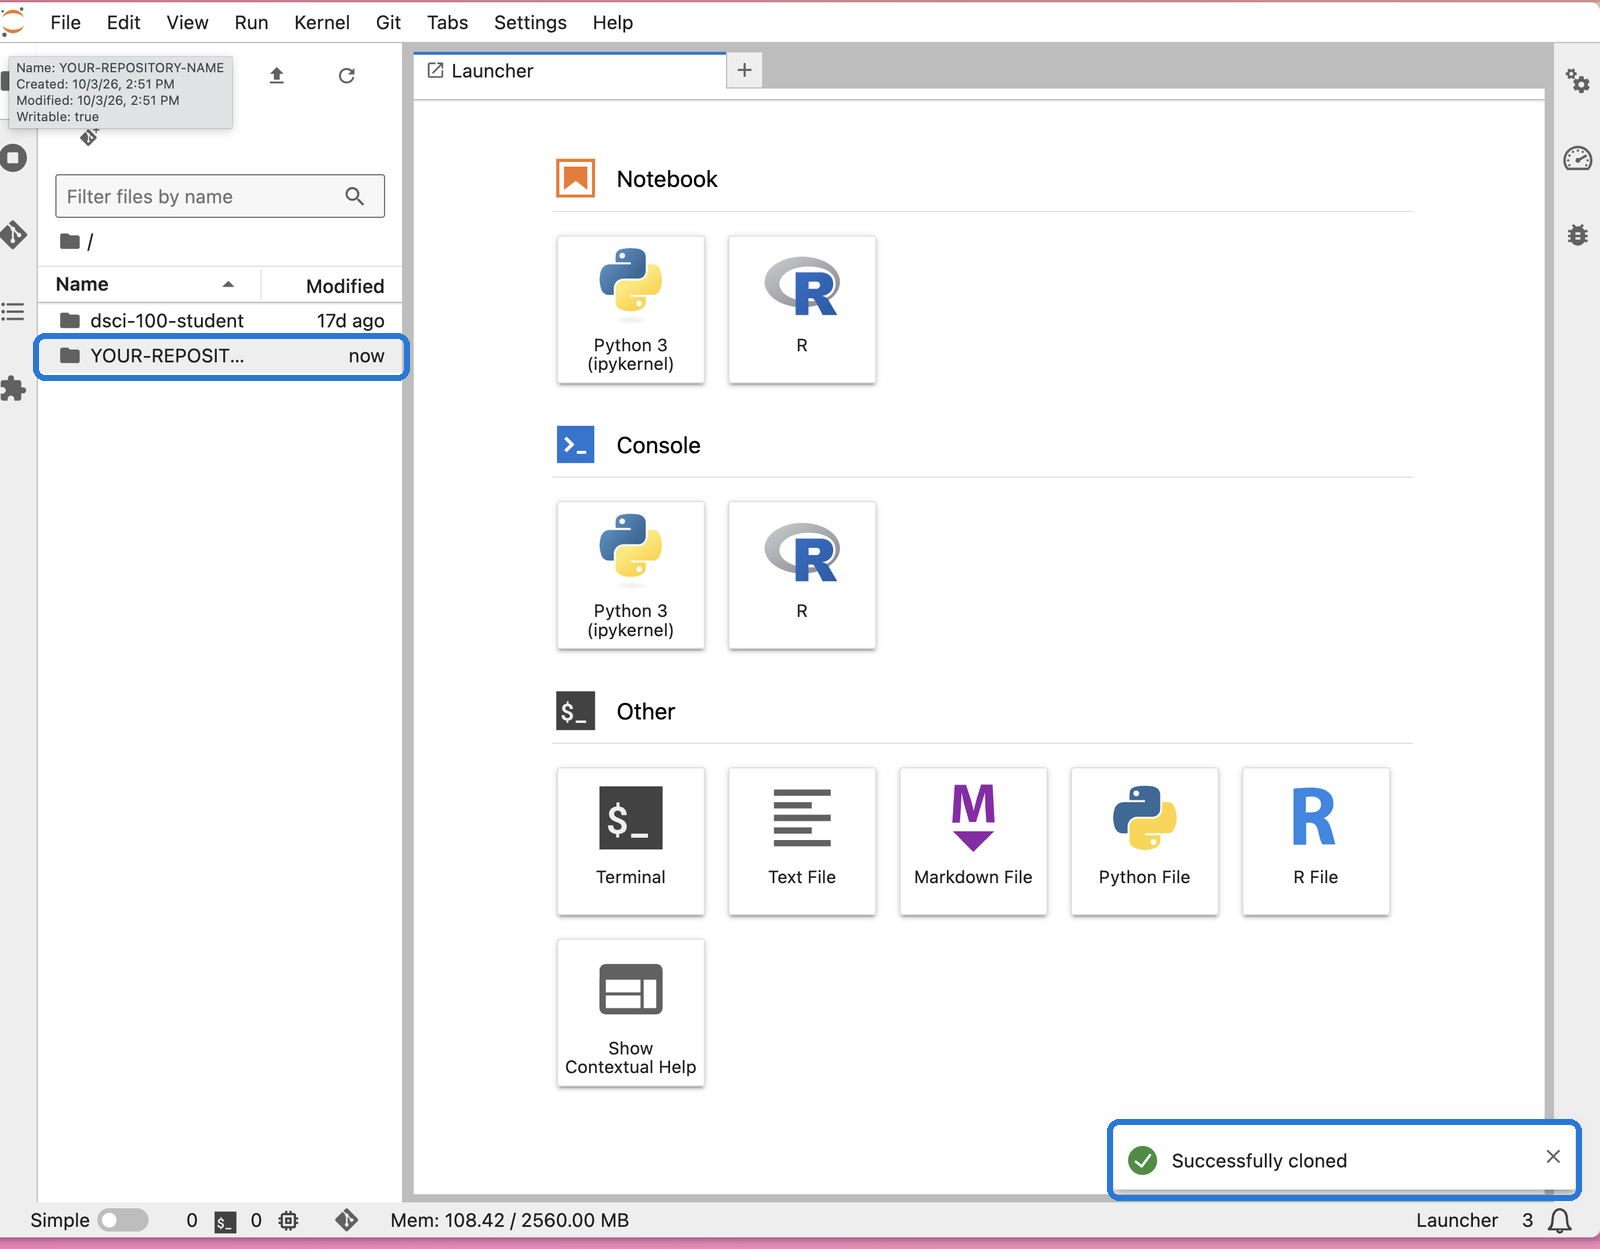
📋 Step 10: Open your notebook
Double click your repository’s folder, then double click dsci-100-project-notebook.ipynb.
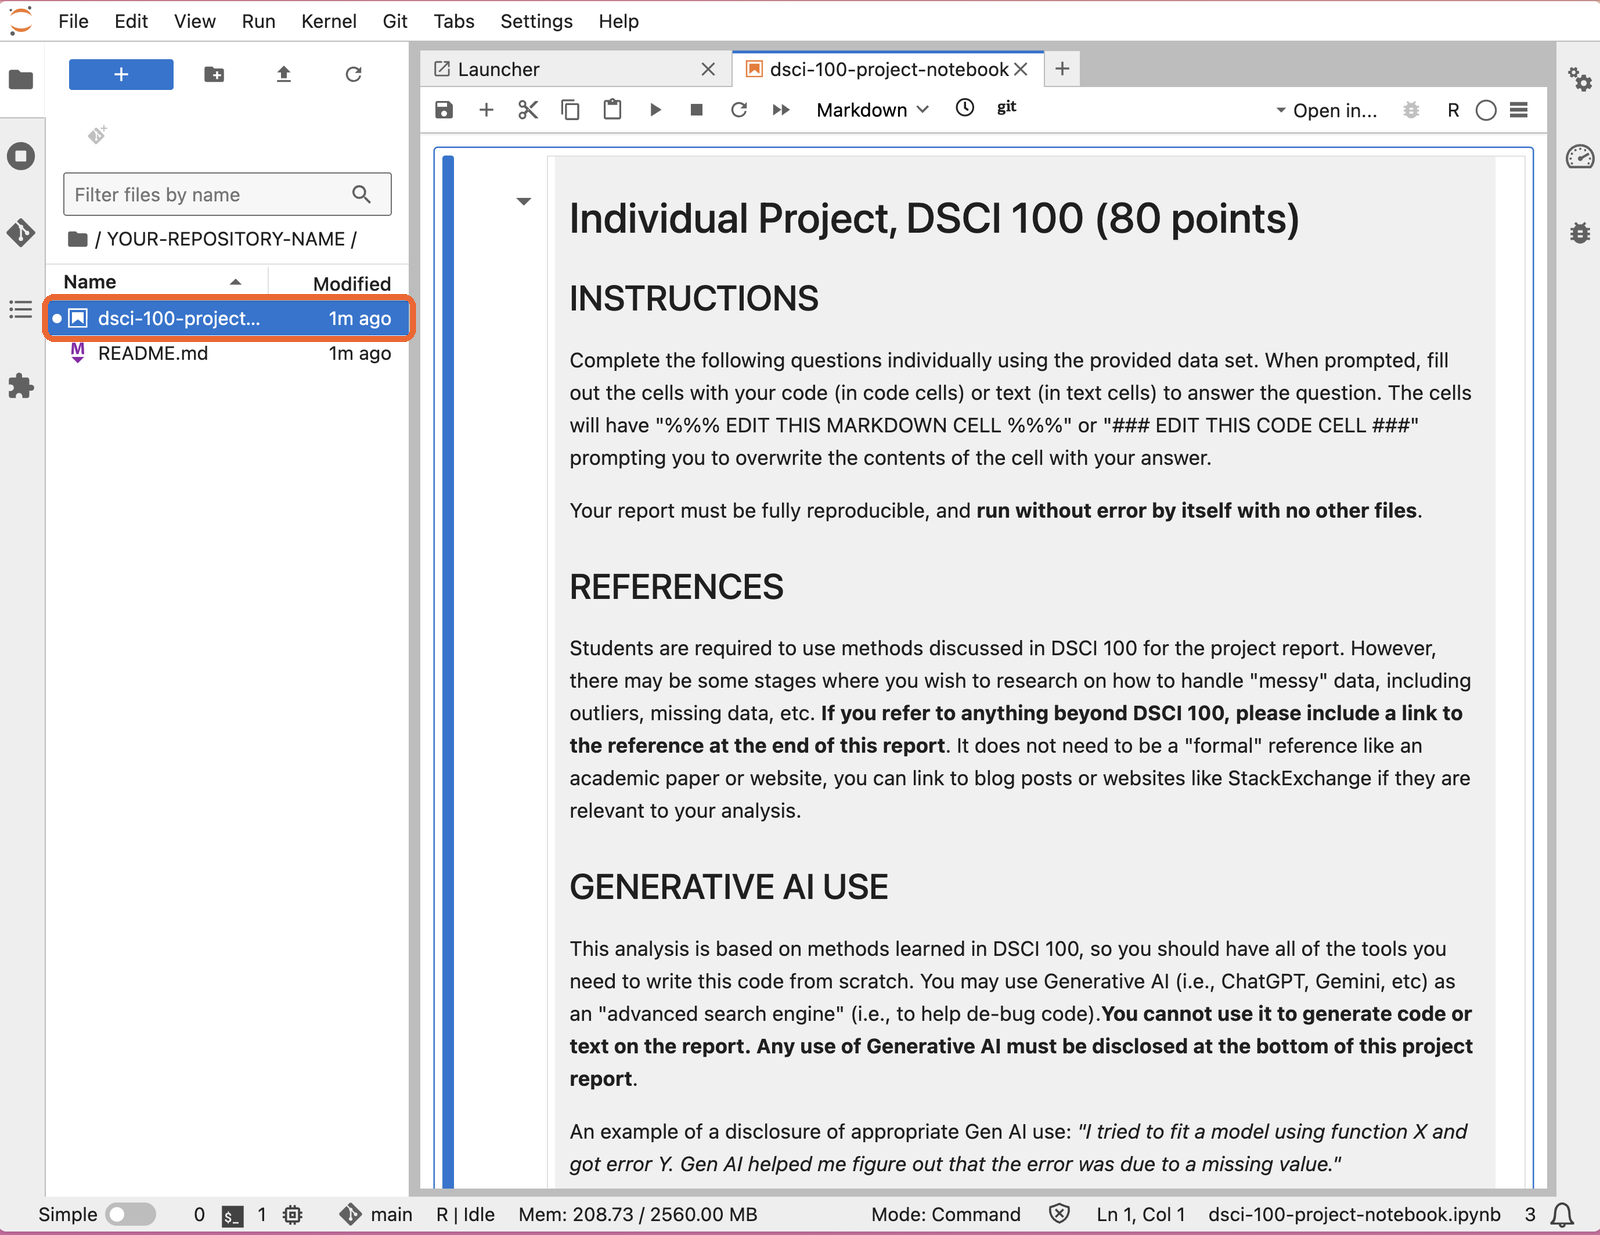
📋 Step 11: Edit the name cell
Scroll to Part 0. Double click the cell with First and Last Name to edit it.
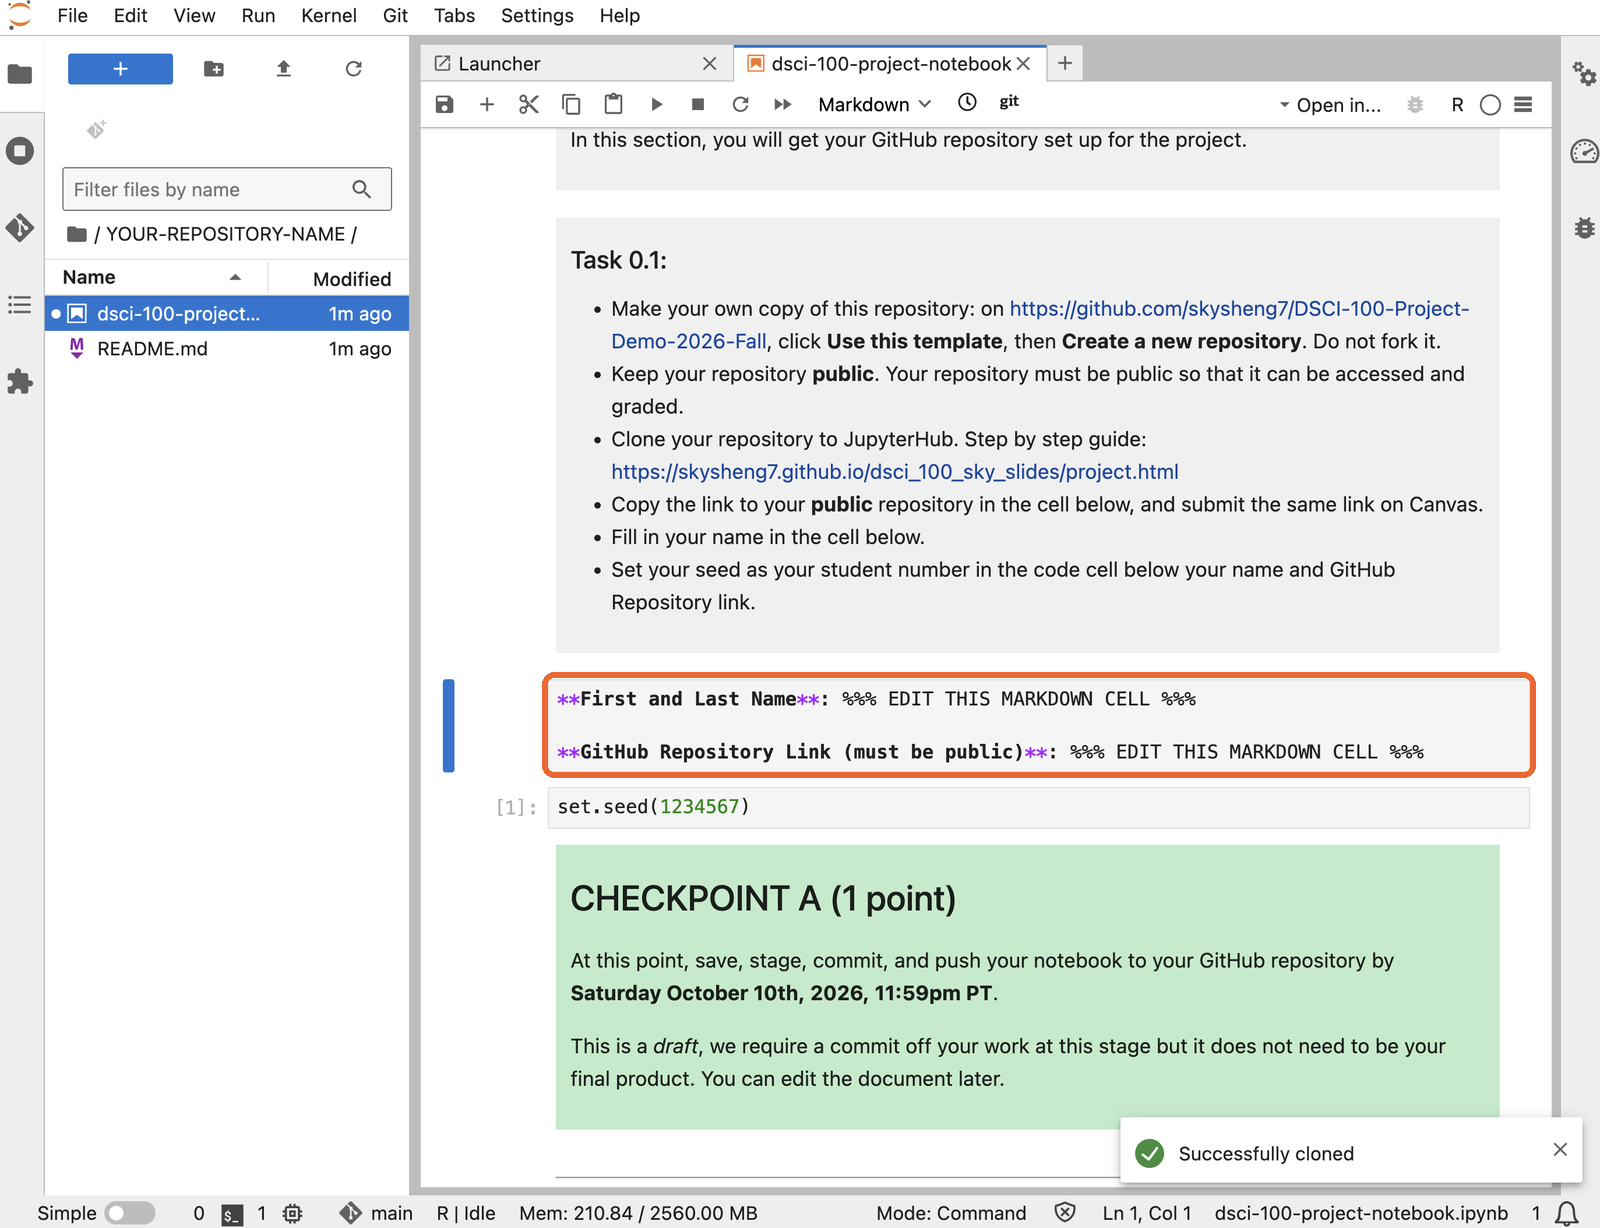
📋 Step 12: Name, link and seed
Fill in your name and your repository’s HTTPS address from step 3. Change the seed to your student number. Run both cells, then save.
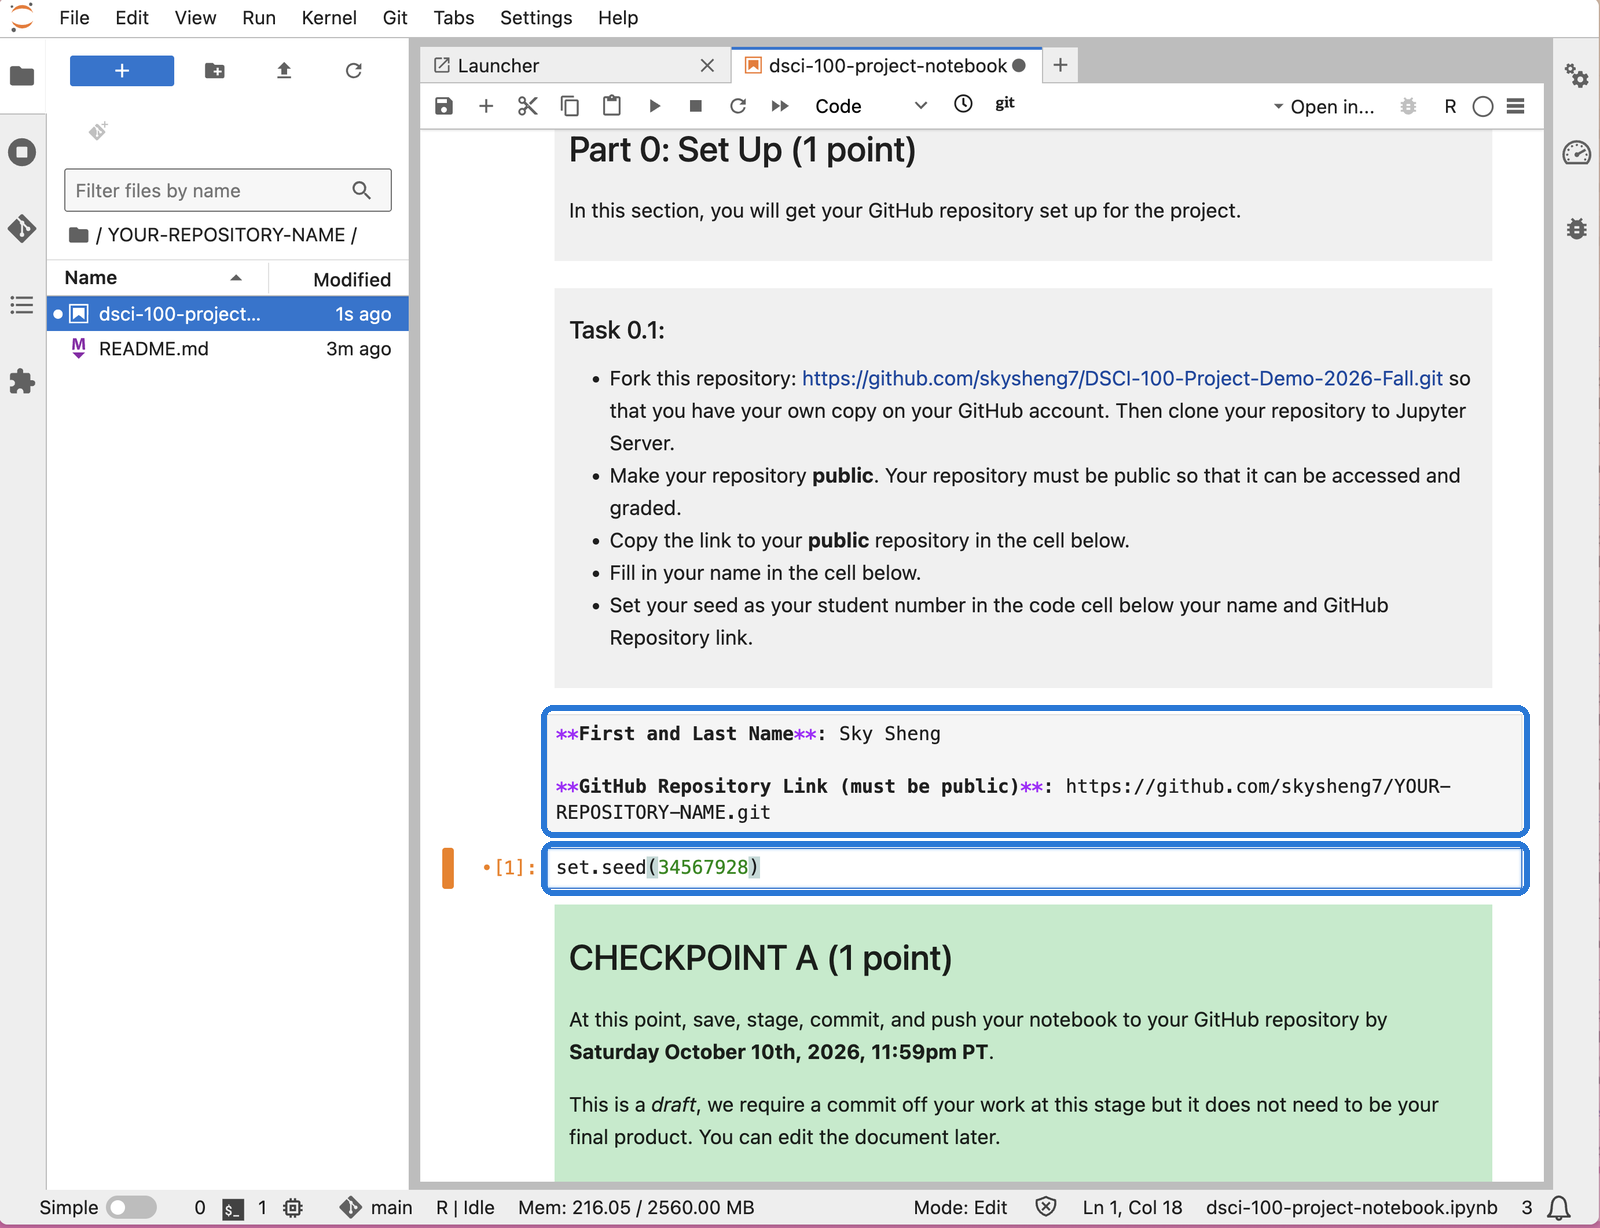
⚠️ Save with Cmd+S (Mac) or Ctrl+S (Windows). Git only sees what is saved.
📋 Step 13: Choose what goes in the snapshot
Click the Git icon again. Hover over your notebook under Changed and click its +.
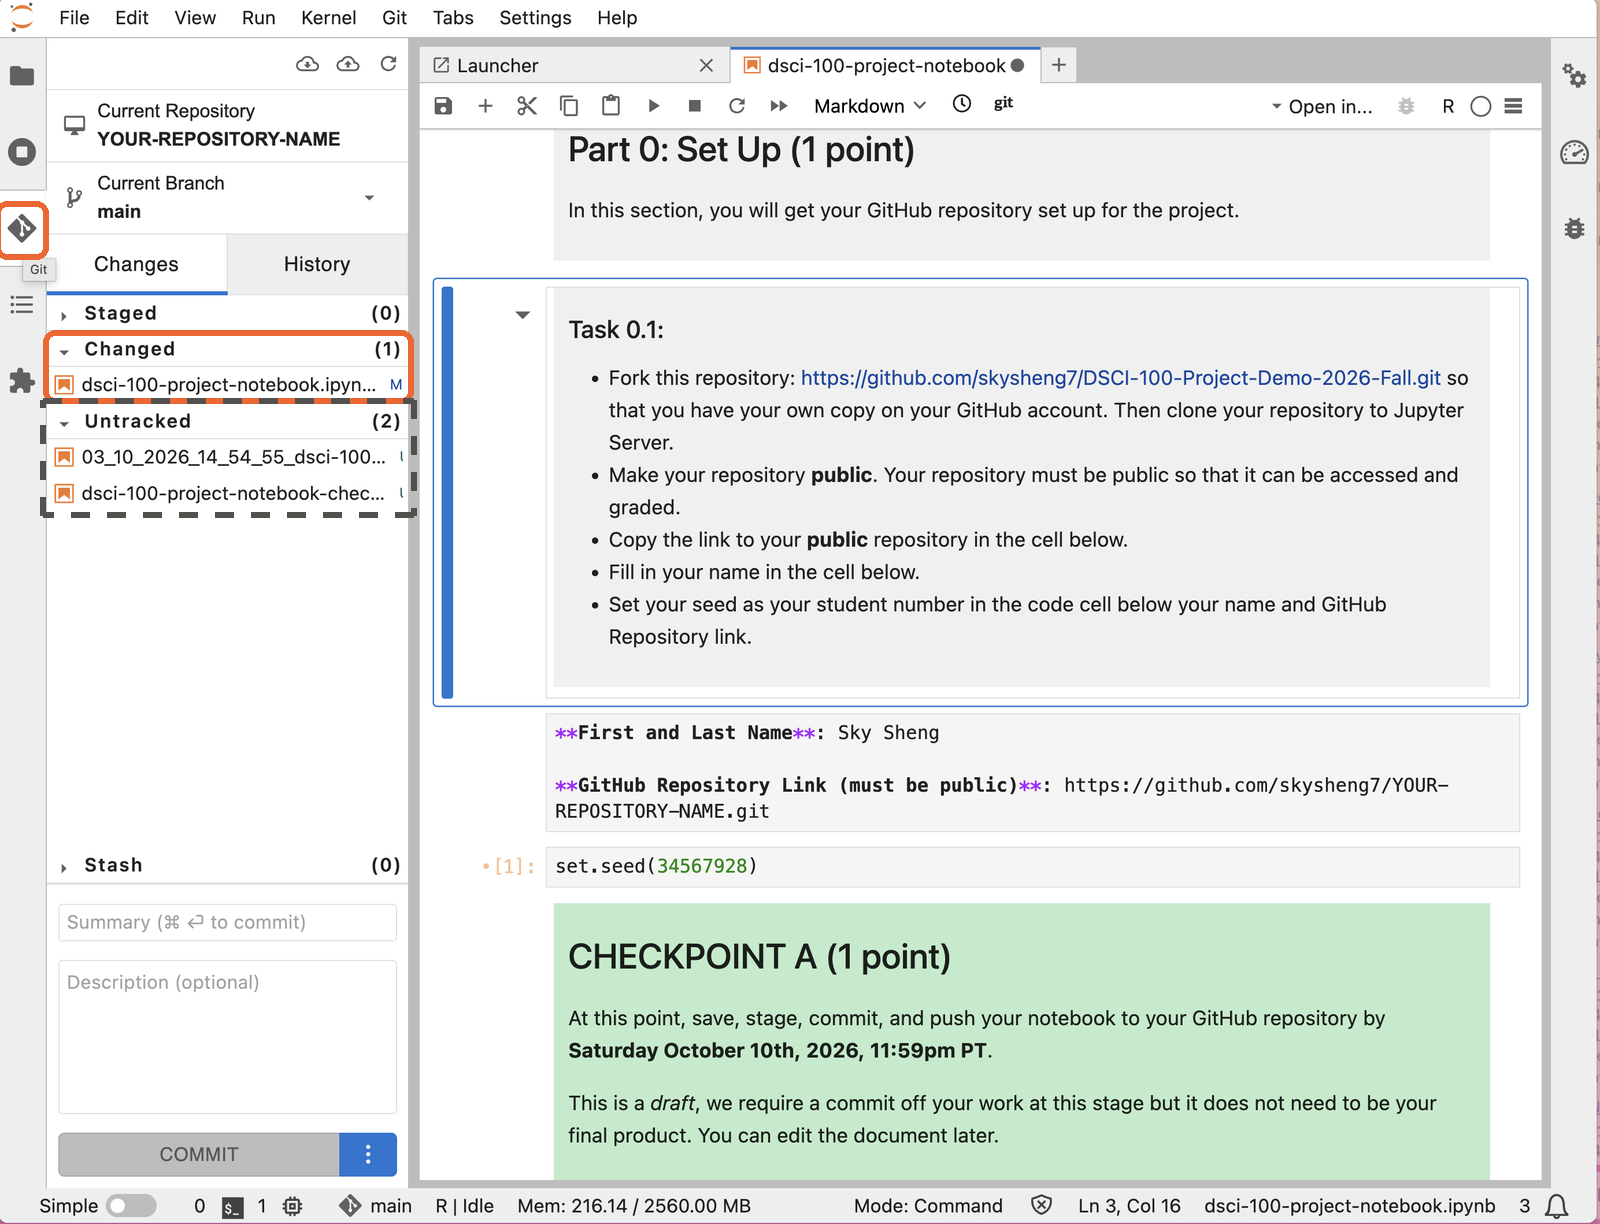
- Staged: what goes in your next snapshot.
- Changed: files Git already knows, that you edited.
- Untracked: new files Git has never seen. These two are backup copies JupyterHub made. Leave them alone. You’ll add a file of your own in step 40.
📋 Step 14: Write a message and commit
Your notebook is now under Staged. Write a short message about what you did, then click Commit.
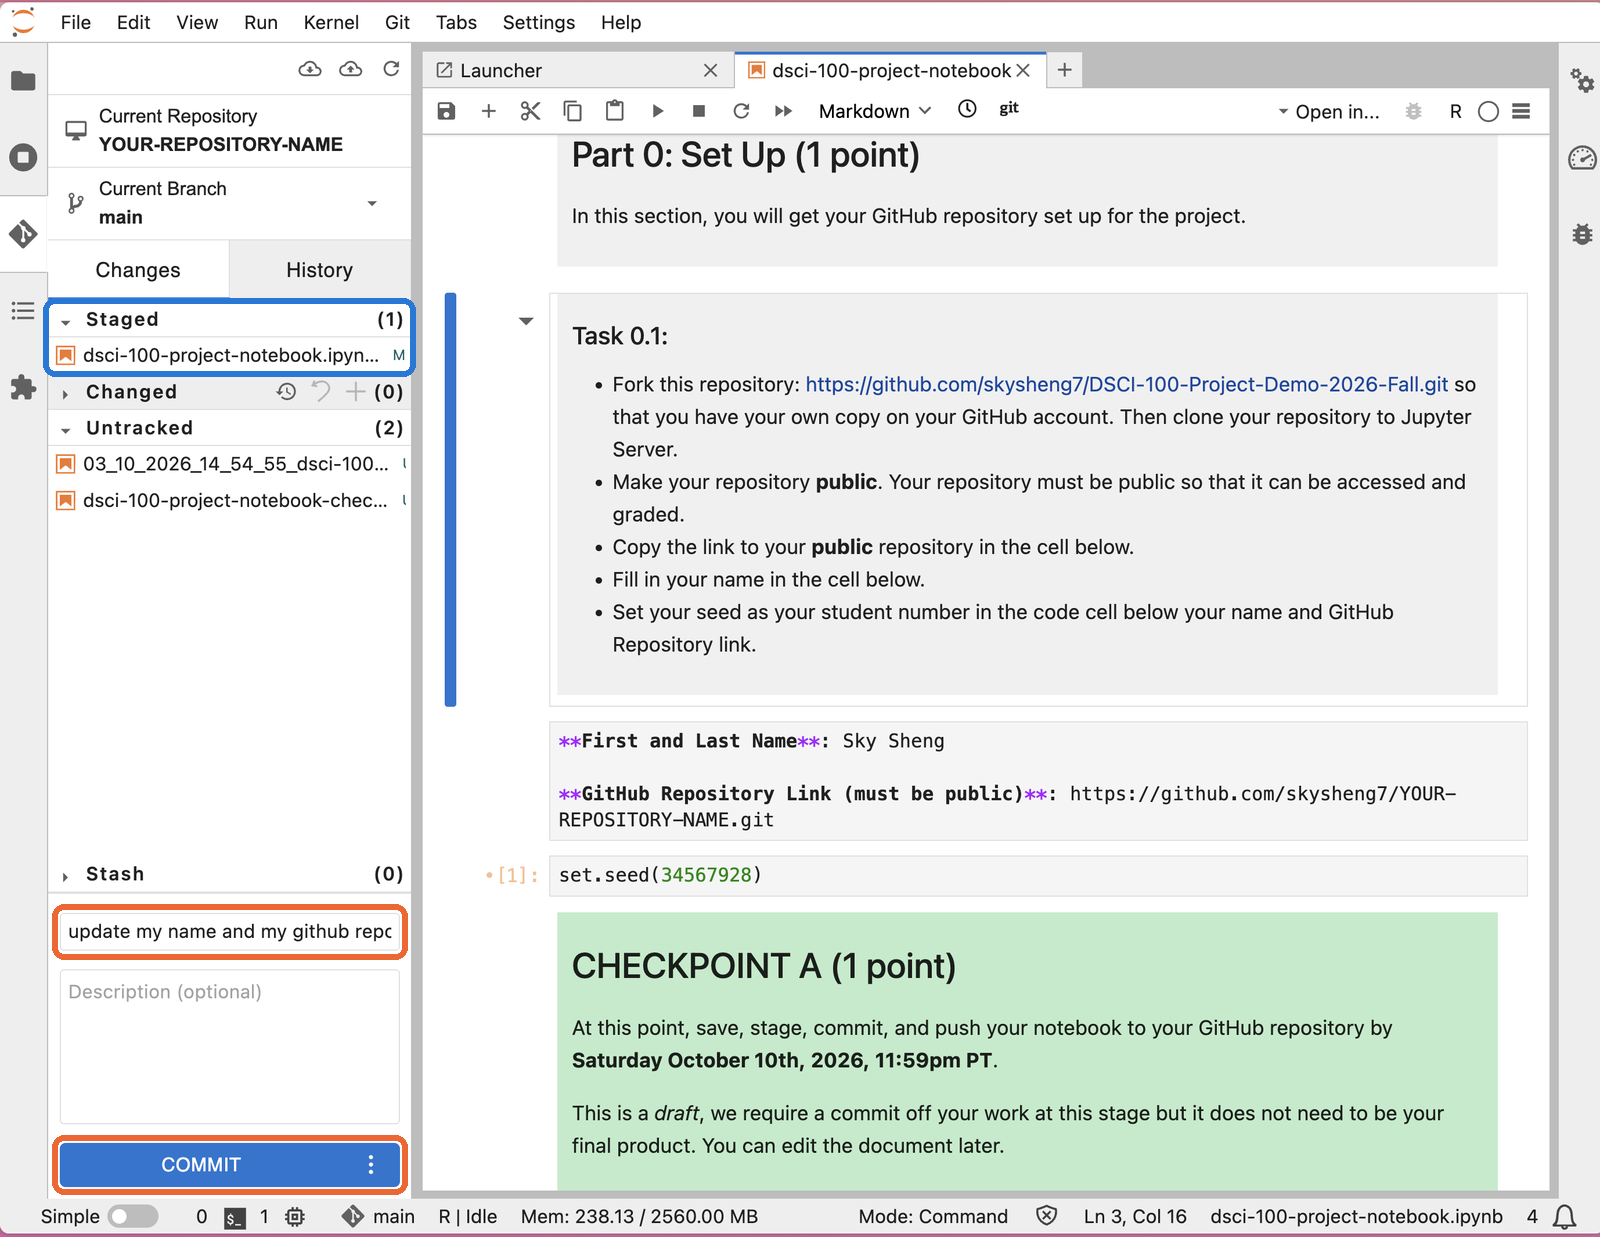
📋 Step 15: Tell Git who you are
First time only. Type your name and the email you used to make your GitHub account. Click Ok.
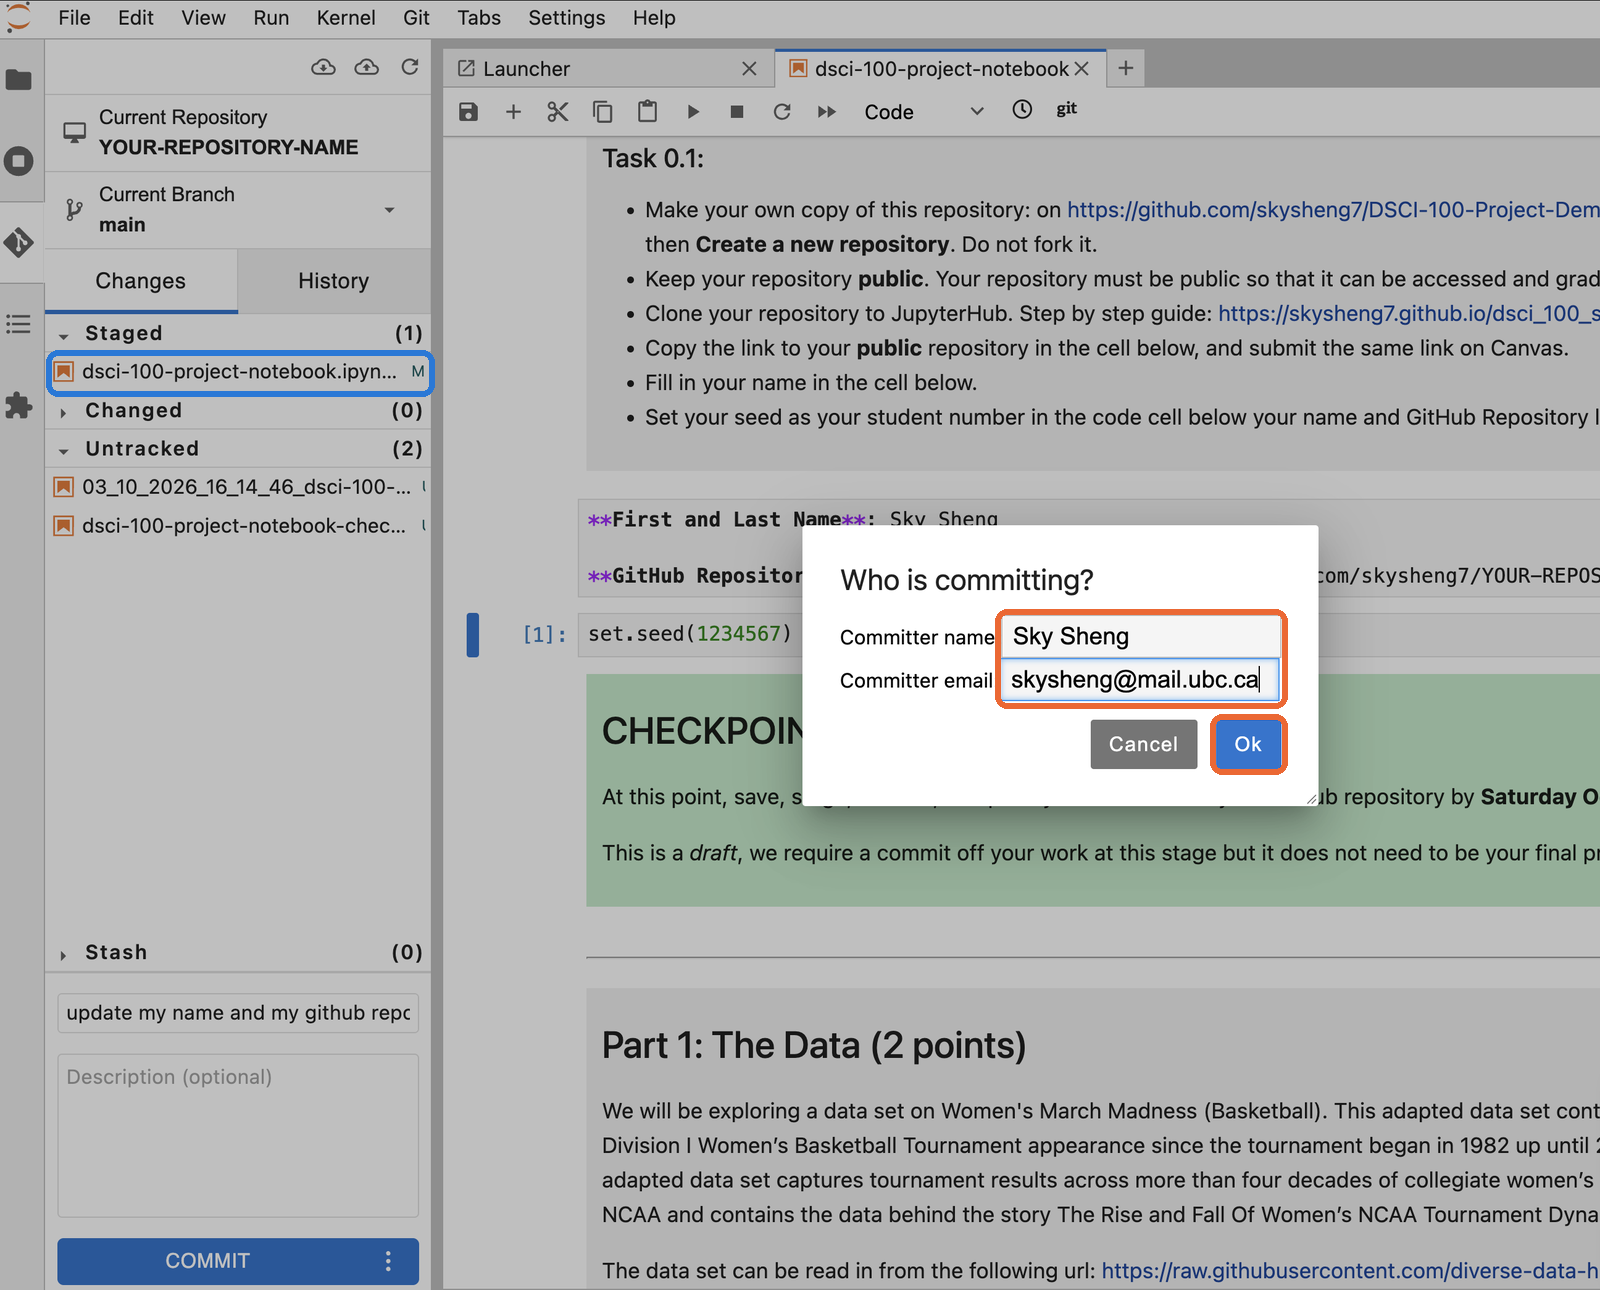
Git writes your name and email on every snapshot. GitHub uses the email to match the snapshot to your account.
📋 Step 16: Check GitHub
Your repository on GitHub still shows 1 Commit. Open the notebook there: your name is not filled in yet.
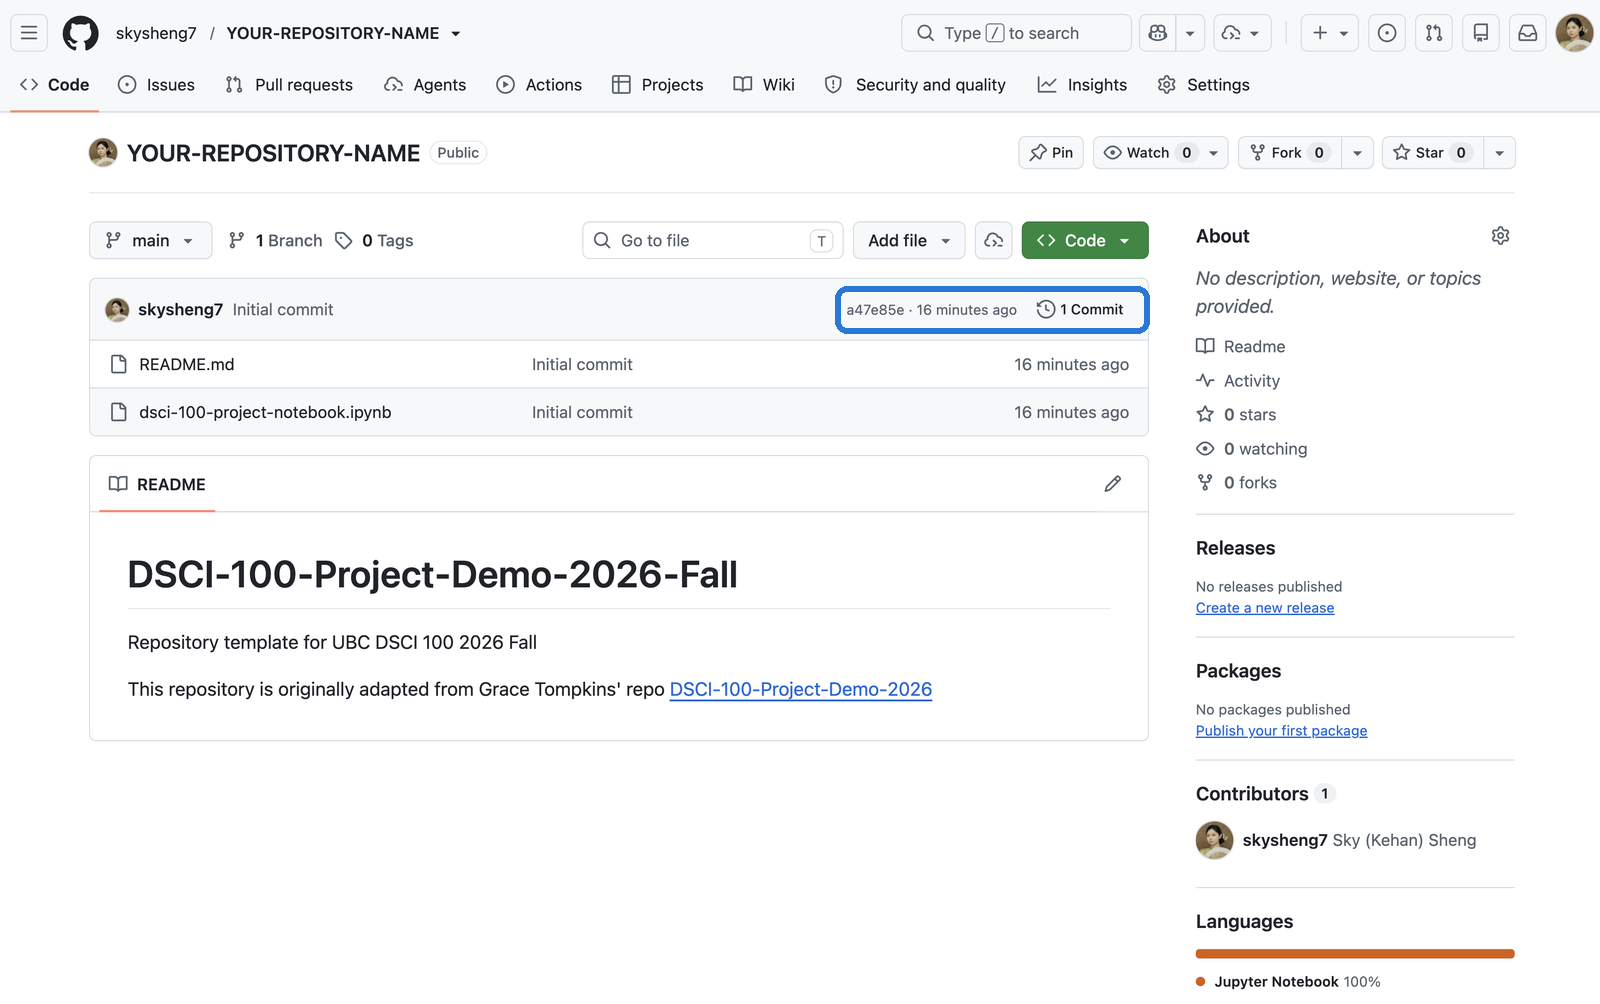
Commit saves the snapshot in JupyterHub only. GitHub has not heard about it yet.
📋 Step 17: Push
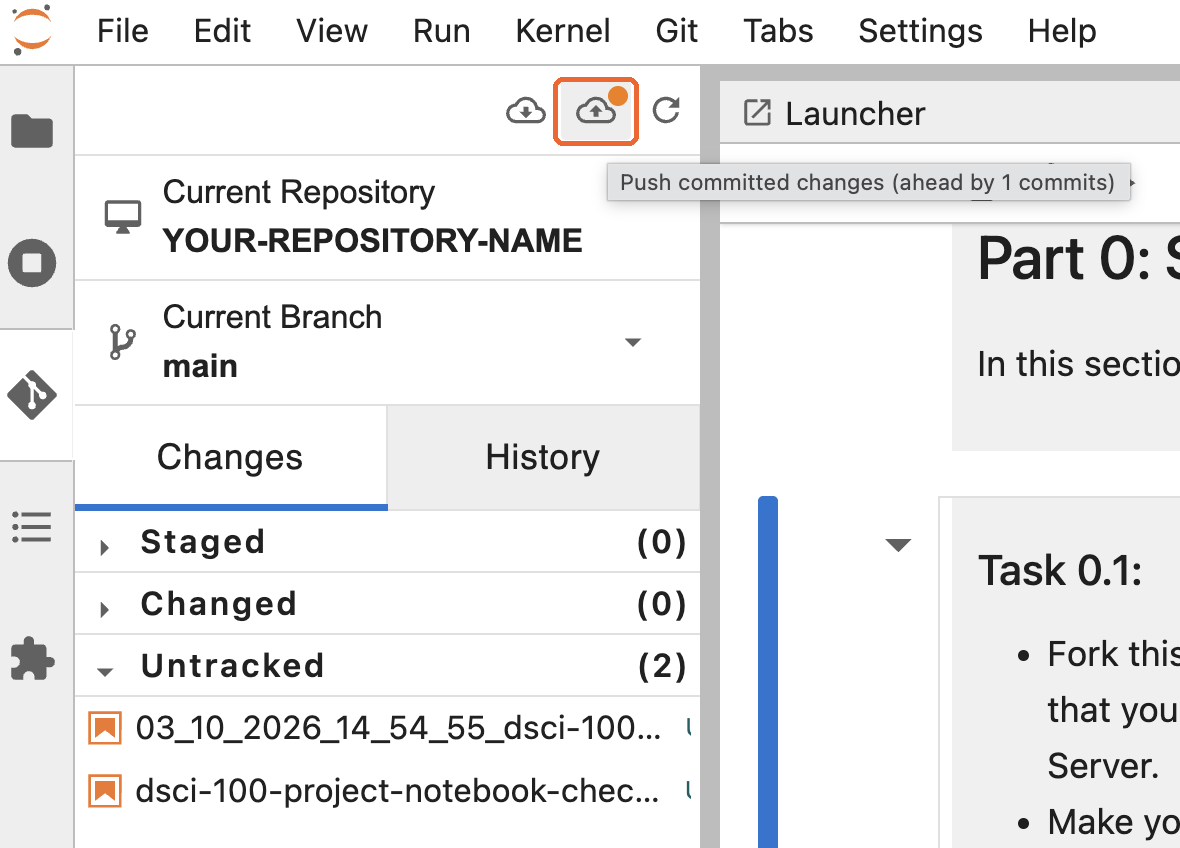
Back in JupyterHub, click the cloud with the up arrow. That is push. The orange dot means you have commits GitHub doesn’t have yet.
📋 Step 18: GitHub asks who you are
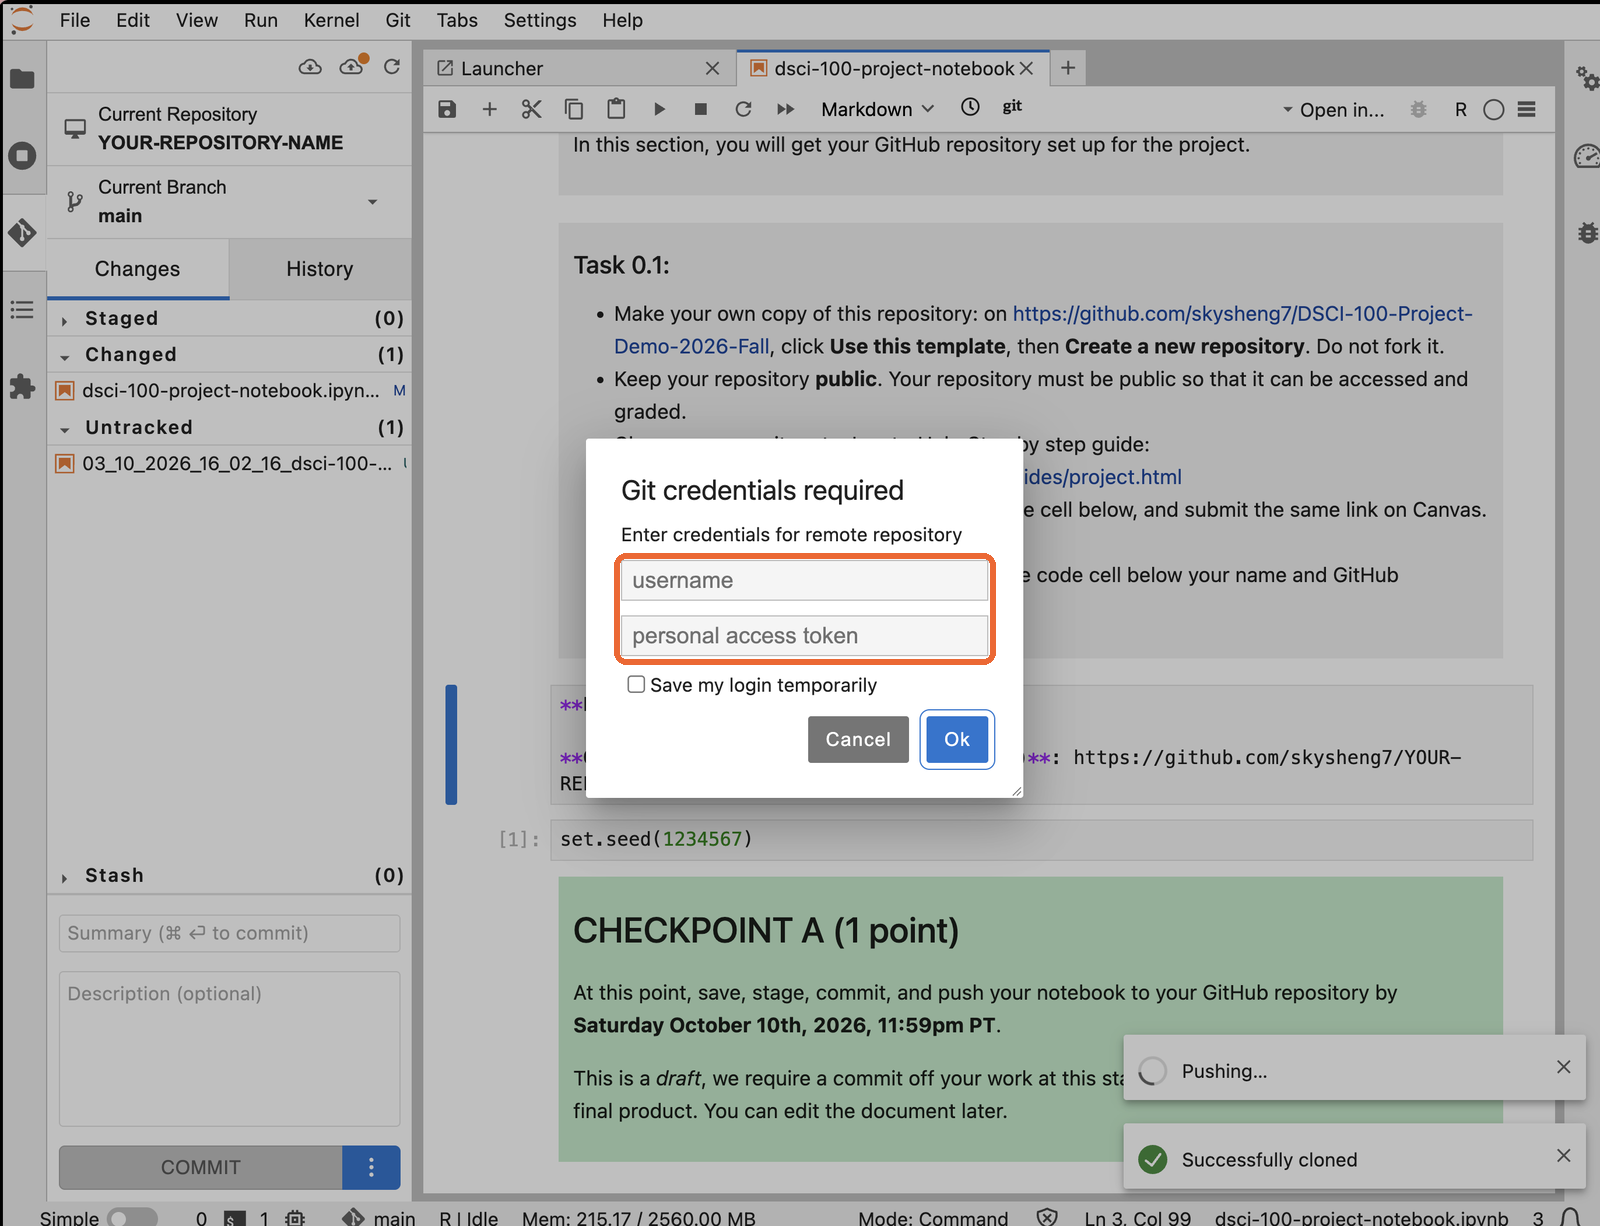
A window asks for two things.
Important
- username: your GitHub username, e.g.
skysheng7. Not your real name. - personal access token: not your GitHub password. You don’t have one yet, so click Cancel and make one next.
🔑 Step 19: Open your settings
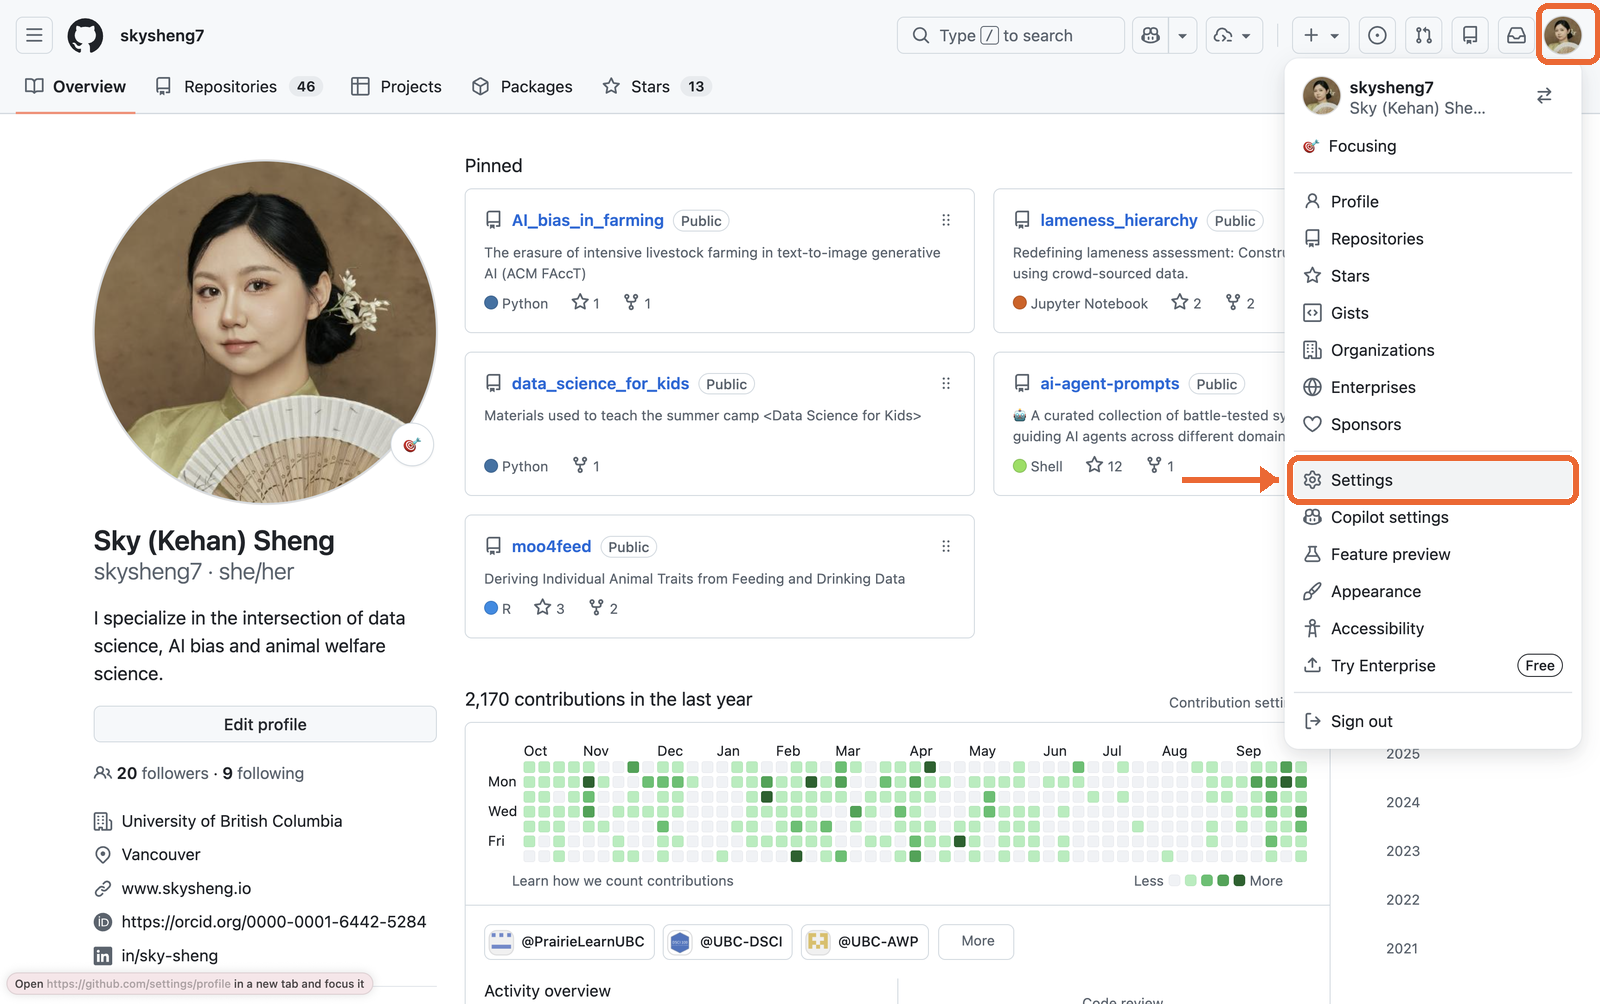
On GitHub, click your profile picture in the top right, then Settings.
🔑 Step 20: Developer settings
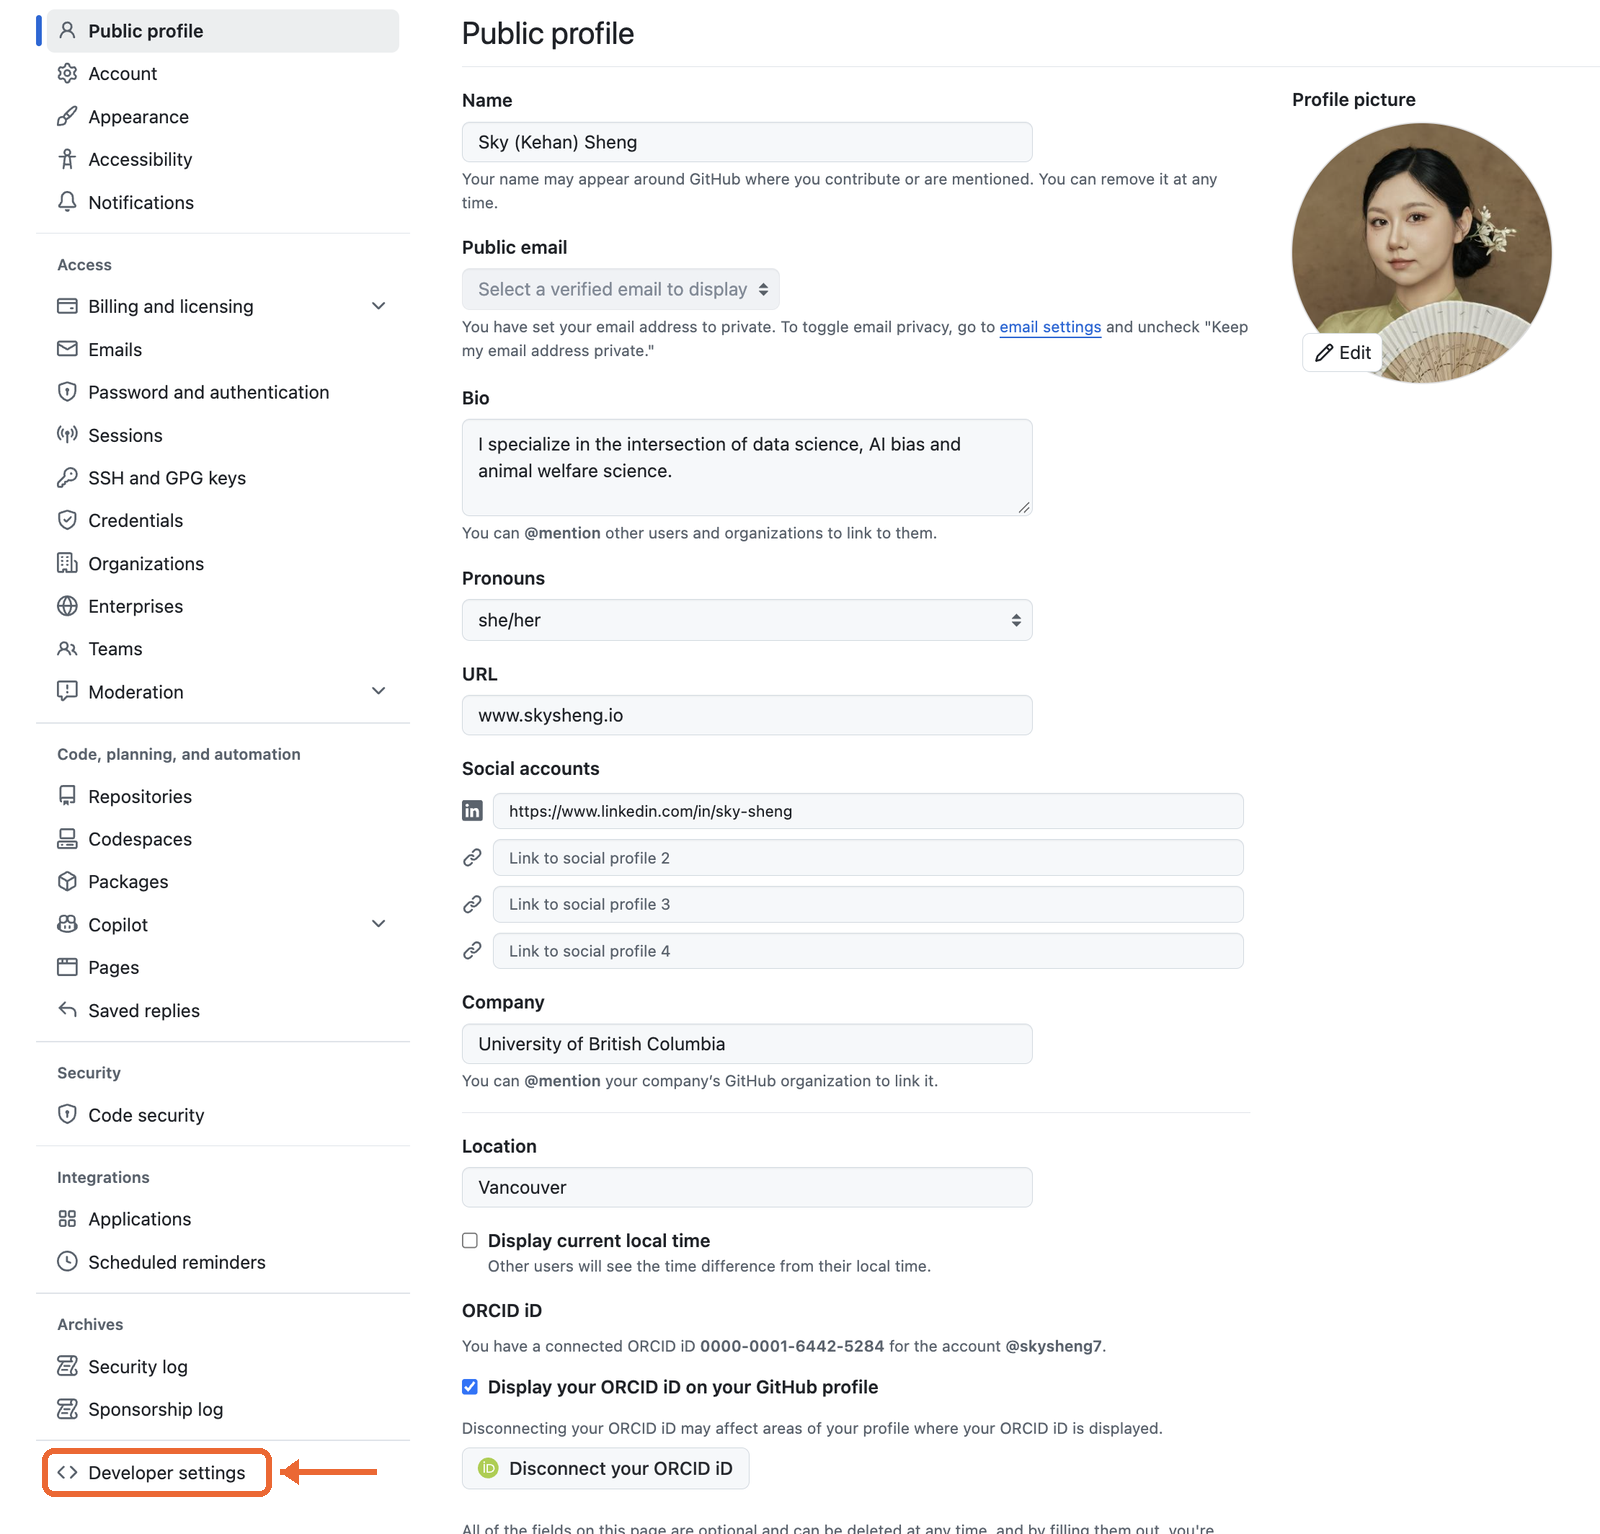
Scroll to the bottom of the menu on the left. Click Developer settings.
🔑 Step 21: Generate a classic token
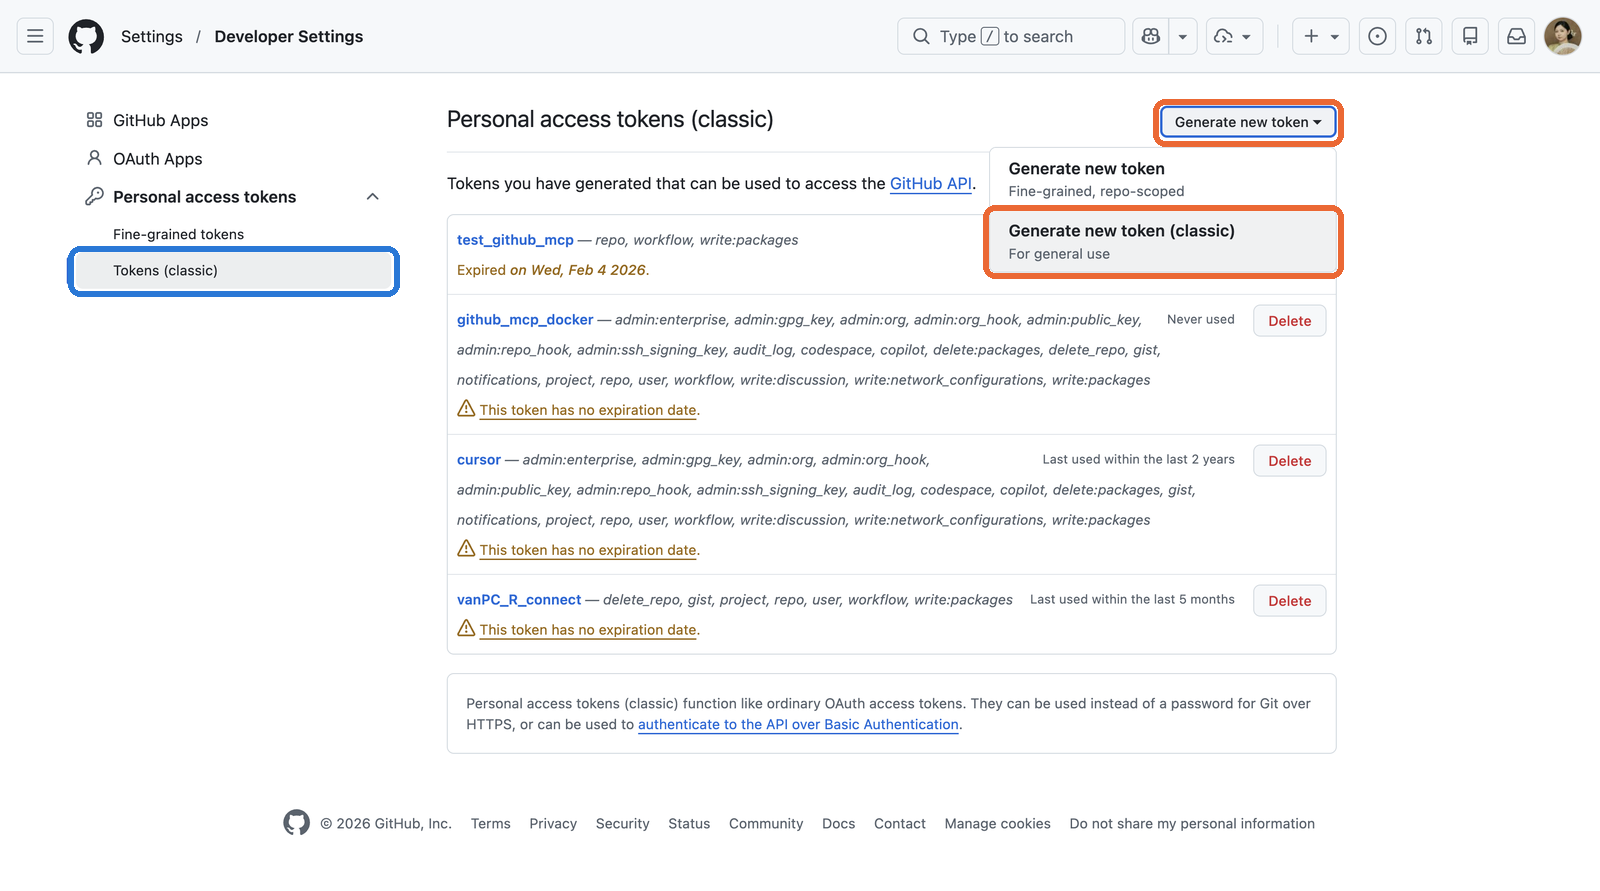
Click Personal access tokens, then Tokens (classic). Click Generate new token, then Generate new token (classic).
Curious: classic or fine-grained?
A fine-grained token is newer and can be limited to one repository. That is safer, but you have to pick the repository every time, and a new repository needs a new token. A classic token works for all your repositories, which is simpler for this course.🔑 Step 22: Name it and set an expiry
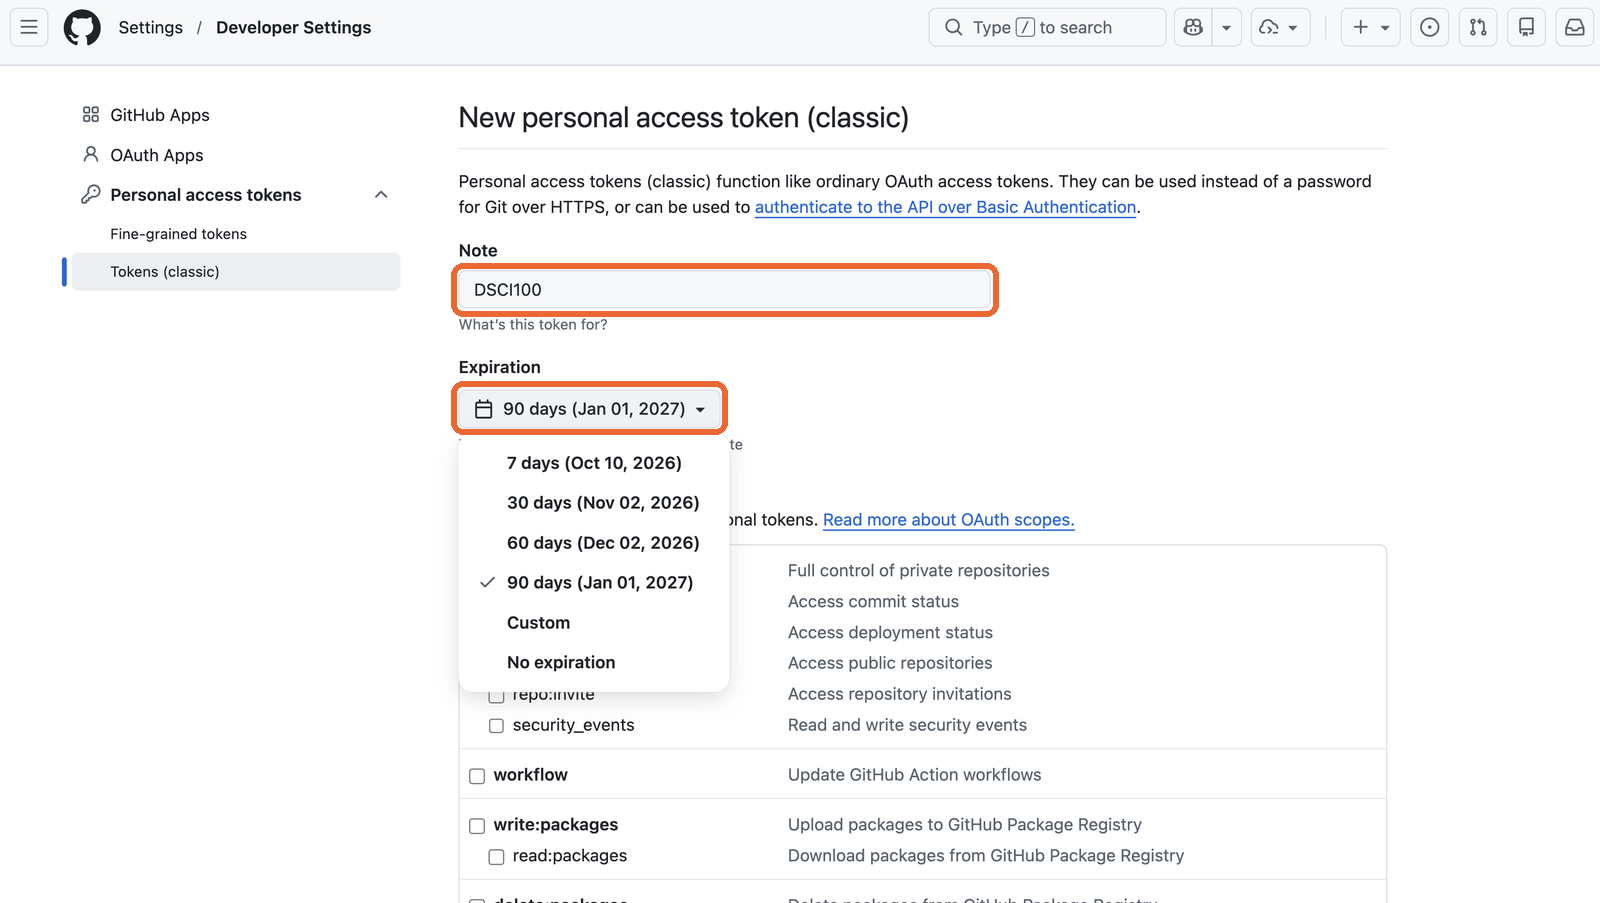
Under Note, give it a name you will recognize, e.g. DSCI 100. Set Expiration to 90 days, so it lasts past the final deadline.
🔑 Step 23: Tick repo only
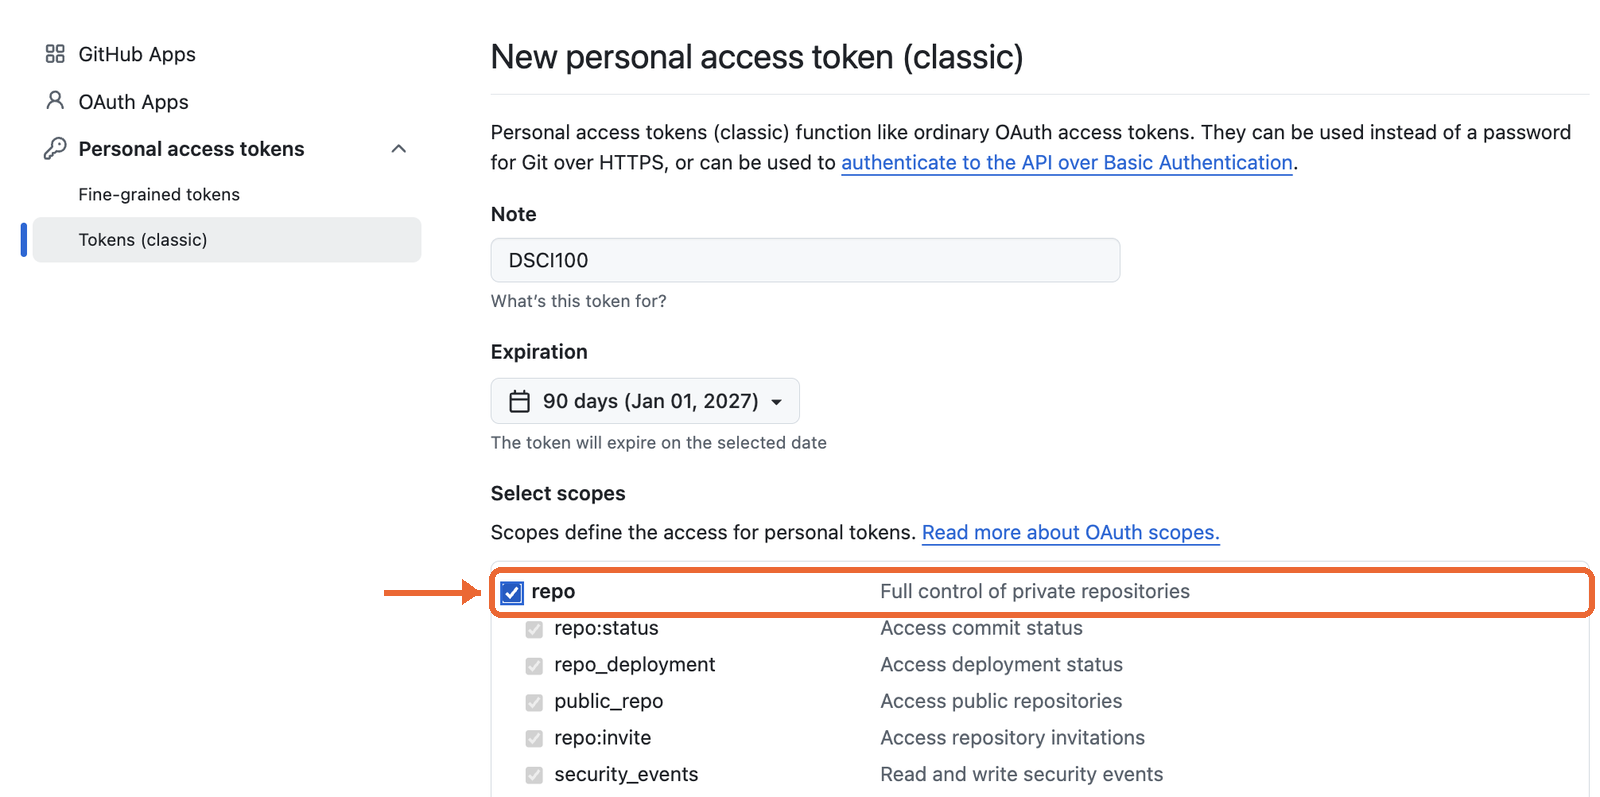
Tick the box next to repo. Its sub-boxes tick themselves. Leave every other box empty.
Why only repo?
Each box is one more door the key card opens. Pushing to your repository only needs repo. The other boxes are for things like running automated workflows, managing organizations, or deleting repositories, which this course never uses. If a token with every box ticked ever leaks, someone could delete all your repositories with it.
🔑 Step 24: Generate the token
Scroll to the bottom and click Generate token.

🔑 Step 25: Copy it now
Click the copy icon next to your token, and save it somewhere safe, like a password manager or a note on your own laptop.
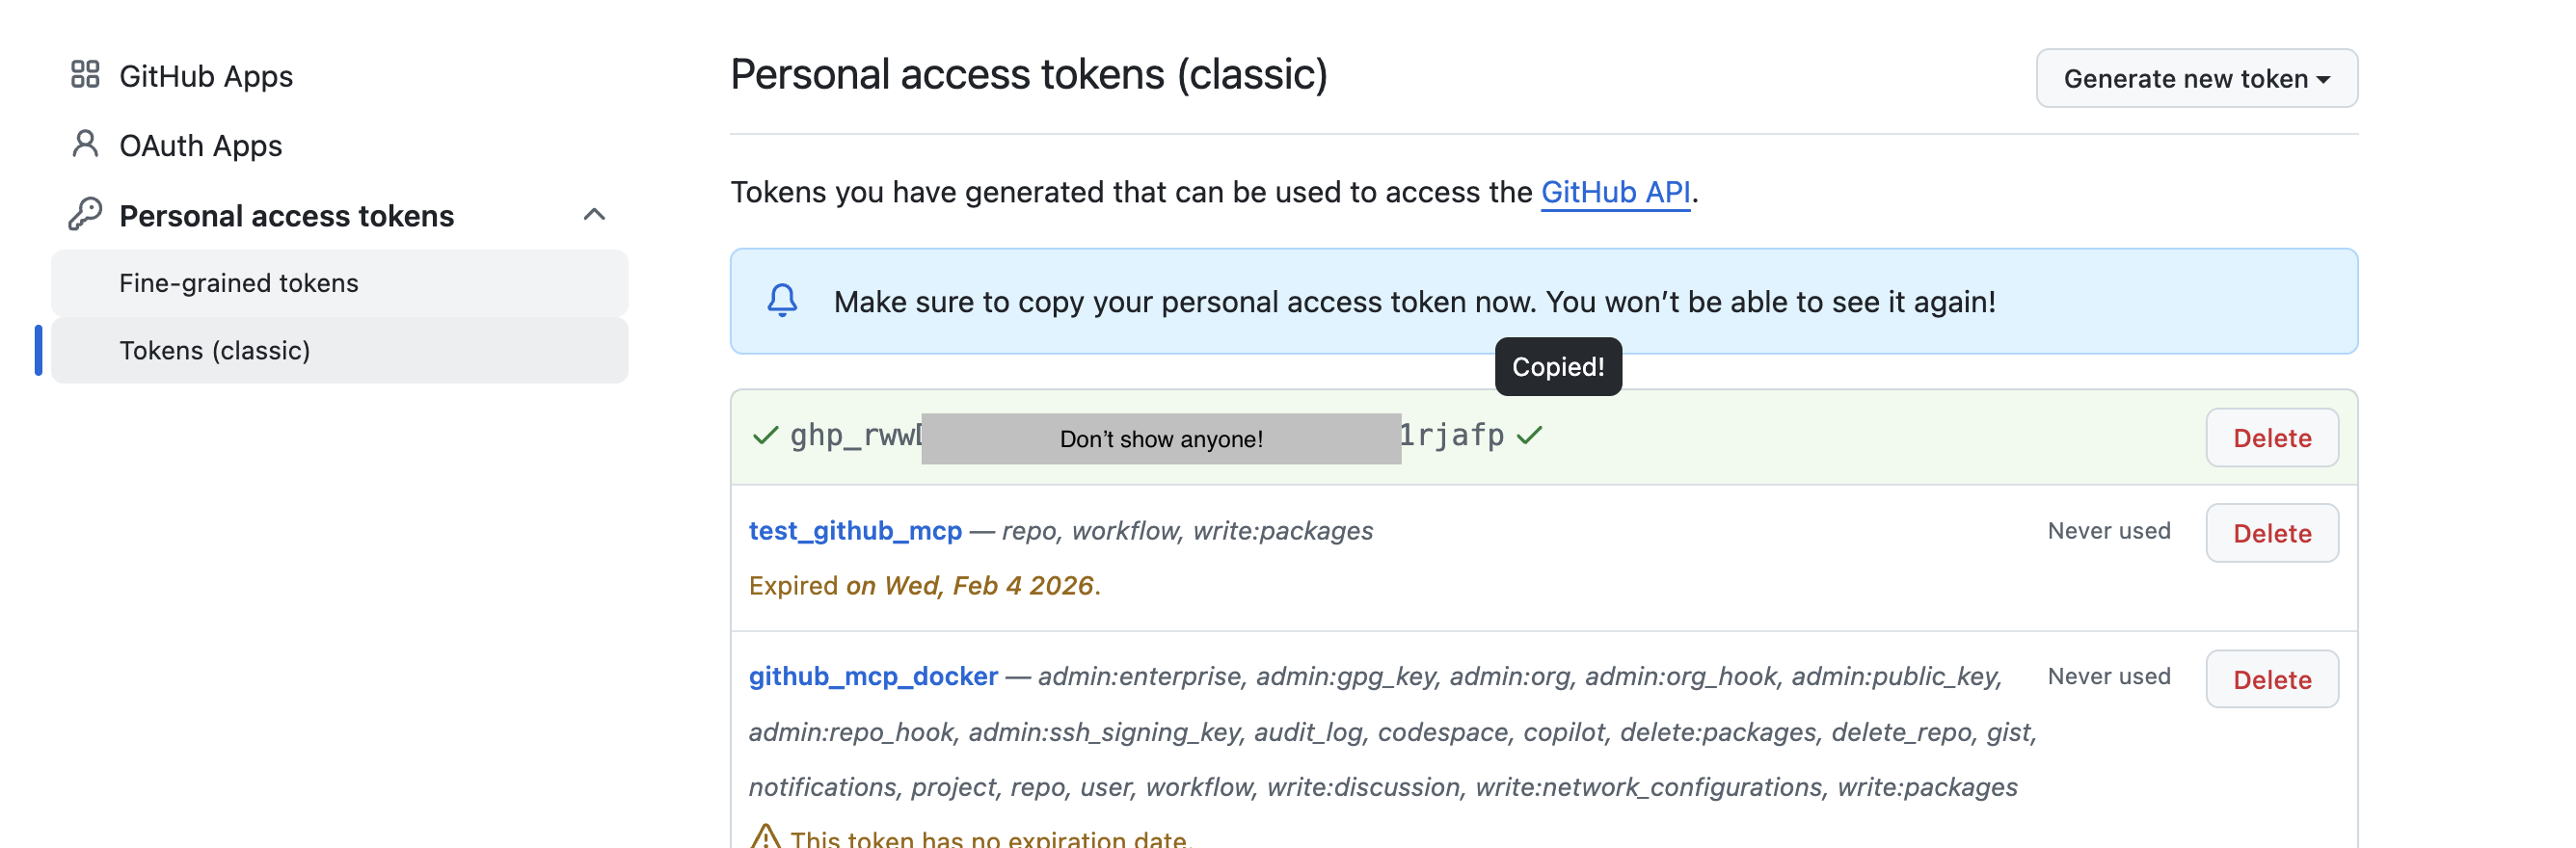
Important
- GitHub shows the token only once. If you lose it, generate a new one and delete the old one.
- Never share it with anyone, and never paste it in your notebook. Your repository is public, so the whole world would see it.
📋 Step 26: Push with your token
Back in JupyterHub, click push again. Type your GitHub username, paste your token, tick Save my login temporarily, and click Ok.
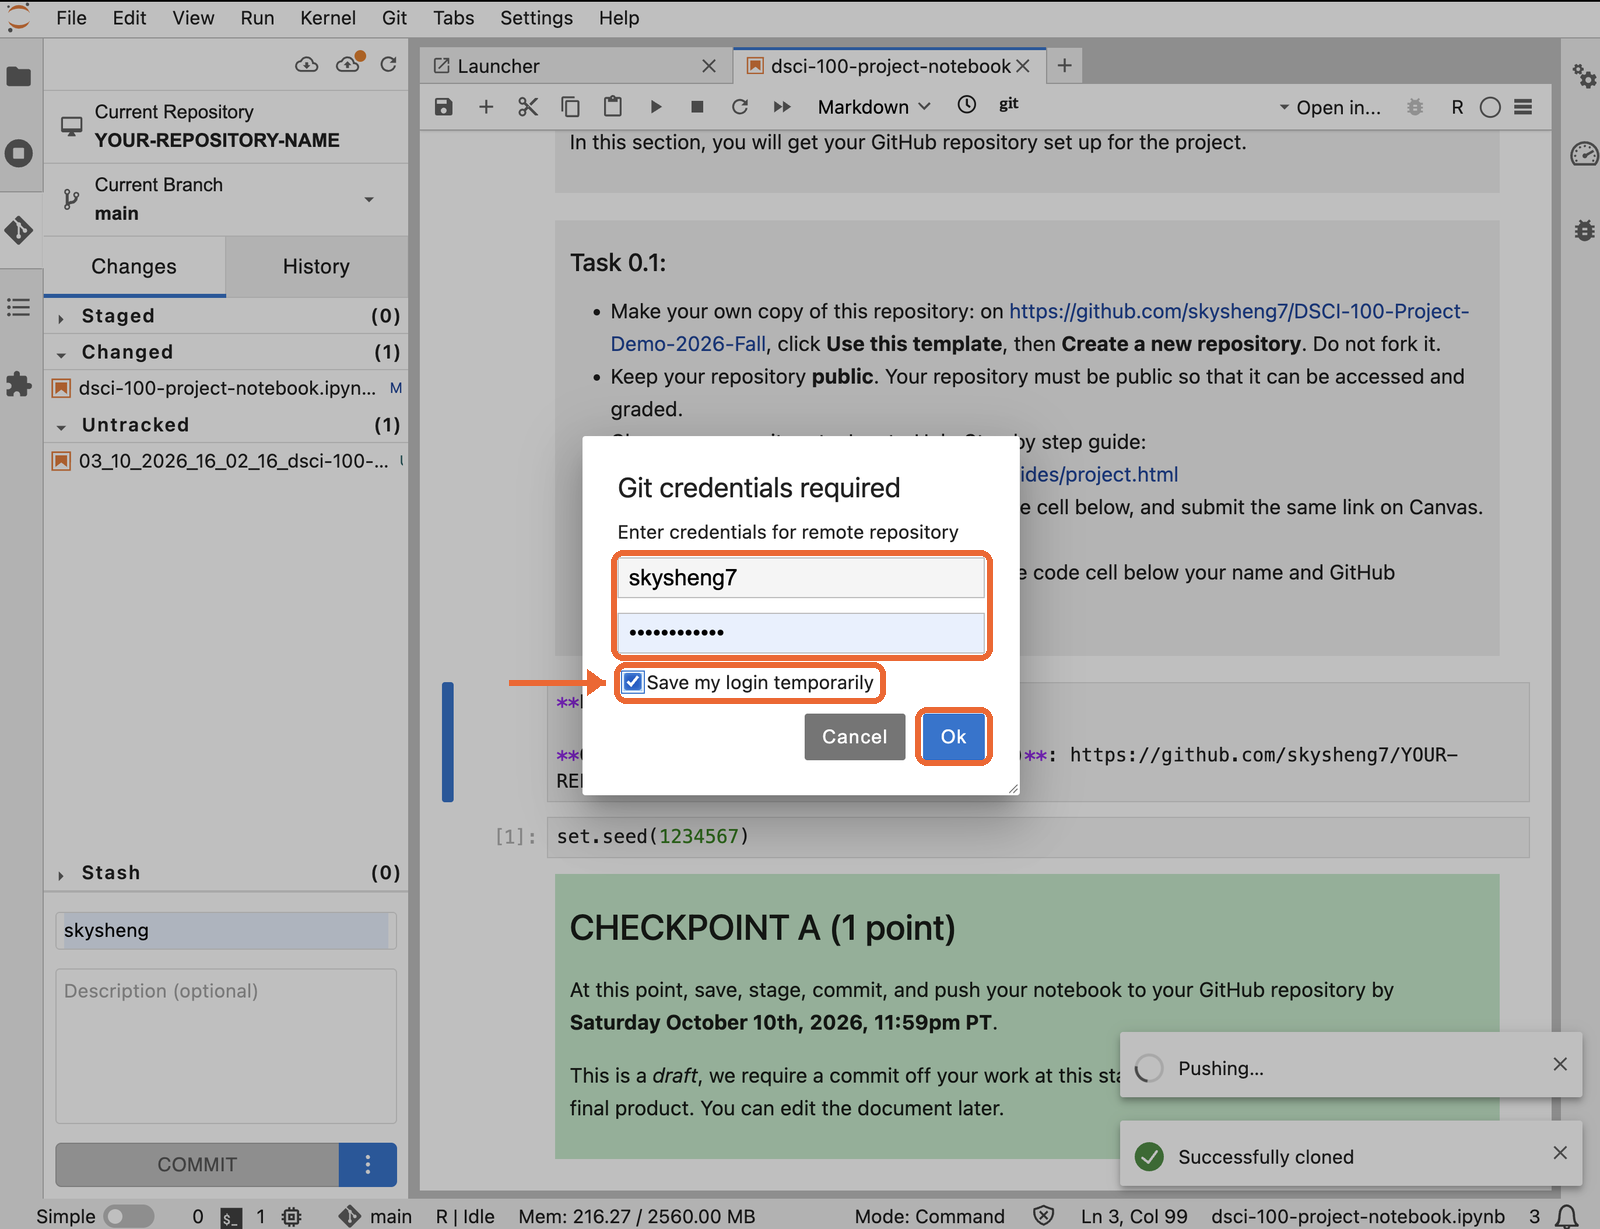
With the box ticked, JupyterHub remembers your token for a while, so you don’t paste it on every push. When it asks again, paste the same token.
📋 Step 27: Pushed
You see Successfully pushed.
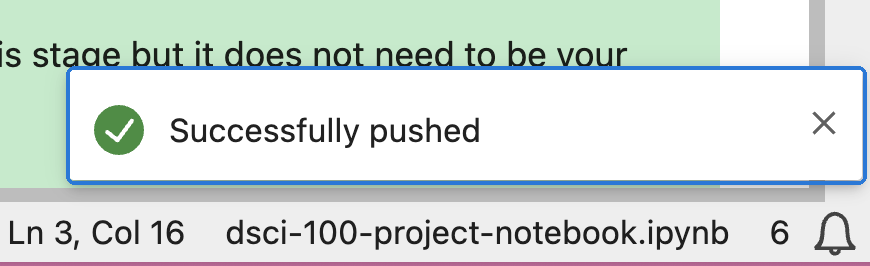
📋 Step 28: Check GitHub again
Refresh your repository on GitHub. It now shows 2 Commits, with your message at the top.
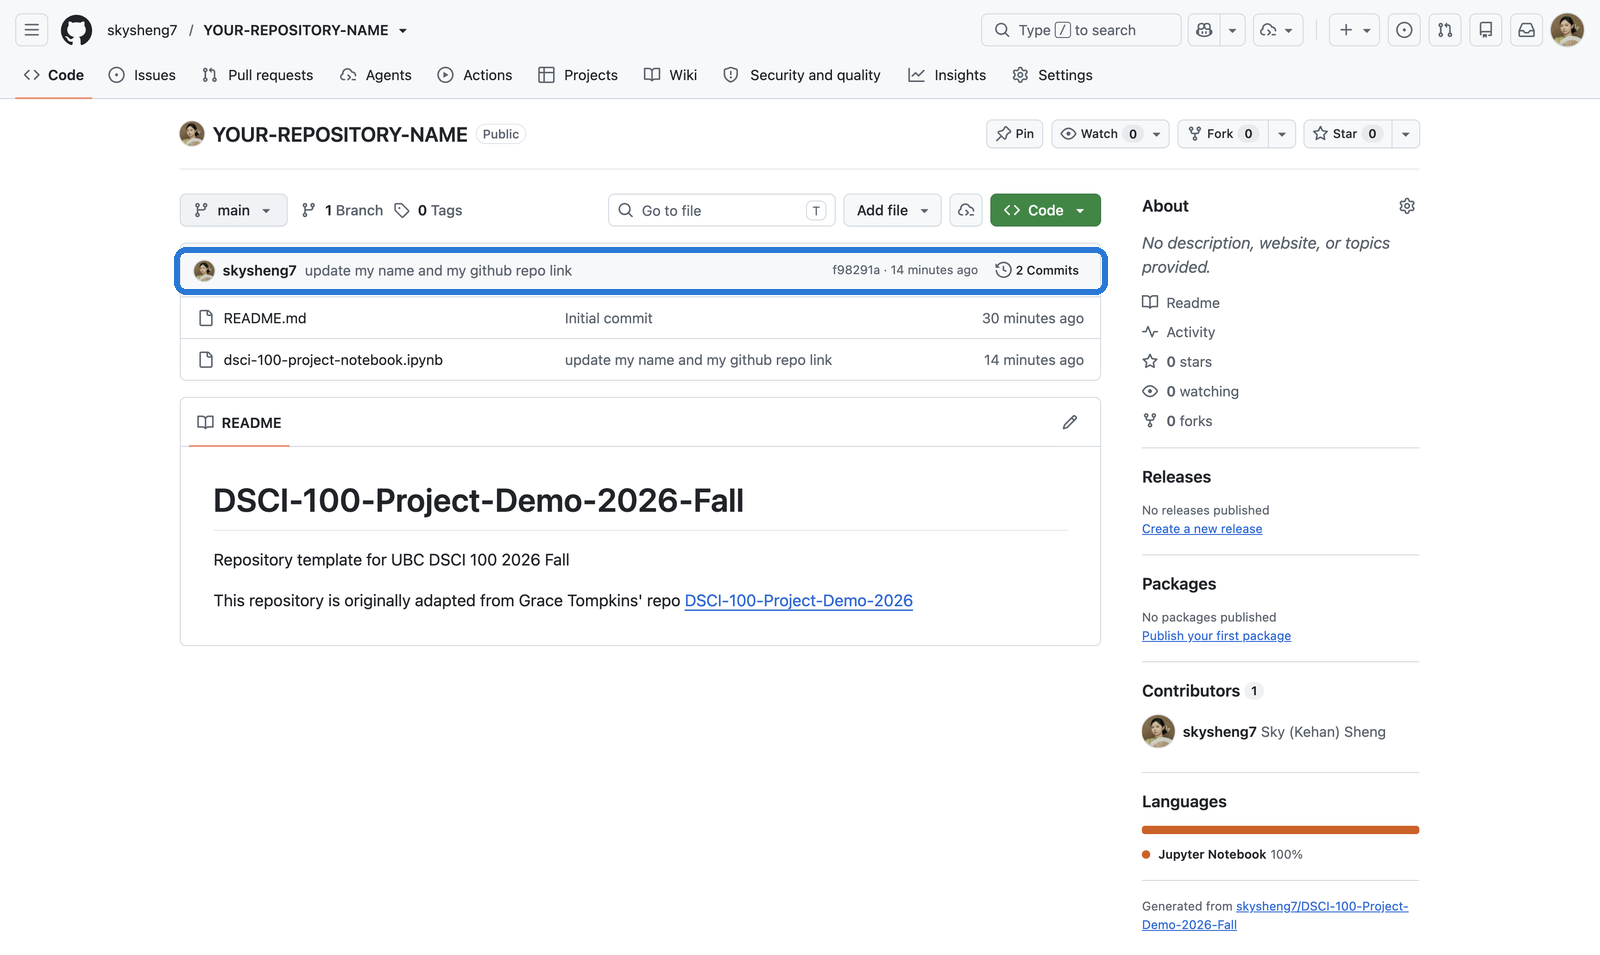
The time shown is when you committed in JupyterHub, not when you pushed.
📋 Step 29: Your changes are on GitHub
Click the notebook on GitHub. Your name, link and seed are there.
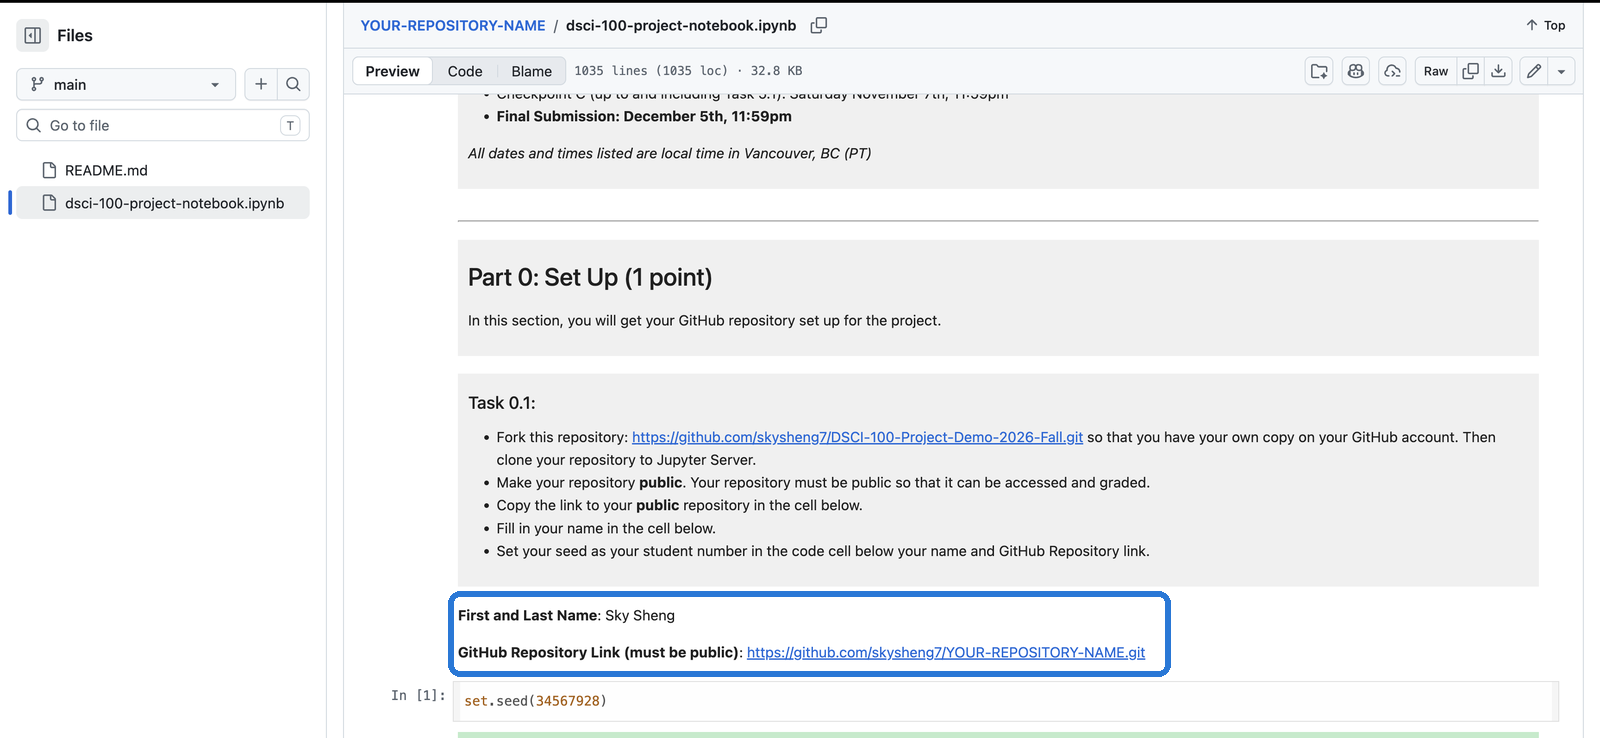
That is Checkpoint A done. 🎉
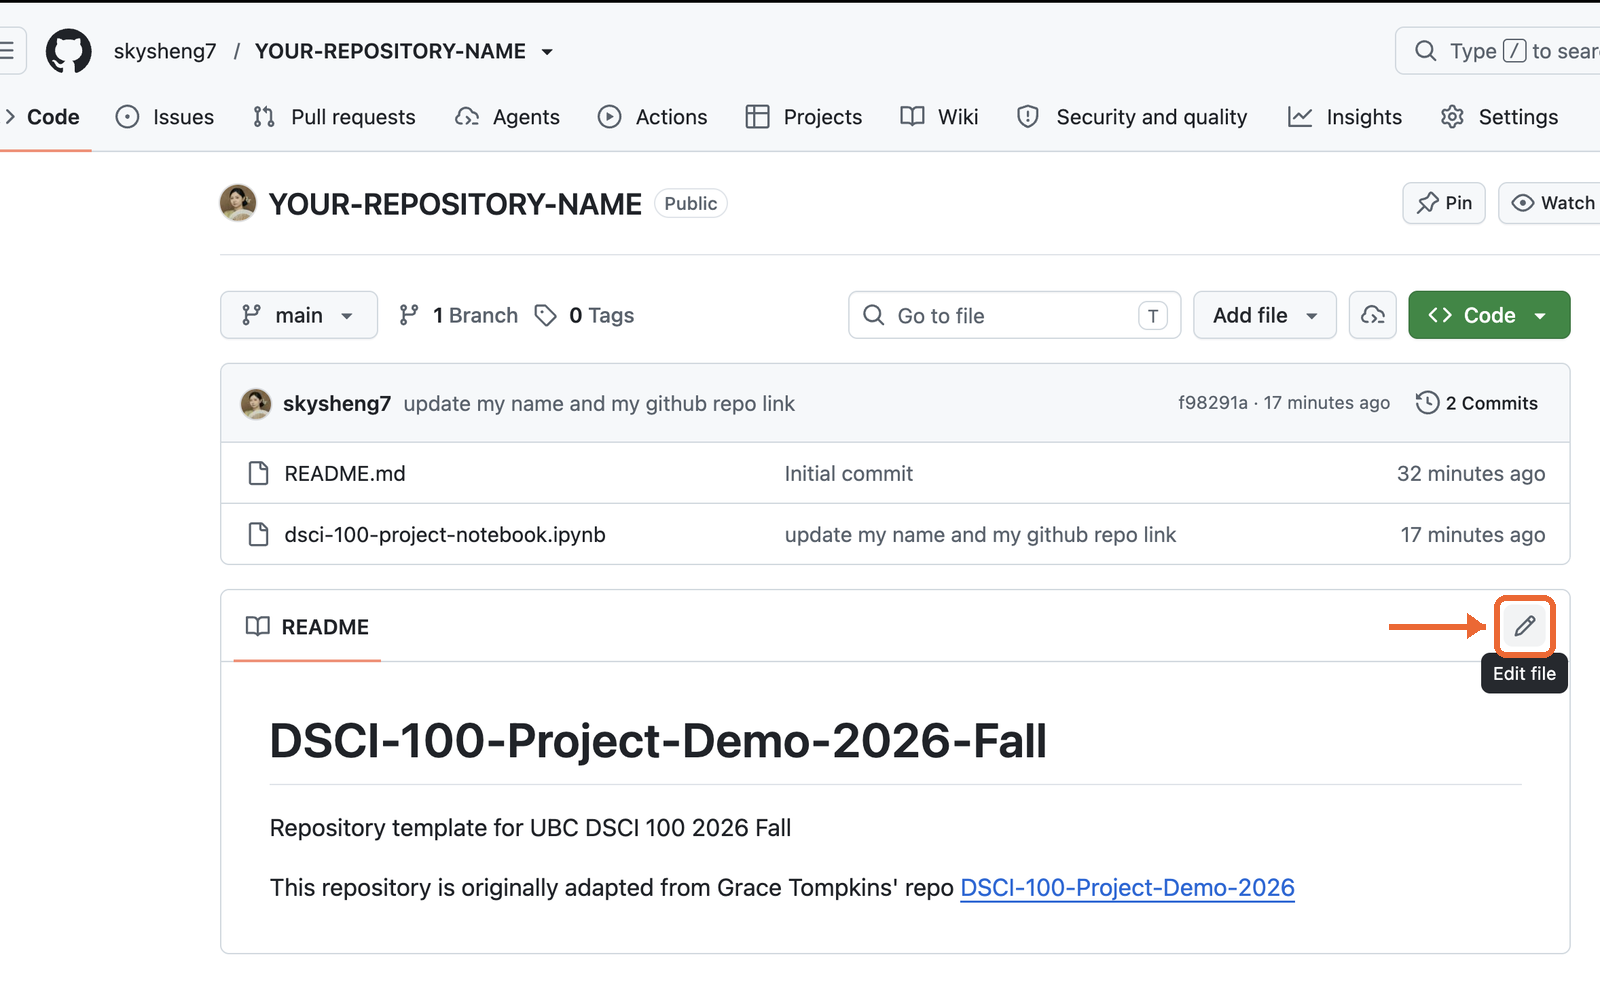
📋 Step 30: Edit a file on GitHub
Sometimes you change a file on GitHub instead of JupyterHub. Let’s try it. On your repository, click the pencil next to README.
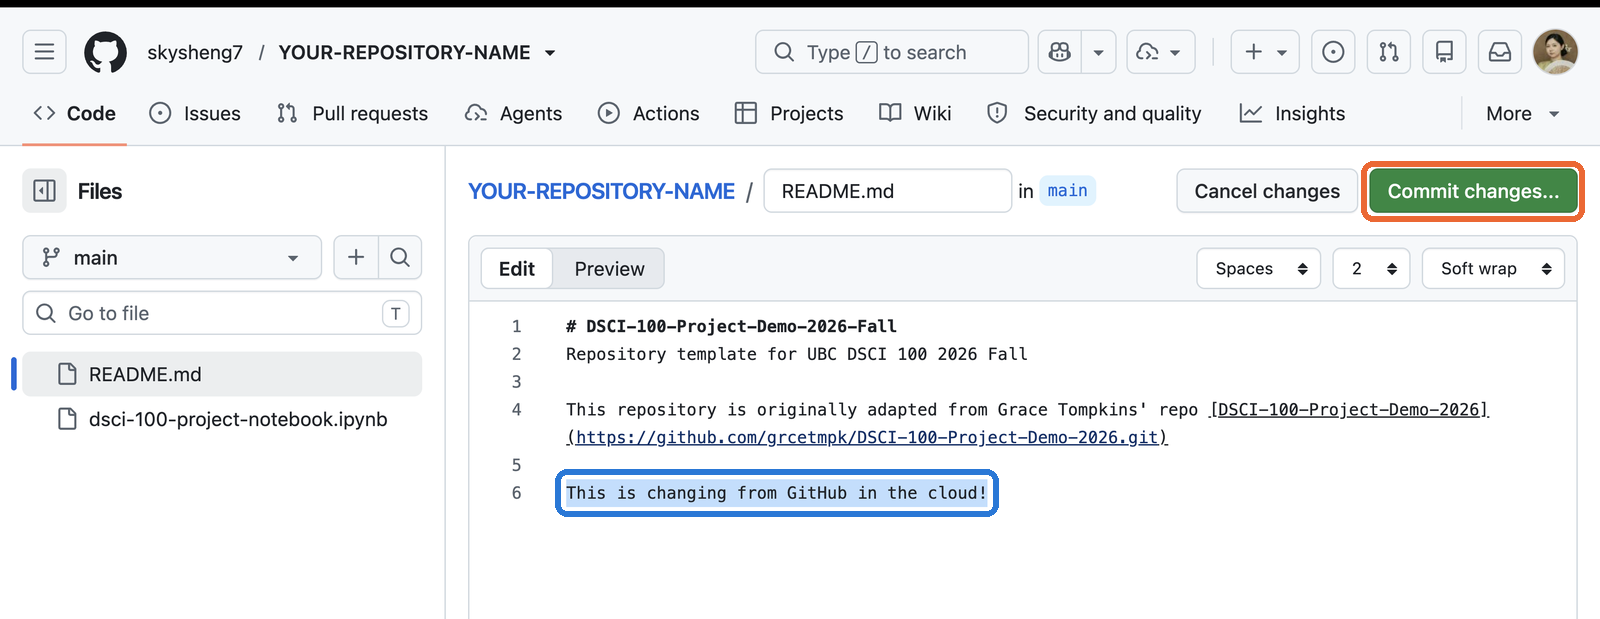
📋 Step 31: Add a sentence
Type a new sentence at the bottom. Click Commit changes….
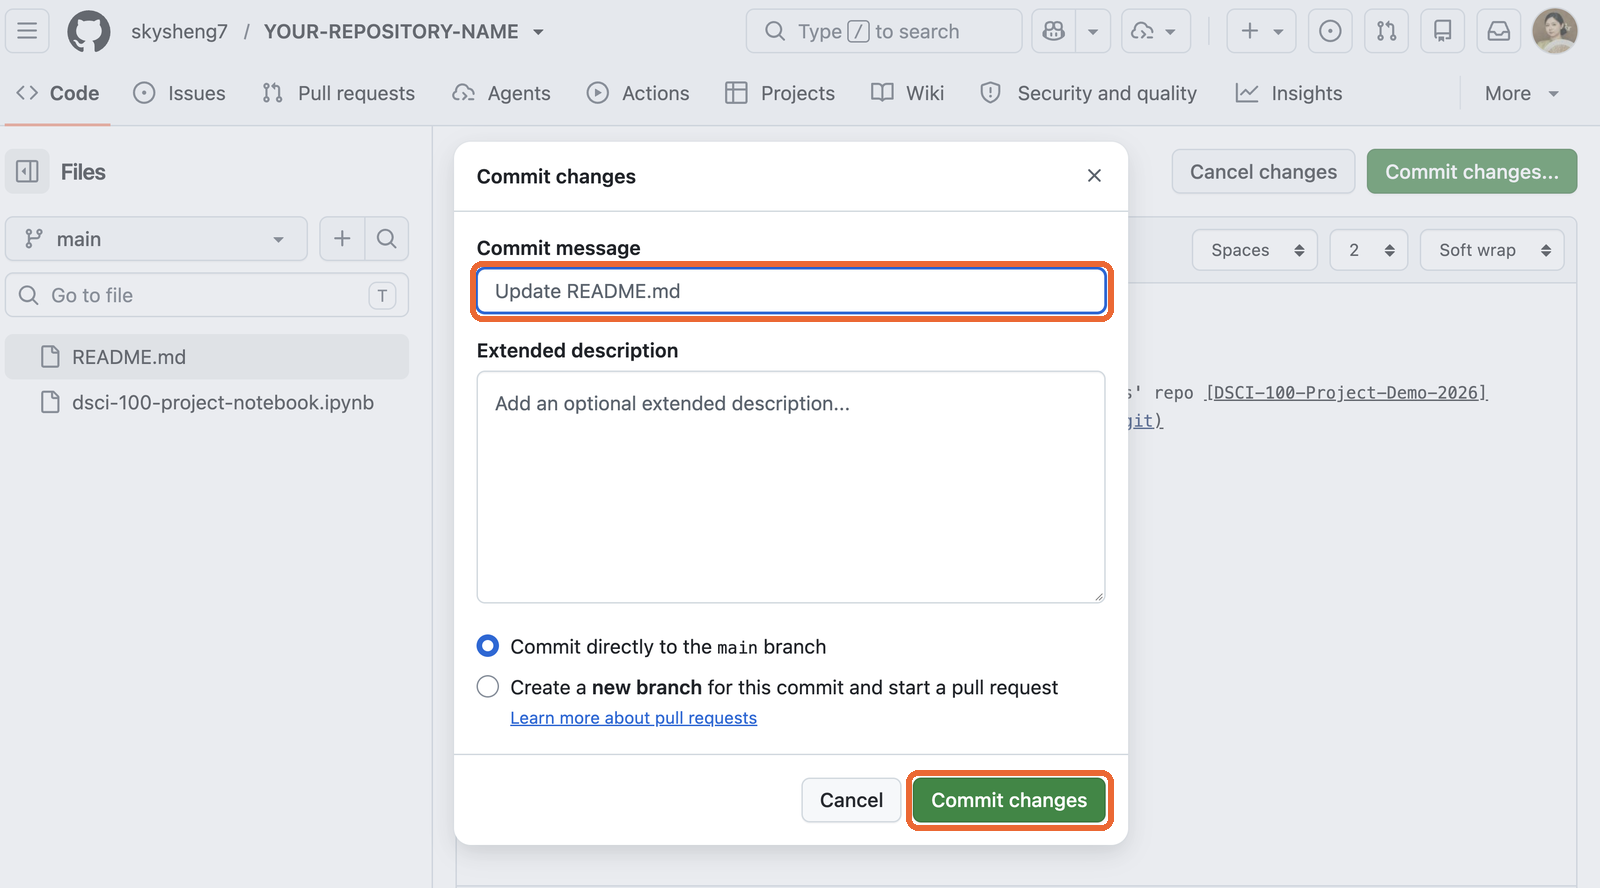
📋 Step 32: Commit on GitHub
Write a commit message, then click Commit changes. This snapshot is made on GitHub, so there is nothing to push.
📋 Step 33: JupyterHub doesn’t know yet
Open README.md in JupyterHub. Your new sentence is not there.
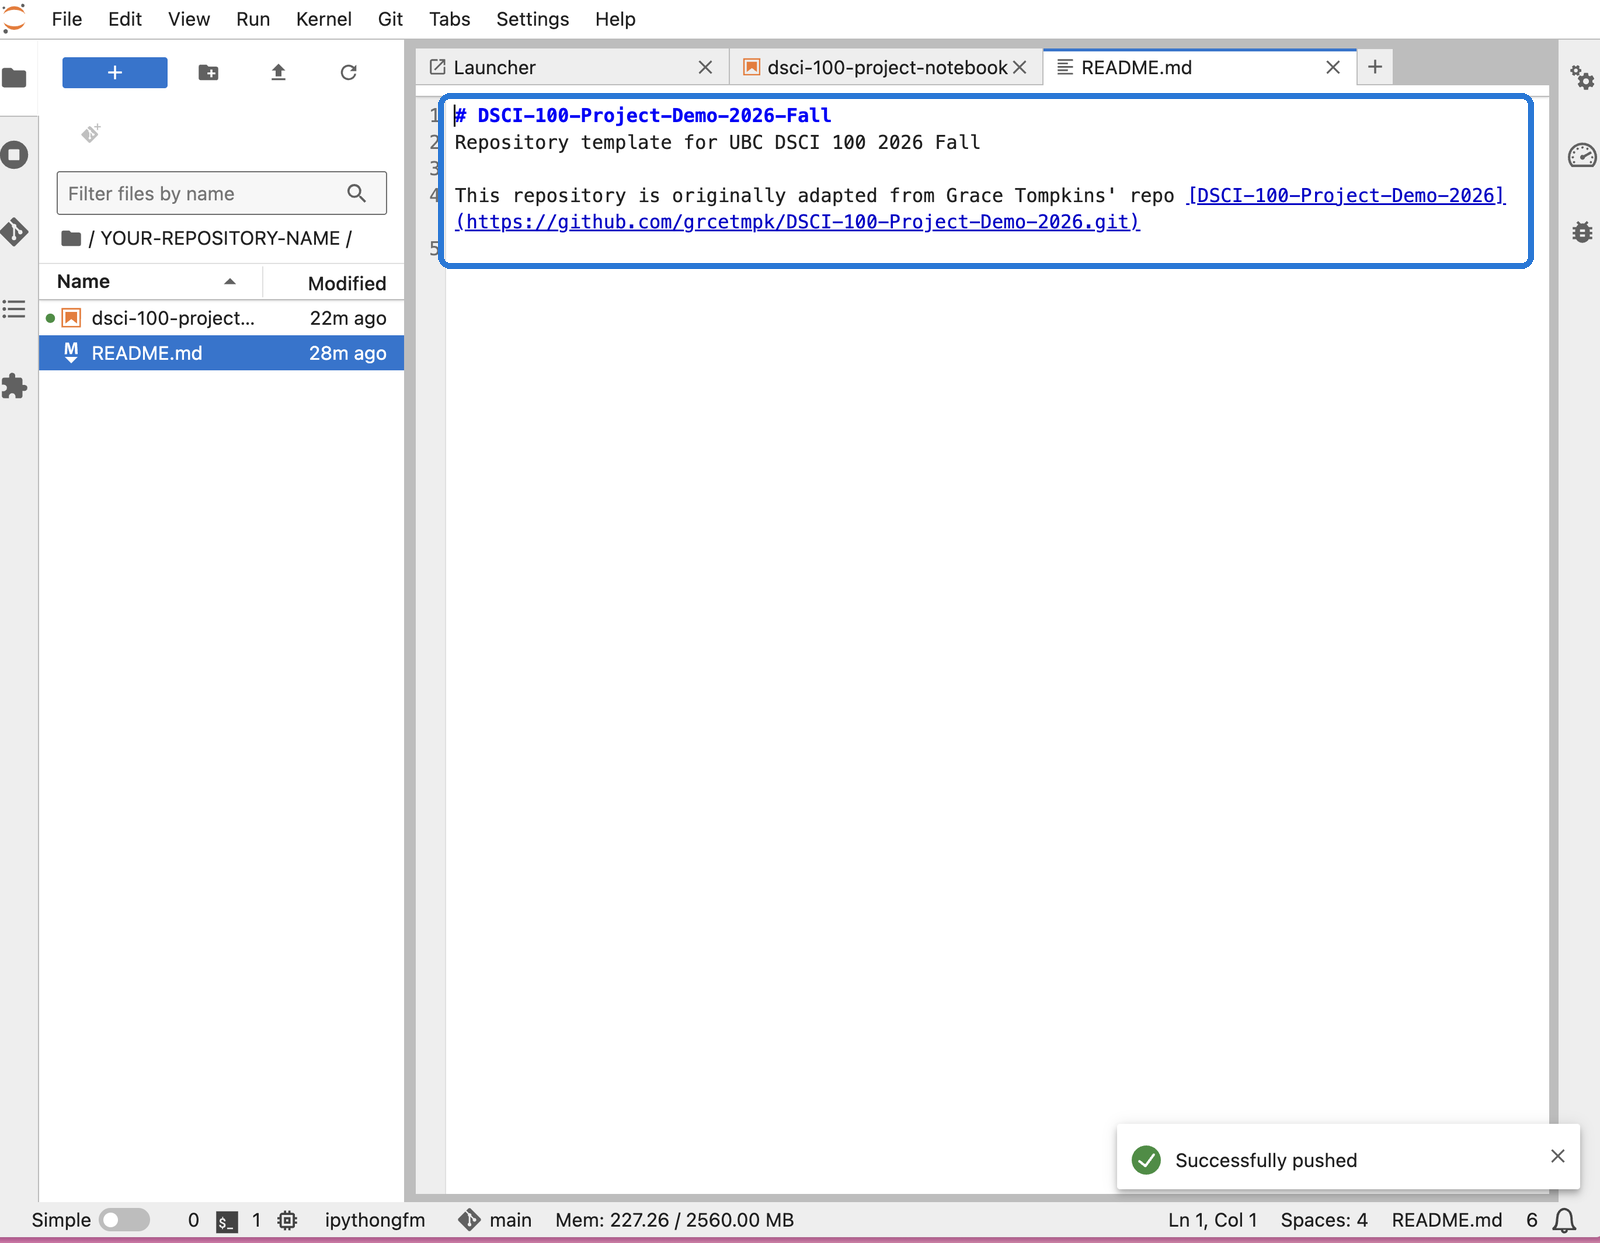
📋 Step 34: Pull
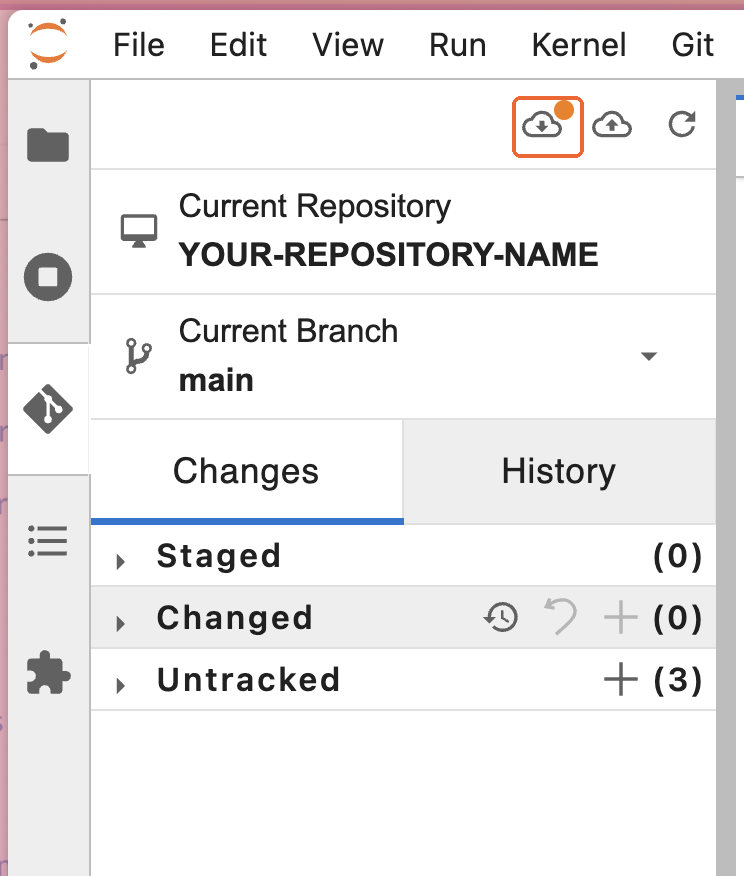
In the Git tab, the cloud with the down arrow has an orange dot: GitHub has a snapshot you don’t. Click it. That is pull.
📋 Step 35: Pulled
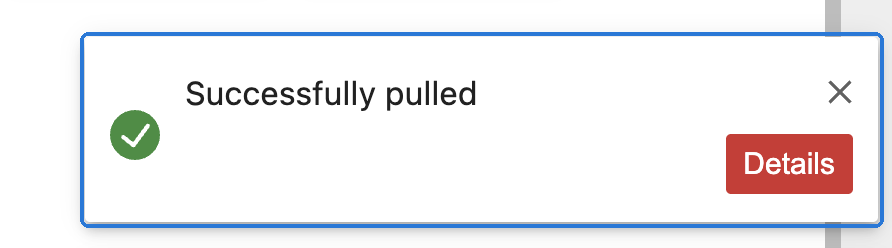
You see Successfully pulled.
📋 Step 36: In sync again
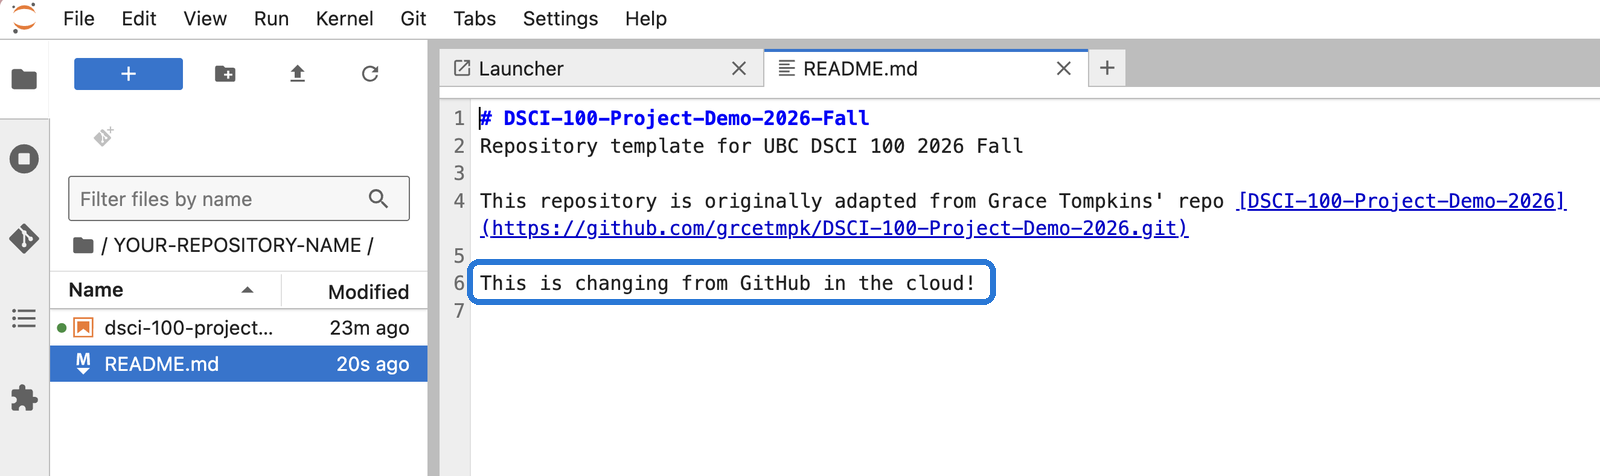
Open README.md again. Your sentence is there.
⚠️ If you ever edit on GitHub, pull in JupyterHub before you start working. Otherwise your next push gets rejected.
📋 Step 37: Make a new file
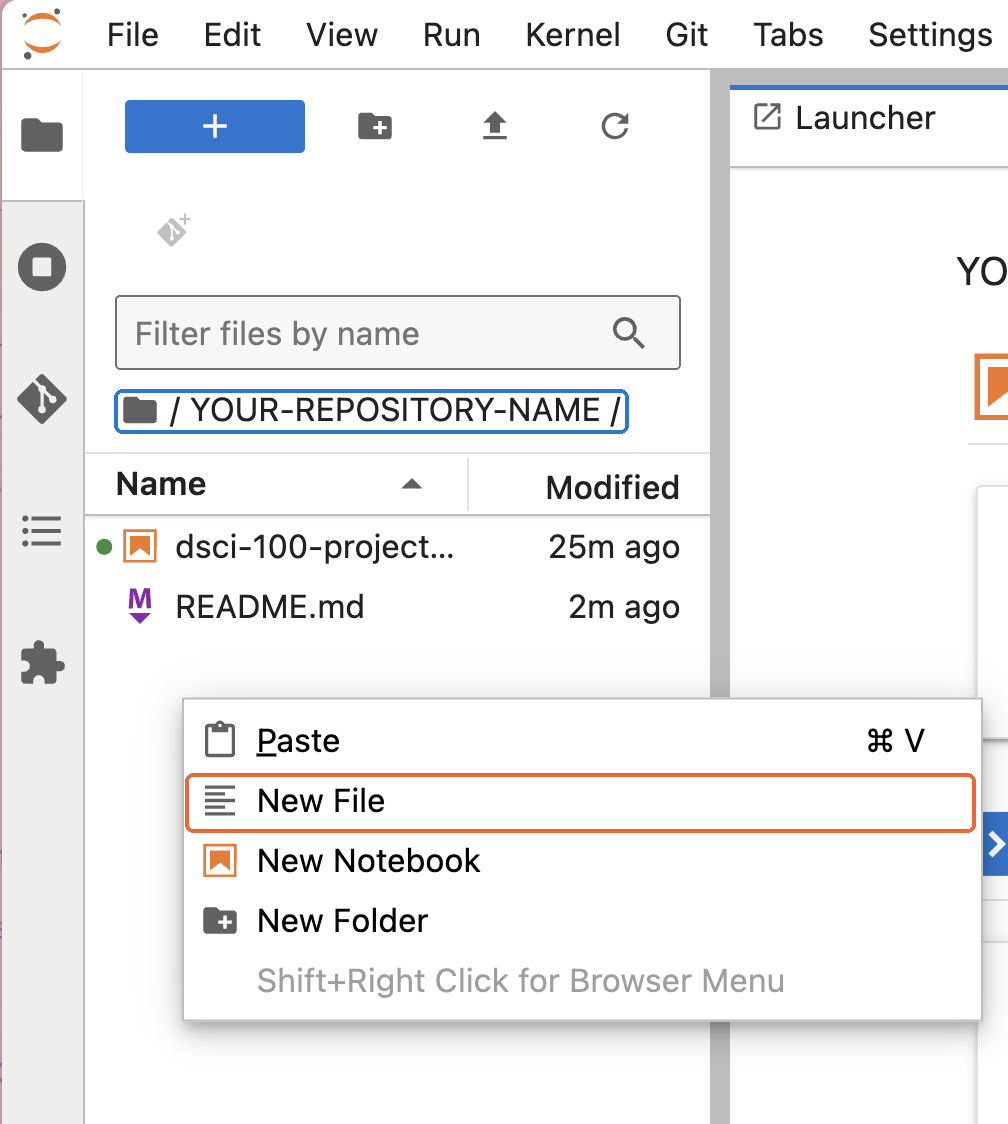
Check you are inside your repository’s folder (see the path at the top). Right click on the empty space below your files, then New File.
📋 Step 38: Name it
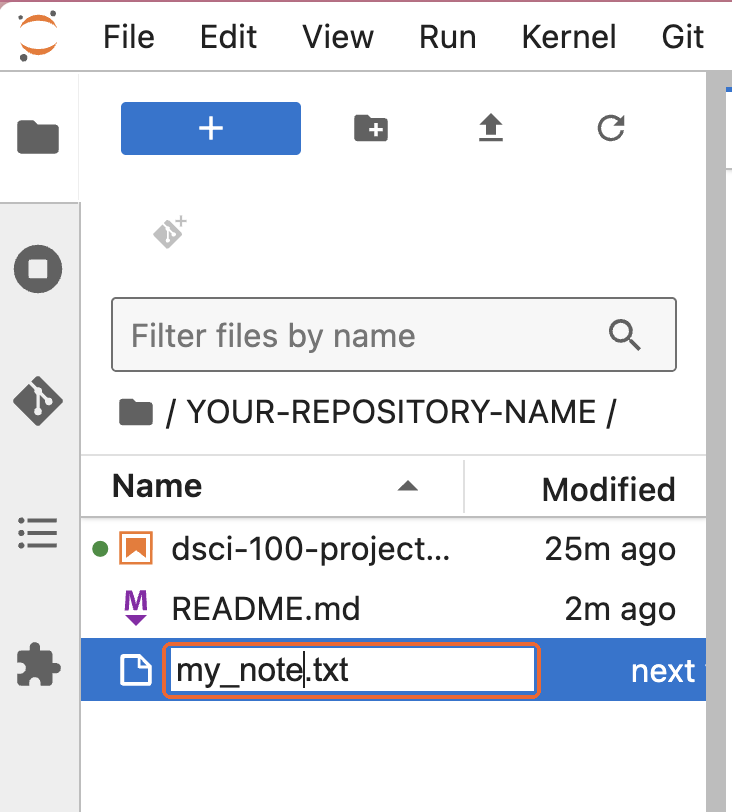
Type a name, e.g. my_note.txt, and press Enter. Double click it to open it.
📋 Step 39: Write something and save
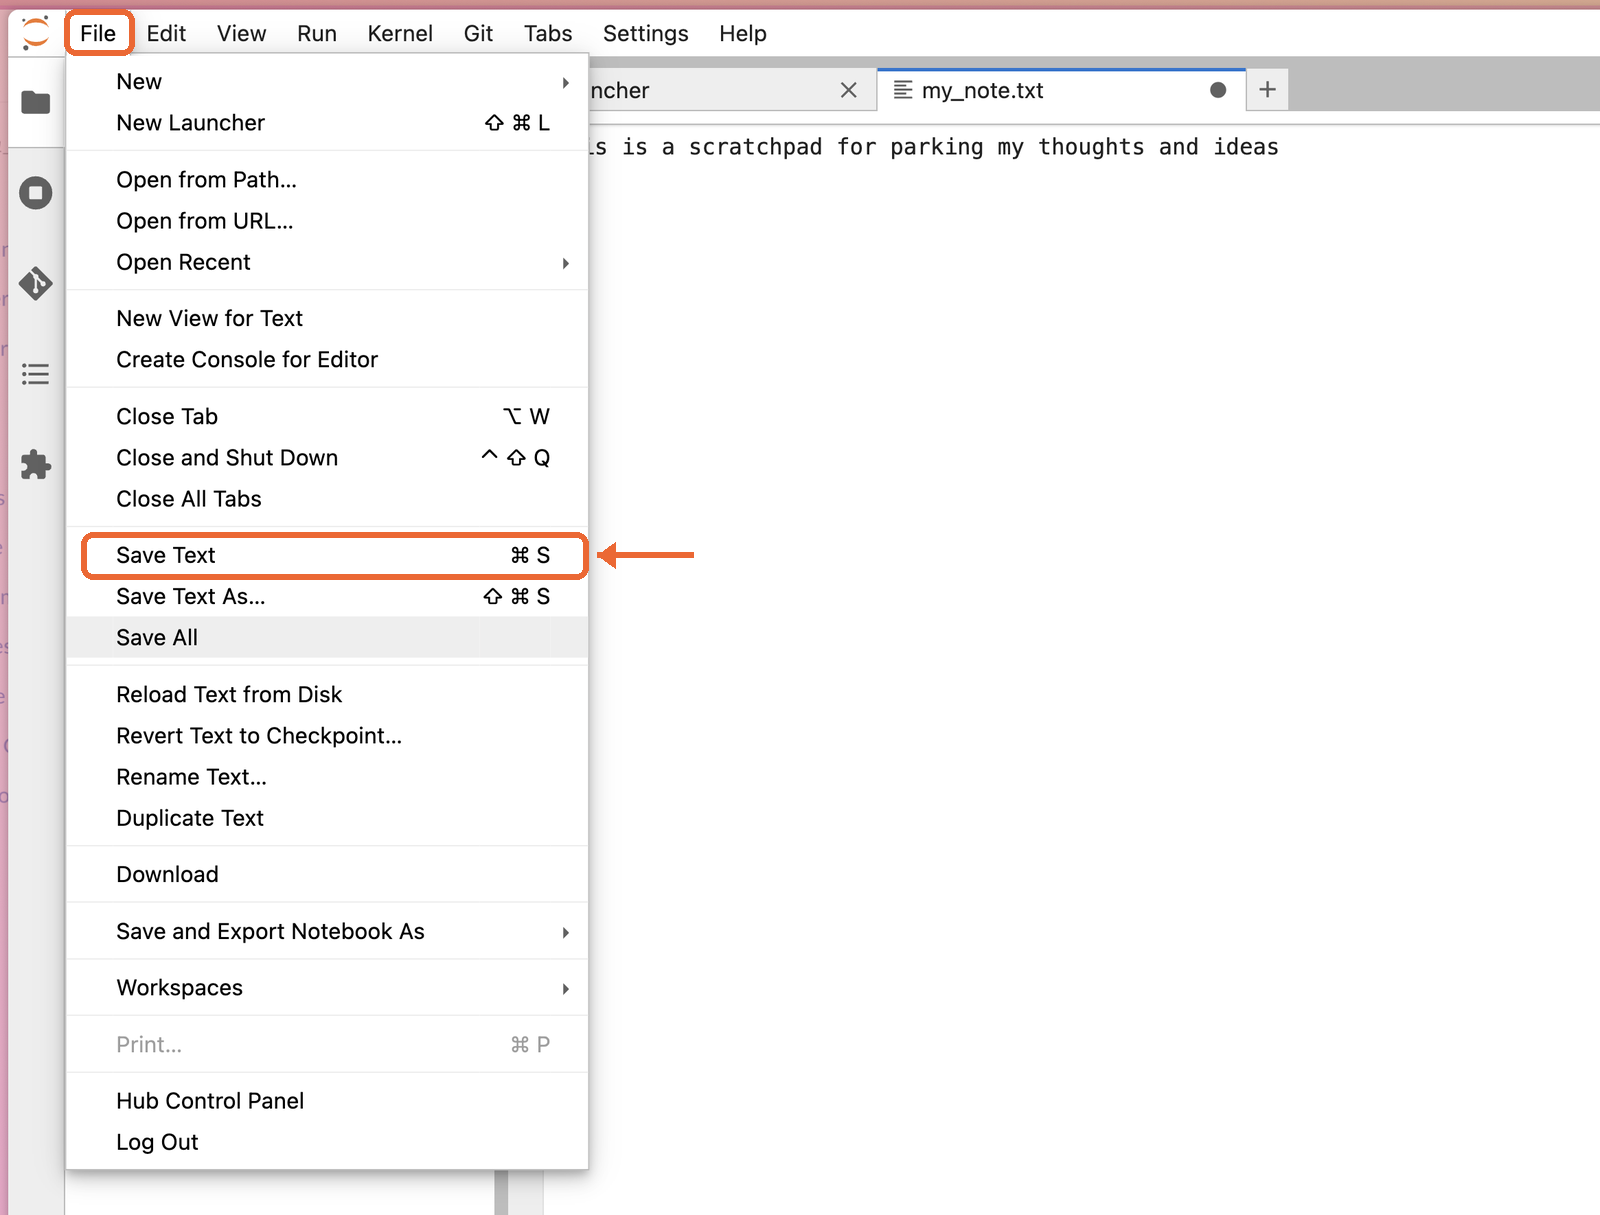
Type a sentence. Then File → Save Text, or Cmd+S (Mac) / Ctrl+S (Windows).
📋 Step 40: Add only your file
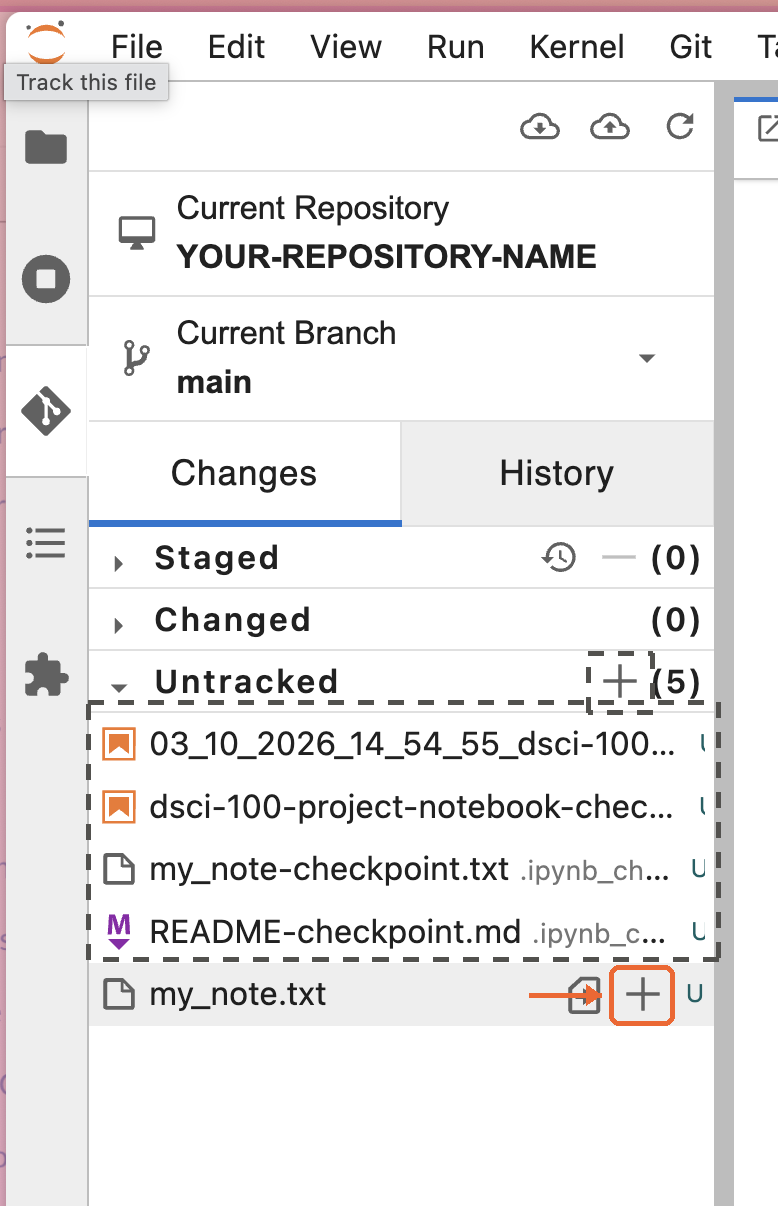
Open the Git tab. my_note.txt is under Untracked: Git has never seen it before. Hover over it and click its own +.
- ✅ The + next to one file adds just that file.
- ❌ The + on the Untracked heading adds every untracked file, including JupyterHub’s backups.
The files with checkpoint in their name are backups JupyterHub saves on its own, so you can go back to an earlier version. They are not part of your project, so they stay untracked.
📋 Step 41: Commit it
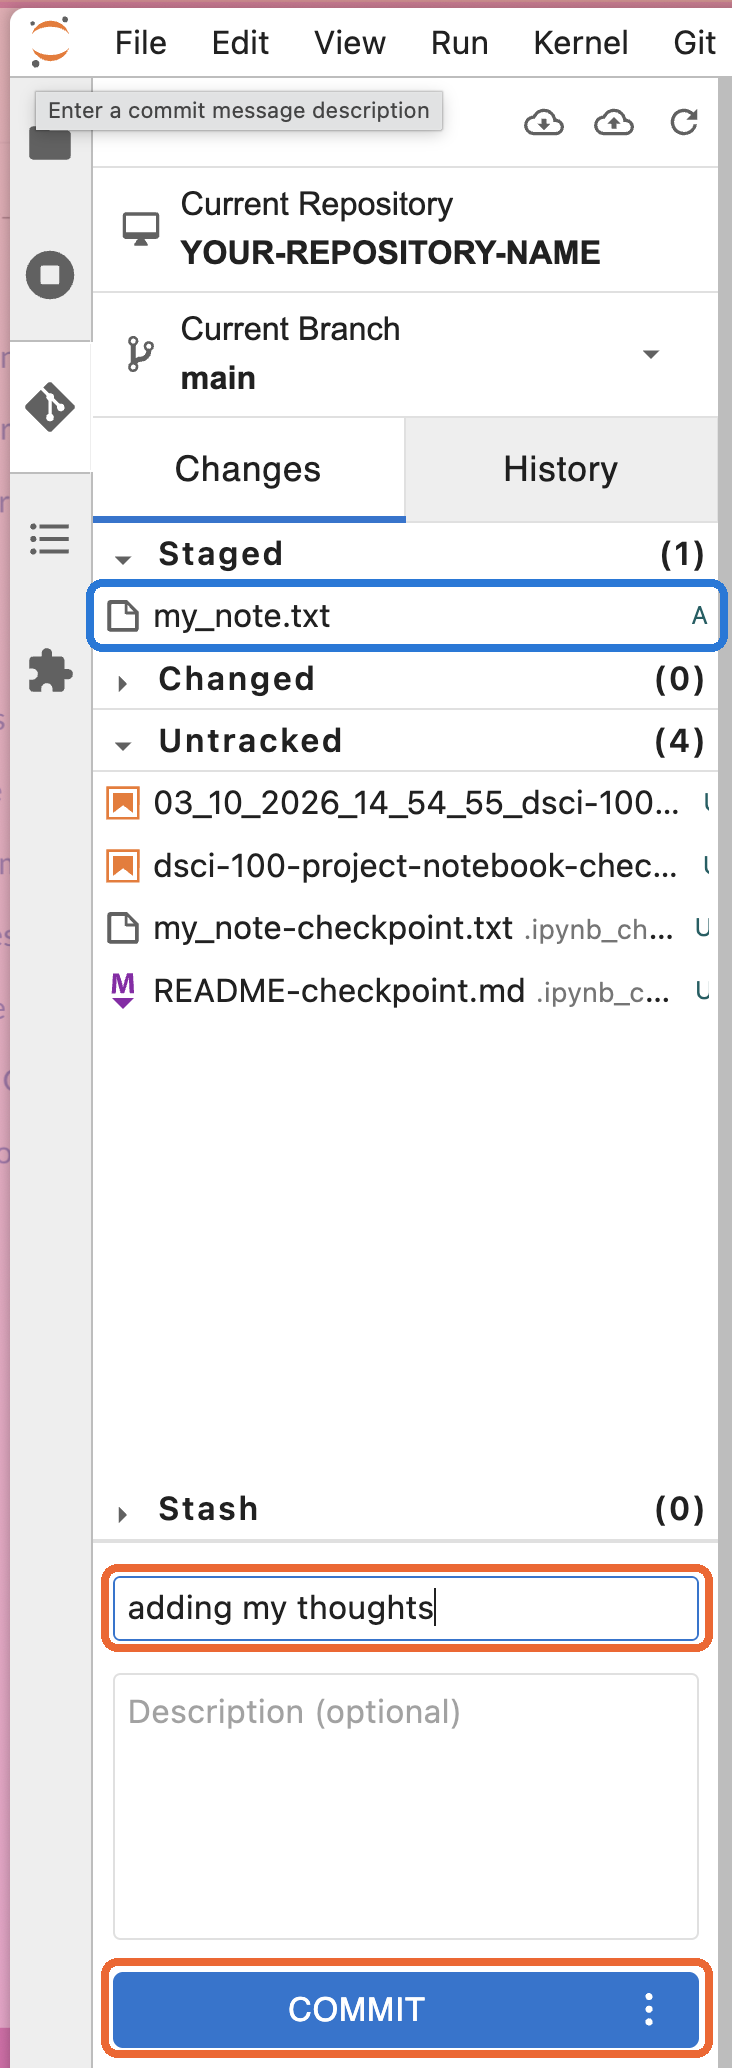
my_note.txt is now under Staged. The A next to it means a new file is being added.
Write a message and click Commit.
📋 Step 42: Push
The push button has an orange dot again: 1 commit GitHub doesn’t have. Click it.
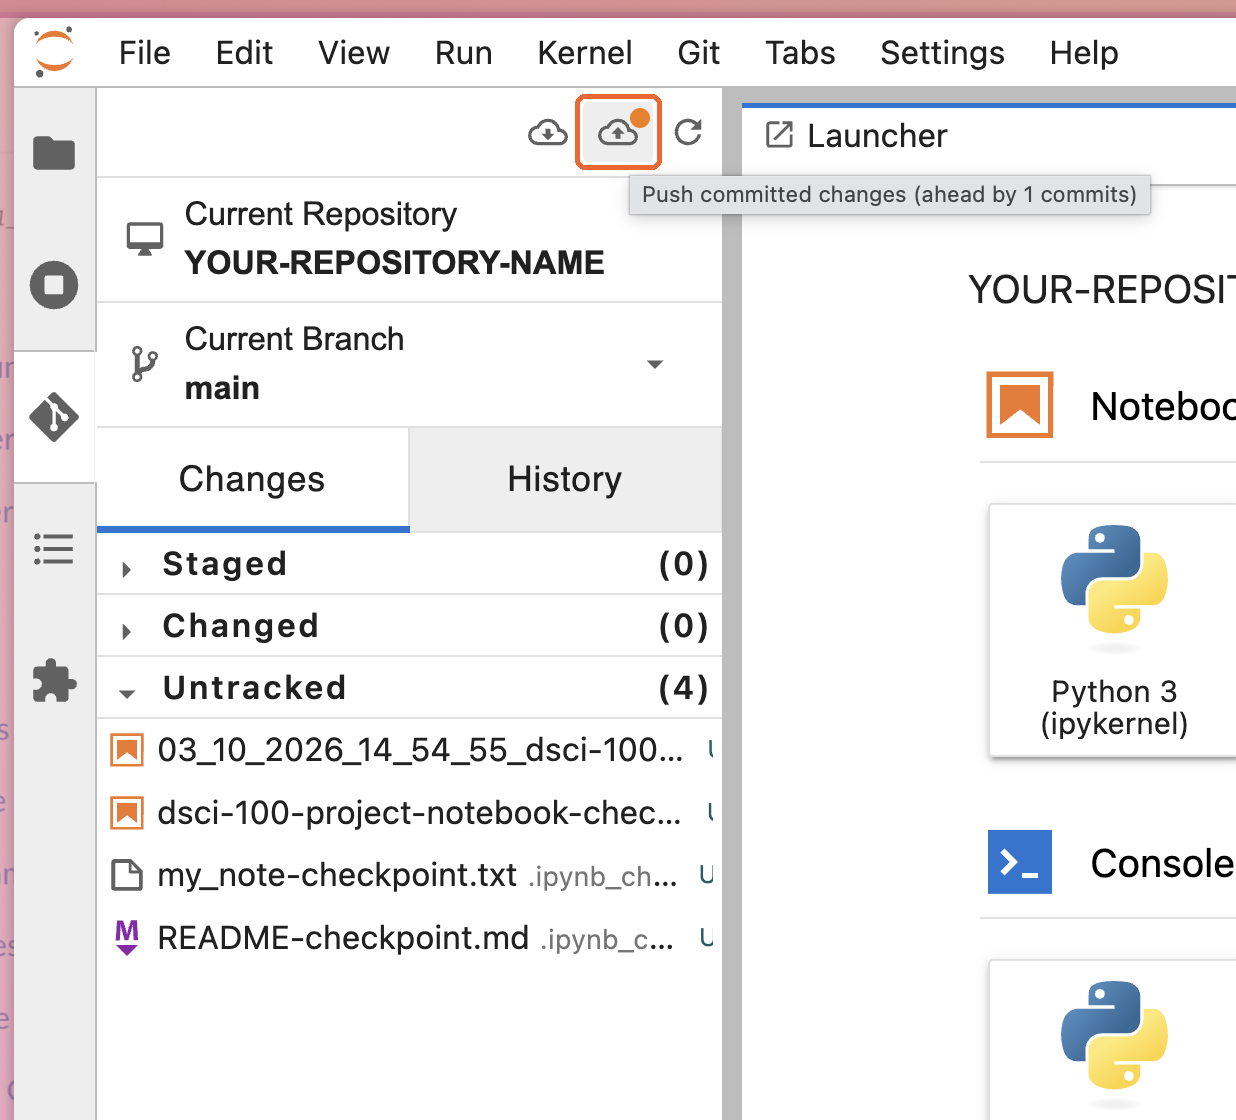
You ticked Save my login temporarily in step 26, so JupyterHub pushes without asking. Refresh your repository on GitHub: my_note.txt is there.