15 Customizing and building containers
Learning Objectives
- Write a container file (e.g., Dockerfile) that can be used to reproducibly build a container image that would contain the needed software and environment dependencies of your Data Science project
- Use manual and automated tools (e.g., Docker, GitHub Actions) to build and share container images
- List good container base images for Data Science projects
15.1 Building container images from Dockerfile’s
A
Dockerfileis a plain text file that contains commands primarily about what software to install in the Docker image. This is the more trusted and transparent way to build Docker images.Once we have created a
Dockerfilewe can build it into a Docker image.Docker images are built in layers, and as such,
Dockerfiles always start by specifying a base Docker image that the new image is to be built on top off.Docker containers are all Linux containers and thus use Linux commands to install software, however there are different flavours of Linux (e.g., Ubuntu, Debian, CentOs, RedHat, etc) and thus you need to use the right Linux install commands to match your flavour of container. For this course we will focus on Ubuntu- or Debian-based images (and that means if we need to install software outside of R and Python packages, we will use
aptas our installation program). However, most of what we’ll be doing for installation is R, Python and their packages. For that we can really use tools we’re already familiar with (condaandconda-lock, for example).
15.1.1 Workflow for building a Dockerfile
It can take a LOOOOOOOONNNG time to troubleshoot the building of Docker images. Thus, to speed things up and be more efficient, we suggest the workflow below:
Choose a base image to build off (from https://hub.docker.com/).
Create a
DockerfilenamedDockerfileand save it in an appropriate project repository. Open that file and typeFROM <BASE_IMAGE>on the first line. Add any files that need to be accessed at build time via theCOPYcommand.In a terminal, type
docker run --rm -it <IMAGE_NAME>and interactively try the install commands you think will work. Edit and try again until the install command works.Write working install commands in the
Dockerfile, preceding them withRUNand save theDockerfile.After adding every 2-3 commands to your
Dockerfile, try building the Docker image viadocker build --tag <TEMP_IMAGE_NAME> <PATH_TO_DOCKERFILE_DIRECTORY>.Once the entire
Dockerfileworks from beginning to end on your laptop, then you can finally move to building remotely (e.g., creating a trusted build on GitHub Actions).
15.1.2 Demo workflow for creating a Dockerfile locally
The example in this section is based on this repository: https://github.com/chendaniely/docker-condalock-jupyterlab
We will demo this workflow together to build a Docker image locally on our machines that has Jupyter, Python and the python packages pandas, pandera and deepcheck installed. When we do this, we will leverage a conda environment that we have for these packages already:
# environment.yml
name: dockerlock
channels:
  - conda-forge
dependencies:
  - altair-all
  - conda-lock=>3.0.4
  - jupyterlab
  - pandas
  - pandera
  - pip
  - pointblank
  - python
  - pip:
    - deepchecks
- vegafusionThe environment.yml file should only have the conda-forge channel. Do not mix conda-forge with defaults channels; sometimes this will cause the package dependency solver to fail.
Also, when you have a set of packages that do solve and install, you should go back and make sure all the packages are locked to a particular version, using =.
To efficiently use this environment to build a Docker image, we need a conda-lock file. We can generate this lock file from the environment.yml file via:
conda-lock lock \
  --file environment.yml \
  -p linux-64 \      # x86-64 Linux
  -p osx-64 \        # x86-64 macOS
  -p osx-arm64 \     # ARM64 macOS
  -p win-64 \        # x86-64 Windows
-p linux-aarch64 # ARM64 Linux and ARM macOS running dockerIf you only use the conda-lock lock --file environment.yml command, it does not solve for the linux-aarch64 architecture by default. You need this architectue to run a linux container on an ARM M-Chip Mac.
From that, we get a file named conda-lock.yml. The conda-lock.yml file will contain all the solved package dependencies for all the platforms specified. We can copy this file into a Jupyter container to either update an existing environment, or to create a new environment.
OK, now we are ready to start writing our Dockerfile! Let’s start with the condaforge/miniforge3:25.9.1-0 image. so the first line of our Dockerfile should be as such:
FROM condaforge/miniforge3:25.9.1-0Next, since we will be wanting the container to have access to a file at build time, we need to COPY it in so we can have access to it in the container. Our Dockerfile should now look like this:
FROM condaforge/miniforge3:25.9.1-0
COPY conda-lock.yml /tmp/conda-lock.yml
This copies the conda-lock.yml from our current local computer’s working directory, into the Docker container’s /tmp directory.
Now let’s build an image from our Dockerfile so we can test out and find install commands that work for what we need to do! To build an image, we use docker build. We’ll want to tag/name the image so we can reference it after its built, so we can run it. Here we named it testing_cmds. Finally we say where to look for the Dockerfile. Here we say ., meaning the current working directory:
docker build --tag testing_cmds .Now we will run our image (named testing_cmds). This “turns’ on” our docker container and gives us a terminal prompt inside the container we just built and ran. We can now run commands in there to test commands to see if they work. If commands work, we can incrementally add them to our Dockerfile. If we mess something up, all we need to do is exit the container and start it again, nothing we do inside the container will persist. This gives us a great way to explore and test commands without worrying about messing up our main computer.
docker run --rm -it testing_cmds bin/bashAt the time of writing this section, miniforge3 and conda 25.11.0 does not have conda-lock installed by default, so in order to create/update an environment, we will have first install conda-lock.
Inside your currently running docker container terminal, you can install conda-lock:
(base) root@45c7f31e47a8:/# conda install -n base -c conda-forge conda-lock -yWe are passing in the -y yes flag because we want the Dockerfile to run these commands non-interactively, meaning we do not want to (or have the ability) for the user to confirm and answer isntallation prompts. In this conda install command, this will automatically answer “yes” to confirm the installation.
Next we can use conda-lock to install the environment specified in the conda-lock.yml file. Here we are creating a new environment named dockerlock in the container. Currently, conda-lock and the libmamba solver will not overrite the root environment.
(base) root@45c7f31e47a8:/# conda-lock install -n dockerlock conda-lock.ymlAwesome! This seemed to have worked! Let’s exit the Docker container (via exit). Then we can add these commands to the Dockerfile, proceeding them with RUN and try to build our image to ensure this works.
Our Dockerfile so far:
FROM condaforge/miniforge3:25.9.1-0

COPY conda-lock.yml /tmp/conda-lock.yml

RUN conda install -n dockerlock -c conda-forge conda-lock -y
RUN conda-lock install -n dockerlock conda-lock.yml
Let’s try building an image named testimage locally:
$ docker build --tag testimage .Looks like a success, let’s be sure we can use the pandera package as a test. Remember to activate the invironment first.
$ docker run --rm -it testimage bash

(base) root@45c7f31e47a8:/# conda activate dockerlock # activate the environment

(dockerlock) root@45c7f31e47a8:/tmp# python
Python 3.13.9 | packaged by conda-forge | (main, Oct 22 2025, 23:33:35) [GCC 14.3.0] on linux
Type "help", "copyright", "credits" or "license" for more information.
>>> import pandera
The main parts of the image are now done! A few more clean up steps and we’re all ready to go.
Since conda-lock doesn’t let us overrite the base environment, we needed to install all our packages into a new environment, we used dockerlock in this example so far. Now we want to make sure the dockerlock environment gets activated automatically whenever we run and start the container. This saves us an exatra set of steps so we do no need to constanly activate the environment.
We’ll update our Dockerfile with these 2 lines:
# make dockerlock the default environment
RUN echo "source /opt/conda/etc/profile.d/conda.sh && conda activate dockerlock" >> ~/.bashrc
This makes absulutely sure the we have conda working, and then activates the dockerlock environment. We then take this set of commands and put it in the ~/.bashrc file. This is a special that runs from top to bottom anytime a new terminal is opened. This way we can guarentee that we have conda loaded, and it activates the envrionment.
# set the default shell to use bash with login to pick up bashrc
# this ensures that we are starting from an activated dockerlock environment
SHELL ["/bin/bash", "-l", "-c"]
This stop makes sure that we are using bash as the default shell and terminal, so the ~/.bashrc file that activates the conda envionment will run.
Our dockerfile should now llook like this:
FROM condaforge/miniforge3:25.9.1-0

COPY conda-lock.yml /tmp/conda-lock.yml

RUN conda install -n dockerlock -c conda-forge conda-lock -y
RUN conda-lock install -n dockerlock conda-lock.yml

RUN echo "source /opt/conda/etc/profile.d/conda.sh && conda activate dockerlock" >> ~/.bashrc

SHELL ["/bin/bash", "-l", "-c"]
Finally, let’s make a small quality improvement so we do not see the root systm files when we run the image.
We’ll use the docker WORKDIR instruction to set the default working directory when the container starts, so we are automatilly put into a specific folder, away from all the root system files. You can still access those, we are only setting a new folder to make things cleaner.
We will add this to our docker file
# sets the default working directory
WORKDIR /workplace
So now we have a fully-functioning docker file. Dont’ forget to build it so you can use your new container.
FROM condaforge/miniforge3:25.9.1-0

COPY conda-lock.yml /tmp/conda-lock.yml

RUN conda install -n dockerlock -c conda-forge conda-lock -y
RUN conda-lock install -n dockerlock conda-lock.yml

RUN echo "source /opt/conda/etc/profile.d/conda.sh && conda activate dockerlock" >> ~/.bashrc

SHELL ["/bin/bash", "-l", "-c"]

WORKDIR /workplace
15.1.3 Run jupyter lab in a conainer
If only needed the container we just created to run code, and did not need any web application to run, we can stop here. However, the environment.yml file we created installed jupyterlab, and it would also be nice for the container to run jupyter lab just like our fist example in an earlier docker chapter when we used the quay.io/jupyter/datascience-notebook:2025-03-14 container.
In order for us to run jupyter lab inside the container, we essentially need to have the container run jupyter lab. The default port that jupyter lab runs on is port 8888, so we must first tell the container to EXPOSE or open this port so we can connect to it later when we run the container. We use the EXPOSE 8888 docker instruction to accomplish this.
EXPOSE 8888Finally, we will use the CMD instruction to tell the container the default command to run when the docker container runs. In this example we will have the docker container run jupyter lab on startup. When we run jupyter lab, we will have it run on the container local host, on port 8888, and disable the token/password generation that jupyter lab typically creates to run. We specify the CMD command as terminal command, with each term sepearted as a list of strings.
CMD ["jupyter", "lab", "--ip=0.0.0.0", "--port=8888", "--no-browser", "--allow-root", "--IdentityProvider.token=''", "--ServerApp.password=''"]Yes it is a bit strange where we EXPOSE the port before we know from the CMD instruction. In general, the best practice for ordering Dockerfile structure is:
FROM- base imageRUN,COPY,ADD- build stepsEXPOSE,ENV,WORKDIR- configurationCMDorENTRYPOINT- startup command (end)
Our full Dockerfile now looks like this:
FROM condaforge/miniforge3:25.9.1-0

COPY conda-lock.yml /tmp/conda-lock.yml

RUN conda install -n dockerlock -c conda-forge conda-lock -y
RUN conda-lock install -n dockerlock conda-lock.yml

RUN echo "source /opt/conda/etc/profile.d/conda.sh && conda activate dockerlock" >> ~/.bashrc

SHELL ["/bin/bash", "-l", "-c"]

WORKDIR /workplace

EXPOSE 8888

CMD ["jupyter", "lab", "--ip=0.0.0.0", "--port=8888", "--no-browser", "--allow-root", "--IdentityProvider.token=''", "--ServerApp.password=''"]
Hurray! We did it! Now we can automate this build on GitHub, push it to Docker Hub and share this Docker image with the world!

15.1.4 Guidelines for RUN Commands
Each RUN command creates a new layer in the Docker image. Each layer in a Docker image takes more disc space. As a consequence, we want to minimize the number of layers where reasonably possible. How can we do this?
Install everything that can be installed by a tool (e.g., conda, mamba, pip, apt, etc) at once (i.e., when installing 5 programs via apt, do not call apt five times, instead do: apt tool1 tool2 tool3 tool4 tool5). However, doing this can lead to long lines. In response, we can break a single command across lines in the shell by using the \ character. For example, to reduce the long line below which uses apt to install the programs Git, Tiny Nano, Less, and wget:
apt install --yes git nano-tiny less wgetWe can use \ after each program, to break the long command across lines and make the command more readable (especially if there were even more programs to install). Similarly, we indent the lines after \ to increase readability:
apt install --yes \
    git \
    nano-tidy \
    less \
    wget
We can also group together related commands that depend upon each other. Whe doing this we need to be careful though, as sometimes we don’t want to run a command if the command that was run immediately before it failed. We can specify this in the shell using &&. For example, if we want to not run apt installation commands if apt update failed, we can write:
apt update && \
    apt install --yes git
15.2 Dockerfile command summary
Most common Dockerfile commands I use:
| Command | Description |
|---|---|
| FROM | States which base image the new Docker image should be built on top of |
| RUN | Specifies that a command should be run in a shell |
| ENV | Sets environment variables |
| EXPOSE | Specifies the port the container should listen to at runtime |
| COPY or ADD | adds files (or URL’s in the case of ADD) to a container’s filesystem |
| ENTRYPOINT | Configure a container that will run as an executable |
| WORKDIR | sets the working directory for any RUN, CMD, ENTRYPOINT, COPY and ADD instructions that follow it in the Dockerfile |
And more here in the Dockerfile reference.
15.3 Choosing a base image for your Dockerfile

15.3.1 Good base images to work from for R or Python projects!
| Image | Software installed |
|---|---|
| quay.io/repository/jupyter/datascience-notebook | Includes popular packages from the scientific Python ecosystem. |
| rocker/rstudio | R, R, RStudio |
| rocker/tidyverse | R, R packages (including the tidyverse), RStudio, make, do not use for ARM based computers |
| condaforge/miniforge3 | Miniforge3 base installation |
15.4 Dockerfile FAQ:
1. Where does the Dockerfile live?
The Dockerfile should live in the root directory of your project.
2. How do I make an image from a Dockerfile?
There are 2 ways to do this! I use the first when developing my Dockerfile (to test quickly that it works), and then the second I use when I think I am “done” and want to have it archived on Docker Hub.
Build a Docker image locally on your laptop
Build a Docker image and push it to DockerHub using GitHub Actions,
3. How do I build an image locally on my laptop
From the directory that contains your Dockerfile (usually your project root):
docker build --tag IMAGE_NAME:VERSION .--tag let’s you name and version the Docker image. You can call this anything you want. The version number/name comes after the colon
After I build, I think try to docker run ... to test the image locally. If I don’t like it, or it doesn’t work, I delete the image with docker rmi {IMAGE_NAME}, edit my Dockerfile and try to build and run it again.
15.5 Build a Docker image from a Dockerfile on GitHub Actions
Building a Docker image from a Dockerfile using an automated tool (e.g., DockerHub or GitHub Actions) lets others trust your image as they can clearly see which Dockerfile was used to build which image.
We will do this in this course by using GitHub Actions (a continuous integration tool) because is provides a great deal of nuanced control over when to trigger the automated builds of the Docker image, and how to tag them.
An example GitHub repository that uses GitHub Actions to build a Docker image from a Dockerfile and publish it on DockerHub is available here: https://github.com/ttimbers/dsci522-dockerfile-practice
What is there that we haven’t already seen here? It’s the GitHub Actions workflow file .github/workflows/docker-publish.yml shown below. This workflow can be triggered manually, or automatically when a push to GitHub is made that changes Dockerfile or conda-linux-64.lock. When that happens, a computer on GitHub will copy the contents of the GitHub repository and build and version/tag a Docker image using the Dockerfile contained therein. The image will get two tags: latest and the short GitHub SHA corresponding to the Git commit SHA at the HEAD of main. It will also push the Docker image to DockerHub. For that last step to happen, the code owner’s DockerHub credentials must be stored in the GitHub repository as GitHub repository secrets.
Example .github/workflows/docker-publish.yml file:
# Publishes docker image, pinning actions to a commit SHA,
# and updating most recently built image with the latest tag.
# Can be triggered by either pushing a commit that changes the `Dockerfile`,
# or manually dispatching the workflow.
name: Publish Docker image
on:
workflow_dispatch:
push:
paths:
- 'Dockerfile'
- .github/workflows/docker-publish.yml # or whatever you named the file
- 'conda-linux-64.lock'
jobs:
push_to_registry:
name: Push Docker image to Docker Hub
runs-on: ubuntu-latest
steps:
- name: Check out the repo
uses: actions/checkout@v4
- name: Log in to Docker Hub
uses: docker/login-action@v3
with:
username: ${{ secrets.DOCKER_USERNAME }} # do not change, add as secret
password: ${{ secrets.DOCKER_PASSWORD }} # do not change, add as secret
- name: Extract metadata (tags, labels) for Docker
id: meta
uses: docker/metadata-action@v5
with:
images: ttimbers/dsci522-dockerfile-practice # change to your image
tags: |
type=raw, value={{sha}},enable=${{github.ref_type != 'tag' }}
type=raw, value=latest
- name: Build and push Docker image
uses: docker/build-push-action@v6
with:
context: .
file: ./Dockerfile
push: true
tags: ${{ steps.meta.outputs.tags }}
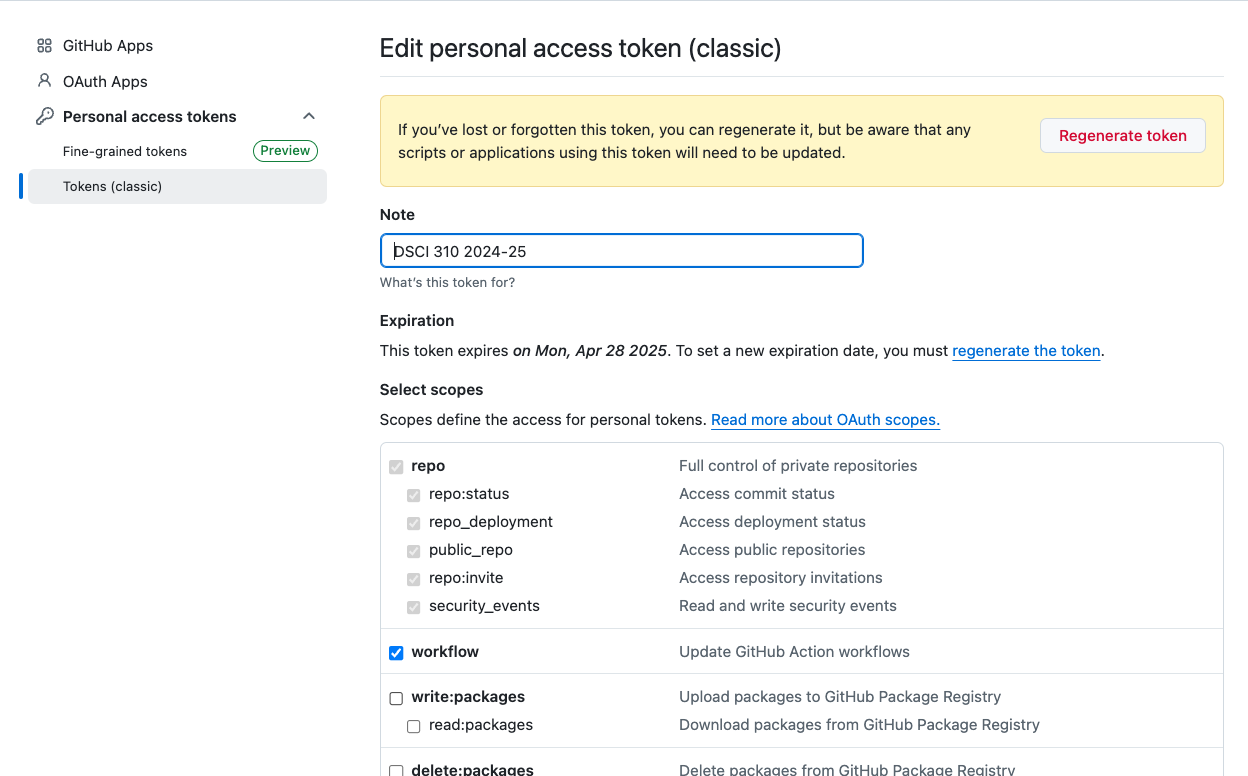
labels: ${{ steps.meta.outputs.labels }}If you are creating this workflow file locally and try to push the file to your repository, you may run into an error that mentions your current PAT does not have permissions to push workflow files.
Go to (account) Settings > Developer Settings > Personal Access Token > Find and select your PAT, and then make sure the “Workflow” permission is selected.